Decorative plaster is used both for cladding transit areas and residential premises. In this material we will consider the basic principles of working with decorative plaster.
Decorative plaster is a practical wall covering that flawlessly performs its aesthetic functions and is characterized by sufficient wear resistance.
The material is used both for cladding transit zones and residential premises. In this material we will consider the basic principles of working with decorative plaster.
It is not surprising that the demand for plastering walls with a decorative composition is increasing, as is the cost of professional services. But you can do without a specialist: this type of painting work is within the capabilities of homeowners.
Before you begin to study the features and nuances of applying decorative plaster, it is useful to decide on the type of material. The finishing materials market includes: acrylic, mineral, silicate and silicone plasters.
Acrylic plaster is an elastic, ready-made water-dispersion composition. The decorative coating repels water and is resistant to ultraviolet radiation and dirt.
Mineral plaster - environmentally friendly pure material, which is recommended to be used for decorating the walls of residential premises. The basis is lime or cement with the addition of solid filler particles of mineral origin.
Silicone composition is a paste-like mixture based on silicone resin. The material is not afraid of dampness and temperature fluctuations.
Silicate-based plaster contains: liquid glass. This determines the main advantages of the material: resistance to ultraviolet radiation and high humidity, the formation of fungus, and a high level of fire safety.
Advantages of the composition over other finishing materials:
Based on their decorative properties, plasters are divided into: textured, structural and flock.
Textured look of wall decorative covering used to create an imitation of the surface of stone, wood, velvet and silk. The material has good masking properties (hides surface defects) and can be used for cladding walls in damp rooms.
Flock plaster consists of an acrylic base with an admixture of rounded “flakes” of a certain size. Thanks to the use of flock, you can create a “leather-like” effect, imitation of velor or suede fabric. The coating is UV resistant and does not require additional detergents for the cleaning.
Structural plaster It is a granular mass of heterogeneous consistency interspersed with granules of mineral or synthetic origin: stone, quartz, wood fibers, etc. To create a colored coating, add a tint pigment to a mixture of dry plaster and water.
There are three basic stages:
To prepare the base surface, you first need to dismantle the old coating, remove cracks and other base defects. Level the walls using cement putty or ready-made mortar.
For good adhesion of the coating to the wall, it is necessary to apply a primer to the base. deep penetration with a strengthening effect. If necessary, treat the surface with an antifungal compound.
In addition to the tools for plastering walls, you must purchase:
When preparing the mixture, you should strictly follow the manufacturer's instructions, which indicate the amount of dry mixture and water, as well as the sequence and method of mixing them. For mixing, use a drill with adjustable speed and a mixer attachment. The minimum speed should be set to prepare a homogeneous mixture.
It is important to correctly adjust the consistency by adding water: when applying by spraying, the maximum allowable amount of water is 5%, when applying manually - 2%. The plaster sets quickly, so it is recommended to mix the composition in small portions.
“Stretching” is a popular way of applying decorative coating to walls. The solution should be applied with a wide trowel in continuous movements from one corner of the base to the other. The thickness of the layer depends on the thickness of the fraction and varies from 2 to 5–7 mm. Smear construction composition It is necessary to apply the decorative coating evenly over the entire area of the treated area, and apply the decorative coating to the adjacent area “overlapping” by 4–5 cm.
Since the layer of material dries out quite quickly, it is recommended that two people apply decorative plaster: first, one person covers the walls with a layer of material, and the other then levels the decorative layer to the grain thickness of the fraction.
After applying several base layers of decorative plaster, you can begin to create artistic effects on the wet surface. We offer you several simple ways.
1. The technique using an artificial sponge involves light blotting movements. At the same time, “spots” form on the wall. For greater effect, they can be painted in several colors.
2. You can get the effect of crumpled paper using a piece of well-absorbed fabric. The material must be crumpled up and walked over the wet base with blotting movements.
3. As an alternative, you can use special textured rollers, the use of which significantly speeds up the process of decorating the base.
The “spraying” technique is somewhat more complicated. First you need to apply two or three layers of decorative coating, and then begin to add volume to the texture. For this you will need a broom and a stick. After soaking the broom in the solution, you need to hit the stick with it in such a way that the splashes hit the pre-plastered wall. In this case, it is advisable to use one color for the base, and to create a “splash” effect, a lighter or darker shade.
After 24–48 hours (after the finishing coat has completely dried), it is worth cleaning it by removing poorly attached plaster particles using fine-grained sandpaper.
You can start painting the surface only after the decorative surface has completely dried, this will take from 8 to 48 hours.
To paint a surface with a coarse filler fraction, several colors are used. The first - lighter - is applied using a paint roller, the base is allowed to dry completely, and only then the protruding areas of the relief are covered with more rich shade. This method allows you to make the walls voluminous and massive, so it should be used only in large rooms.
In order to make the finish durable and shiny, the glazing technique is used. In the old days they used wax, but working with it was very labor-intensive, so now they use transparent acrylic-based varnish.
It is most convenient to cover the walls with it using a long-nap roller or a wide paint brush.published If you have any questions on this topic, ask them to the experts and readers of our project.
Decorative plaster is the most popular material when decorating walls with your own hands. Over the entire existence of this material, its style, method and method of application have changed, but the technology has always remained the same.
Due to in various ways applying decorative plaster, the room can be changed beyond recognition. The interior of the house can be kept in one style or it can be mixed.
A characteristic feature of plaster is the originality and uniqueness of the design, so each room will be original and unique.
Decorative plaster can be painted in any color. Therefore, a few years after the repair, you can easily change the color of yours.
One of the advantages of finishing walls with decorative plaster is its ease of use. Without professional experience, but following our advice, you can easily do all the work yourself without the help of specialists.
Below we will describe in detail step by step instructions on finishing with decorative plaster with your own hands.
When encountering this material for the first time, the question arises: “How to apply decorative plaster to walls?” There is nothing complicated about this.
First, let's figure out where you can buy decorative plaster. As a rule, it is sold dry, but there are also ready-made options compositions.
The composition of decorative plaster includes T:
After purchasing the necessary tools, you can safely begin decorating the walls with decorative plaster with your own hands.
Fill a bucket with water and add the mixture. Using a drill with a mixing attachment, mix the contents to a creamy consistency. Leave the prepared solution for 15 minutes until it reaches and acquires all the necessary properties. Mix decorative plaster.
Do not mix too much material. Over time, it will begin to dry out and lose its plasticity.
The final stage of work is painting. You can choose two options: paint the finished plaster, or add the selected color at the stage of preparing the solution. In the latter case, the plaster is already colored.
Various techniques for applying decorative plaster and the subtleties of the work differ from each other.
Decorative plaster solutions, or decorative textured coatings, do not require further processing or surface finishing. They can be applied to walls and partitions made of any material - be it brick, concrete, plasterboard, wood or ordinary plaster. But the plaster hardens very quickly, so it is quite difficult to carry out finishing work with its help on a large surface.
In addition, the use of decorative plaster to finish a wall requires careful preparation of the surface (treatment with primer, putty, and grouting materials).
Typically, decorative plaster is produced in the form of a dry or ready-to-use thick mixture. The basis of such materials includes a polymer binder, filler (marble or granite chips, sand, lime), on which the texture of the future coating depends, as well as a liquid base - water.
Dry plaster in packages
Decorative plaster often includes other additives that provide additional properties (different surface structure, protective shock-proof properties).
There are also special, separately sold additives for giving decorative plaster a particular color.

Plaster with color additives
If the coating is made in the form of a dry mixture, it must be diluted with water in the required proportion. The plaster is applied quickly enough: first with a brush, and then with a spatula or other tool, or special tool immediately (which one should be indicated in the instructions for using decorative plaster). Such a tool can be a roller, brush, trowel, or trowel.

Stretching plaster is always applied using a trowel, working from the bottom up. This plaster is characterized by a denser grain structure. Externally, it is very different from ordinary plasters.
The use of decorative plaster provides many possibilities. For example, using various molding tools, you can additionally create different types of texture.
Plaster consumption is measured in kilograms per square meter surface and usually ranges from 1.5 to 3 kg.
Decorative synthetic plaster is also used for finishing both interior walls and facades. Depending on the graining and direction of grouting of such plaster, you can create an individual wall structure interior spaces. This plaster is usually used as a finishing coat, but can be additionally coated with paint.

Decorative plaster in the room
Grout mineral plaster is characterized by a high content of natural grains and does not contain artificial resin. It has a high ability to transmit water vapor. Used for external and internal work.
Before covering the walls with decorative plaster, apply a preparatory layer of ordinary plaster, consisting of spray and primer, along the beacons. The surface of the preparatory layer is scratched, giving it roughness for better adhesion to the decorative layer. A coating of decorative mortar is applied over a well-seasoned preparatory layer. Moreover, it can consist of two, three or more layers.

First, a spray of decorative mortar is applied to the preparatory layer, then a layer or layers of primer and, if required, a cover of the same mortar.
A variety of textures for future painting can be “depicted” on ordinary plaster. For example, “waves” look great on lime-sand plaster.
To reproduce them on the surface, apply a second layer of mortar in straight or curved strips to fresh or previously rubbed plaster, notched and moistened with water, and smooth it with a spatula. This way a wavy surface is obtained.

Plaster "Wave"
To create travertine (lime tuff) on the wall, a thin layer of colored mortar is applied to the prepared plaster surface. After this, smooth it with a spatula or steel trowel. The result is raised islands on a smooth, worn-out background - the so-called decorative “stones”.

Plaster "Traverine"
For information on the process of applying this type of paint, watch the video:
To create a “boulder-like” texture, apply a plastic colored solution to the ground, quickly level it with a trowel and then trim the surface with a hard hair or bristle brush. When trimming, the brush should be held strictly perpendicular to the surface. A hard brush is needed because only it gives clear, sharply defined “boulders”.

Stone plaster
Under the dunes, the colored solution is also first leveled with a trowel, and then a grater is applied with slight pressure and immediately torn off. The solution sticks to the grater and, together with it, is pulled away from the surface, causing roughness to form on the surface. Externally, these roughnesses are very similar to sand dunes. If you want the dunes to be wavy, you can not tear off the grater directly, but slightly move it to the side. To obtain the texture of small dunes, the solution is first allowed to set a little. After this, it is lightly rubbed, a grater is placed on the surface and it is torn off.

Plaster "Dune"
Watch how to apply Dune to a wall in a short video:
The “furrow” texture is obtained using a grinder with semicircular teeth, which is made from a steel strip or wood. It is up to 30 mm wide with gaps between the teeth of 10-15 mm. The teeth of the hammer are sharpened in one direction. Apply a low-impact solution to the prepared soil, quickly level it with a trowel, then take the rule in your left hand and apply it to the solution that has not yet set. Now you need to place the small bit on the rule with your right hand and guide it with the sharpened side of the teeth forward at an angle of 45° to the surface. This way, even furrows are obtained. Their size and shape, naturally, depend on the shape of the teeth of the bait.

Plaster "Furrows"
By spraying, throwing the solution through a mesh, shaking the solution from a broom or brush.

Methods of applying plaster “under a fur coat”
Spraying through a mesh and from a broom is carried out with any solution (even with coarse aggregate). Only a solution with fine aggregate is suitable for spraying with a brush. To get a dense spray without skipping, repeat it several times until there are no areas left on the surface not covered with the solution. You can also use a special spraying device (it looks like a fan).
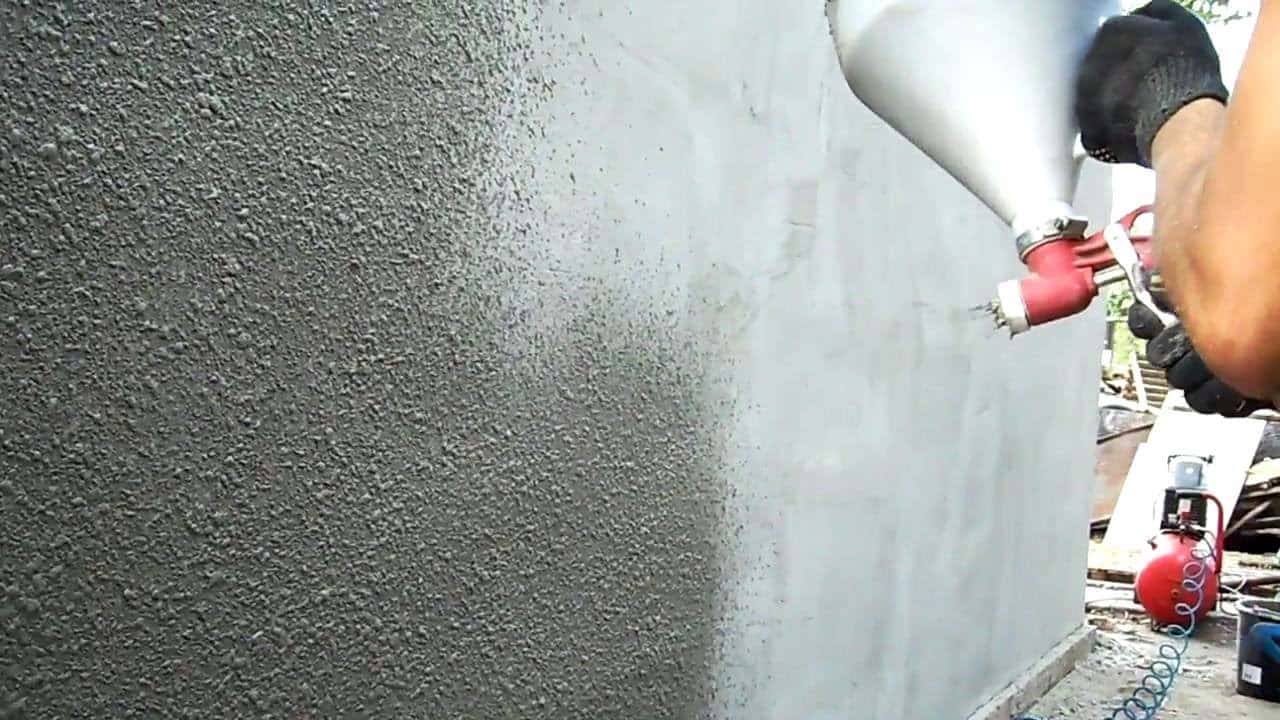
Spraying plaster under a fur coat
Spraying on the mesh is done like this. Stretch a mesh with cells from 2.5 to 10 mm (the specific size depends on the size of the texture) onto a wooden frame measuring 100 x 100 or 100 x 50 cm. WITH reverse side Stretch the wire diagonally across the frame. It is necessary to ensure that the mesh does not bulge or vibrate during operation. Attach the mesh to the wire and tie it. To ensure that the frame is always at the same distance from the wall, nail strips 10-25 cm thick to it.

Spraying plaster “under a fur coat” through the mesh
The frame is placed against the surface of the soil and the solution is thrown through the mesh with a spatula from a falcon. Passing through the mesh, the solution remains on the surface in the form of tubercles. To ensure that your texture is the same, try to apply the solution with the same force.
When spraying from a birch broom, hold it with your right hand, and in your left take a round stick with a diameter of 4-5 cm and a length of 50-60 cm. Scoop the solution onto the broom and hit it on the stick, shaking it onto the wall surface. The size of the resulting texture will depend on the thickness of the broom rods, the thickness of the solution and the force of shaking. While working, stir the solution from time to time so that it does not separate.

Spraying plaster “under a fur coat” with a broom
To get a finer texture, spray with a brush. It is better to use a stiff hair brush or (the best option) a bristle brush. The brush is held with the left hand and, having been dipped into the solution to half the height of the hair, is brought to the surface with the bristles up. Then they pass along the bristles with a stick or board (it is held in right hand), and the solution flies off the brush onto the surface to be plastered. A thick texture will remain on the wall, similar to the pile of a fur coat.

Brush for applying plaster “under a fur coat”
To get a texture similar to snow flakes, spraying is done with flakes of a creamy plastic solution. The wall will be especially impressive if flakes of white mortar are applied to colored plaster. In this case, the colored solution is first applied, leveled and rubbed, and then sprayed over it. This must be done without waiting for the plaster to dry.
To create a texture with a sponge, apply a solution of a creamy consistency to the soil, quickly level it and immediately apply face blows to it with a sponge. After this, a relief remains on the surface of the plaster, the appearance of which depends on the shape of the pores of the sponge. To prevent the solution from sticking to the sponge, it must be moistened with soapy water and lightly squeezed.

Instead of a sponge, you can use a relief roller
To obtain relief patterns on an unhardened plastered surface, you can use special stamps or any convex objects: shells, dense leaves, branches, etc. Pieces of stone, brick, multi-colored glass fragments, shells can simply be pressed into the still soft plaster. It will harden and hold the mosaic together.

A variety of objects can be used to give relief to the plaster.
Another way decorative finishing walls using plaster is called "sgraffito" (scratched). This technique involves scraping off thin layers of specially applied colored plaster. If there are several such colored layers, the resulting pattern will be voluminous and multi-colored, reminiscent of a fresco.

Wall finishing using the sgraffito method
Now let's move on to considering techniques for decorating walls using terrazite plaster. This type of plaster consists of large quantity fluff lime mixed with white cement, white sand, marble chips, glass, mica and other materials. What makes terrasite plaster special is the addition of mica and anthracite fines (up to 10% of the volume of cement).

A type of terrasite plaster
The “hatched” texture (straight or shifted strokes) with irregularities from 2 to 5 mm is obtained from fine-grained mixtures using a freshly applied solution. The solution (in the interval from 1 to 6 hours after application) must be processed by notching with nail combs or toothed scrapers. The applied cement mixture can be treated with a Troyanka or scarpel. Work on the hardened mortar begins no earlier than 6 days after its application.
The rock-like texture resembles crushed stone, and is made from hardened mortar with coarse aggregate, hammered with a chisel or tongue. The tongue and groove is driven into the mortar, thereby knocking out pieces and leaving indentations that form a uniformly grained surface. If the processing is carried out with a chisel or a scarpel, cutting off pieces of mortar, the surface will have the appearance of torn or chipped natural stone.
Before processing, the surface of stone plaster is divided into separate “stones”. To do this, using a chalked cord, lines of rows of “stones” or rusticated “seams” are punched, as well as straps and other straight parts. After this, they begin to finish the plaster to suit one or another texture.
Texture “under a fur coat” perform different instruments. If you perform notching with bush hammers with large teeth, the result will be a coarse-grained texture, with small teeth - a fine-grained texture, and when forging with a tongue and groove, a particularly coarse-grained texture will be obtained. Keep in mind: with large and long spikes of bush hammer teeth, the texture is deeper and larger.

Under shading The work with grooves is done with a bush hammer, only instead of teeth it should have blades. The depth of the grooves will be determined by the size of the teeth. The first forging is carried along the line marked by the cord, and the subsequent ones are parallel to it. To get a texture with the entire surface divided into strips, you need to use a trojan or a toothed tooth.

Bouchard and Trojan
Texture “under the dunes” on stone plaster it is done with a chisel. First, the surface of the wall must be cleaned with steel brushes or rubbed off with whetstones. And then from a well-compacted and rubbed surface of the plaster, you need to cut off a thin layer so that small depressions are formed.

Types of chisels
Under torn stone or roughly chopped sandstone invoice made with tongues, chisels, scarpels. First, apply a solution to the surface in a layer of 4-6 cm, compact it and divide the surface into “stones”. When the solution has set, they cut through or perform rustications, and then treat the surface as necessary to obtain the texture. A chisel or dowel is driven into the applied hardened plaster and pieces of the mortar are broken off in different places to form large irregularities. If you want to get the texture of hewn sandstone, use a chisel to chop off small pieces of plaster.

Fur coat finish and torn stone finish
Coarse-grained and fine-grained textures received in two doses. First, cement mortar is applied - in small or large throws - then a mortar for stone plaster is prepared and applied in a layer up to 10 mm thick over the set layer of soil. The top texture can be fine-grained or coarse-grained, depending on the filler.
For achievement best result The surface to be covered with Venetian plaster should be as smooth as possible, plain (white) and non-absorbent. You cannot apply plaster to wood and metal - over time, the coating will crack.

Venetian plaster
To prepare and cover walls with Venetian plaster, you will need the following tools:
It is advisable to round off the working edges of the tools and polish them with fine-grained sandpaper, completely removing scratches, burrs and other defects.
Before applying Venetian plaster, make sure the base is thoroughly prepared. When not enough quality training base, cracks may appear on the surface that cannot be repaired.

Stages of applying Venetian plaster
The depth and transparency of the coating is achieved using a special application technique.
The master applies several thin layers of coating to the wall, consisting of randomly located spots of material. The combination of many such spots and their layers creates the illusion of depth in the design. natural material. The number of layers varies from 2 to 10, but the total thickness hardly exceeds 1 mm. Each layer must be smoothed (pressed) manually with a spatula, float, or grater until a completely flat, smooth and glossy surface is obtained. Even an experienced specialist takes almost an hour to work with 1 m² of one layer.
The first layer is usually made of a material that contains finely ground marble chips. It is applied to the surface with a steel trowel or spatula in the same way as putty. After 4-6 hours, covering and glazing layers can be applied to this layer, which will create the texture of the coating pattern.

Applying the first layer of plaster
If you need to get matte finish, then the second and subsequent layers are made of the same material as the first. The glossy surface is obtained using a finely dispersed material mixed with the selected dye.
Before starting work, apply with a spatula a small amount of material onto the working surface of a long trowel. Now start working from any top corner. Proceed in the same way as when applying finishing putty, applying the mixture in an even layer. Cover areas near the floor using a bottom-up motion. Press the trowel firmly against the wall, holding it at an angle of 10-15° to the surface. Make sure there are no gaps.
When the first layer has dried, begin applying the next one.
First, mix the coating material: add dye to it (if you bought a “semi-finished product”) and mix everything thoroughly again.
Next, apply a small amount of material along the edge of the short trowel with a narrow spatula and spread it in random strokes using short arc-shaped movements. Each movement should be approximately equal to the length of the iron. If a swell forms on the wall at the end of the movement, disperse it rectilinear movement at an angle to the sag line. Alternate the movements of spreading and accelerating and randomly change their length and direction. Apply the coating on the floor using arcuate movements, starting from the bottom. Finish when an area of approximately 0.7 x 0.7 m is covered with the second layer.

Stage of applying Venetian plaster
Now level the coating in this area with long strokes of the trowel in random directions. Every 2-3 strokes, clean the ironer and wipe it with a damp cloth. Increase the pressure and tilt of the smoother plane to 20-25°. The result should be a uniform thin layer.
After 10 minutes, begin to smooth the coating with the edge of a wide (200 mm) spatula. Movements with a spatula from top to bottom should be slightly crossing. As gloss appears (this occurs from heating and polymerization of the material), release the pressure on the spatula. If this is not done, the resulting crust may be damaged.
To finally polish the surface, you need to smooth it with a clean trowel. At the same time, it is pressed firmly with both hands and held at an angle of 5-12° to the plane of the wall. When polishing an area near the floor, direct the strokes of the trowel from bottom to top and slightly cross them.

The next stage of applying Venetian plaster
When finished, proceed to apply the second layer to the next area, repeating all stages of the operation sequentially.
The pressure on the stroker is released at the beginning and end of the movement (as when scraping). This allows you to change the thickness of the material layer. When smoothing and glossing, the movements of the trowel should cross the boundaries of adjacent areas. To get the desired texture, change the size of the trowel, the length of the strokes, the spaces between them, as well as the force of pressure on the tool.
When working in corners, openings, ledges and other difficult places, direct the spreading movements from the border line into the area. If necessary, use a spatula instead of a smoothing iron.
While the second layer is still wet, begin applying the next layer in randomly placed spots. At the same time, the entire finishing cycle is repeated in sections. Apply as many layers as possible different colors), as long as it takes to achieve the desired result.
If you accidentally damage the surface, use a narrow spatula to apply the first layer of material to the area and around it. When it dries, repeat the entire operation of applying the next layer.
You can use the room after all the work is completed within a day, but it’s better not to rush. The walls will dry completely in a week.

Venetian plaster
After all layers have dried, you can cover the walls with natural beeswax. It will enhance the shine of the coating and give the feeling of an optical illusion. Waxing gives the coating additional moisture resistance. There is no need to apply wax to some plasters produced today: all the necessary components are already contained in the material.
Wall decoration with decorative plaster: 10 types of textures with your own hands
Currently, decorative plaster is understood to mean several various types this finishing material. Experts assure that this is marketing ploy manufacturers. The composition of this plaster is almost the same. You should study this aspect more carefully to understand the types and methods of using this tool.


Decorative plaster is the main competitor of wallpaper when it comes to covering walls. It is worth knowing that this is not the material that is used to level walls. This species building material has its own characteristics. It is both a leveler and a final coating in itself.
Decorative plaster contains additional substances that distinguish it from ordinary plaster.


This type of finishing material has a number of undeniable advantages. For example, such plaster can be the base and at the same time the finish. It perfectly hides wall unevenness and, due to its high percentage of plasticity, can fill any cracks and crevices.
Decorative plaster has no special restrictions on application. It goes well with stone, brick, concrete and plasterboard walls. The only feature is that it must be firmly attached to the wall. But this requirement applies to all types of finishing materials.
Decorative plaster does not absorb odors at all and is perfect for decoration kitchen space. This is one of its features and an undeniable advantage compared to other finishing materials. It has excellent soundproofing properties.


Another feature of decorative plaster is its unique appearance. The final version will look unique depending on the application technique and the tools used. If there are small defects on the wall, you may not need to carry out preliminary preparation. Experts recommend getting by with just a light primer of the surface.
The most common use of decorative plaster is indoors. It allows air to pass through and prevents the formation of fungi and other harmful microorganisms. Due to this specific finishing material, the repair will last its owners much longer.
Thanks to the properties of the material, unusual patterns and designs can be created in the process of wall finishing. Some experts recommend making multi-colored designs from decorative plaster. This way the walls will look original and stylish.


Basically, the composition of the plaster includes natural ingredients. They are environmentally friendly and safe for people, children and pets. For some, this is the main criterion when choosing a finishing material. This coating can last for many years. It can withstand minor mechanical damage, which can often happen in the kitchen and nursery.
When professionals work, everything seems simple and easy. When applying decorative plaster, there are a number of features that you need to remember.
This will help you avoid mistakes during the work process and get the desired result.


When choosing decorative plaster, you need to study the entire range of this product, presented in hardware store. It would be a good idea to consult with the seller. It is best to find a large sample with plaster applied to it. It is necessary to buy material with a reserve. This will save you from additional expenses and hassle. It will not be very pleasant if the plaster runs out in the midst of renovation work.
It is important to choose the right tools for a specific type of plaster and achieving the desired effect. The minimum is two spatulas. It is necessary that one of them be wide and the second narrow. To make more textured designs, you will have to buy a special roller and a smoothing iron with round ends. If the owners want to paint the walls, then they need to purchase additional brushes or rollers for applying it.


If there are no serious defects, you can forget about leveling the walls. Decorative plaster has an amazing property - it will hide all the imperfections. But if the defects on the walls are obvious, then you should first go over the entire surface with putty. This will significantly save the family budget. Experts believe that the finer the relief pattern, the better the alignment of the walls.
Before using decorative plaster, the entire surface of the walls is thoroughly primed. For a novice master, it is better to start working with inconspicuous areas. This will help you gain a little experience, and the resulting defects will be hidden from view. Many builders recommend practicing on a sheet of drywall first.


After applying the plaster, you can make a certain relief or design on it. High-quality applied material is moisture resistant. These walls can be washed. It is important not to use aggressive chemicals. It is better to use soft sponges and rags. Metal brushes and scrapers are not allowed when washing decorative plaster.
Some builders additionally cover such plaster with a layer of wax. But this method will protect from moisture rather than from various damages. If there is a need to change the interior, the plaster can simply be painted over with a different color.
In case of further wallpapering, it is permissible to putty the walls on top of the old layer.

There are several types of decorative plaster in the construction industry. Very often it is divided according to the type of filler or binder. It is better to check in advance about its quality and features with builders or consultants in specialized stores.
If we consider this material by filler type, it will differ in appearance, not composition.
Let's look at some types and effects of decorative plaster:


It can be divided into several textures that have interesting names. The "bark beetle" resembles furrows in an old tree. And when using colored paint, this effect is only enhanced. Lamb creates a grainy surface that appears very soft and curly from a distance. “Fur Fur” is a little similar to the second option, but visually more fleecy.


Many experts consider this product to be one of the most versatile types of finishing material. It can be used on any surface. The result is a very interesting and intricate relief of the walls and ceiling.
The widespread use of plaster is explained by its good vapor permeability, durability and resistance to various natural influences.
In addition, this type of material does not always require additional putty on the walls.
When using this material in a children's room, you should carefully choose the composition. Decorative plaster should not contain resins of synthetic origin. When applying material to walls, do not sharp corners. It is important to think about the safety of your child.


In the bathroom and toilet it is worth using cement-based material.
For kitchen area It is worth using glass and plastic aprons. This is especially true for the food preparation and dishwashing areas. For those who want to use decorative plaster in the kitchen, experts recommend covering the walls with an additional coat of paint or clear varnish. Such additional means of protection will help protect the walls from grease and soot, which are simply inevitable in the kitchen.
Available for sale special kind material that is intended for outdoor use. This type of plaster is absolutely not suitable for use at home. This is due to the substances included in the composition. They give the plaster additional resistance and strength to the effects of snow, rain and sun.


Other mixture options are only suitable for indoor use. This decorative plaster is environmentally friendly and contains natural ingredients. This material cannot be used for finishing building facades. Due to its natural composition and the absence of aggressive components, the material will not withstand the effects of natural disasters.
In specialized stores you can also find universal plaster. It can be used in residential apartments. It also performed well when used on building facades. This decorative plaster contains substances that are safe for people. The composition also contains special components that extend the service life of the material on facades. This type of decorative plaster is the most expensive.


Many builders are sure that such plaster looks great in rooms with a large area. Decorative plaster is used to decorate all walls or small fragments of them. Designers are confident that some types of material can visually increase the area of a room.
This is achieved through a special application style and the use of light paint.
Currently, the material can be applied to wood, drywall or brick. You can use a concrete or already plastered wall as a base. A plastic surface is not the best option for applying decorative plaster. It is a fairly strong material, so it is important that it is applied correctly.
It can also be used in the hallway. It will be able to withstand minor mechanical damage that can happen in everyday life.


Currently, this type of finishing material does not lose its popularity. Construction stores offer a huge range of this material. She has different composition, service life and finishing surface. All types of decorative plaster have in common only a fairly high cost.
If you wish to have original interior, but limited financial capabilities or clearly defined estimates for renovation work, you can try making decorative plaster with your own hands.
It may contain sand, gypsum or cement. Fillers can be chips of natural stones. It is advisable to add components to the resulting composition to increase the viscosity of the material, as well as antiseptic and moisture-resistant additives.


The finishing option will depend on the type, quality and quantity of filler. The most widely used version of decorative plaster contains grains up to five millimeters in size. It is important to know that in decorative plaster the filler should not exceed 70% of the total amount of solution.
Exist different ways preparation of decorative plaster. Let's look at the simplest and most popular of them.
Very often used during repairs gypsum plaster. This type of decorative plaster dries instantly, is easy to apply and levels well. It's very easy to do. You need to purchase gypsum flour and make limestone dough. These components must be mixed together in a ratio of one to three. Then a small amount of water is added. You need to add water gradually, stirring the solution evenly.


As a result, it should resemble thick sour cream in consistency. At the very end, if desired, color is added. In order for the solution to be plastic, all proportions must be strictly observed.
To make your own lime paste, you will need slaked lime and water.
The ratio of components should be one to three. After kneading, cover the resulting mixture with a lid and put it in a dark place for about a day.
Popular methods for preparing plaster at home and with the addition of silicate-based components. Preparation of the bulk is carried out in the same way as in the first case. Another element is liquid glass. It is poured into the resulting solution, and then a little water is added. The amount of silicate in such a mixture should not exceed 5%.


A more budget-friendly option for decorative plaster would be a mixture of sand and cement. To prepare such a composition, you will need cement, sand and slaked lime. The proportions of this composition are approximately one to two. After mixing the main components, silicate is added to the mass. Its share should not exceed 5% of the total mass. At the very end, water is added to the mixture. Stone chips should not exceed 70%.
It's pretty simple methods production of material. It is important to maintain accurate proportions and consistency. Before starting work, you can watch a master class from an experienced builder.
To purchase decorative plaster that does not require preliminary preparation, you should turn to ready-made mixtures. In this case, you should pay attention to textured plaster. Its surface is almost flat. The desired pattern is obtained using spatulas, brushes and rollers. In addition, an experienced craftsman has more opportunities when working with such material. Structural plaster is applied much easier and faster. It is ideal for an inexperienced craftsman.


For rooms with high humidity, you should pay attention to cement plaster. Builders add about ten kilograms of tile adhesive to a bag of cement. 500 grams of plasticizer are added to the resulting mixture. Then water is poured in evenly and everything is thoroughly mixed.
Venetian plaster is considered the most exquisite and amazing. It belongs to the textured varieties. Due to its popularity and variety of effects, it is allocated to a special group.
Marble dust is quite expensive. To reduce the cost of manufacturing such a coating, granite and malachite chips are usually added to it. After applying the material to the wall, it needs to be treated with a trowel. This means that the plaster must have very finely ground stones in its composition.
For this, it is better to use natural and finely dispersed fillers.


The next component is slaked lime. It acts as a component for linking all funds. Typically, ready-made building mixtures contain acrylic resins instead of slaked lime. Special dyes will also be required. Previously, natural plant juice was used. Currently, they have been replaced by synthetic components.
It is possible to use running water during operation. It is important to monitor its temperature. It should not be below ten degrees. The standard recipe for preparing Venetian plaster contains all of the above components. Stone dust and slaked lime are thoroughly mixed until they form a homogeneous mass of fairly thick consistency.
Then running water is added to the resulting composition and everything is mixed again. At the same time, dye, antiseptic and metallizing particles are added. Due to the peculiarities of applying this type of decorative plaster, the finest fillers are required.


Experienced builders suggest considering two more options for preparing this type of material. The first is quite simple - the material is mixed with flour from white marble. The proportions are one to ten. Then water and colored paint are added to the resulting composition.
The second option is a little more difficult to prepare. For 7 kilograms of marble sand, about 1.5 kilograms of flour of a similar composition are added. Then add to the composition white portland cement in the amount of 700 grams, then about a kilogram of lime dough.
A novice master needs strict adherence to all proportions. It is better to use paper to write down all the components.

Before you start finishing works When using decorative plaster, it is important to make a competent calculation of the material. As a rule, it is customary to consider the mixture consumption per square meter.
Decorative plaster perfectly imitates stones, wood or leather. Despite its cost, it is very budget-friendly in terms of consumption. Most often, the consumption per square meter of wall or ceiling ranges from one to one and a half kilograms.
Plaster, which resembles wood in texture, has the lowest consumption. The total thickness of the layer should not be more than one centimeter.
If the plaster contains large grains, then two layers must be applied.


Structural plaster is made from a mixture of acrylic, cement or gypsum. This mixture is sold in 25 kilogram packages. To decorate a ten square meter wall you need one or two bags.
The mixture based on acrylic dispersions is homogeneous in consistency with the presence of small grains. The size of these grains does not exceed two millimeters. Finished plaster has a fairly significant consumption. If there is a fraction of one millimeter, the consumption is two and a half kilograms per square meter of wall or ceiling.
This plaster is usually sold in plastic packaging of 15 kilograms. For 10 meters of wall you need about two plastic packages. This amount of material will be needed to apply one layer of decorative plaster.


Structural materials containing marble chips or a mixture of marble and granite chips are in great demand. The layer of material can be from one to three millimeters. This depends on the depth of texture required. To apply the material to a wall of 10 square meters, you will need one package of material with a volume of 25 kilograms.
If we consider the structural material, then most often it is used to decorate the fireplace. A solution of such plaster is sold in plastic packaging of 15 kilograms. To apply plaster to a ten square meter wall, you need to buy two packages of the material.
Separately, it is worth mentioning the decorative plaster “Bark Beetle”. The consumption of this product ranges from 2.5 to 4 kilograms per square meter. This scatter is due different sizes grains in the structure of the product and the thickness of the layer.


Still, before purchasing, you should consult with the seller at the hardware store. A specialist will accurately determine the possible consumption of decorative plaster of this type. It would be a good idea to read the information about the material on the packaging.
Venetian plaster allows you to create an imitation of marble on the wall in all its splendor. In terms of consumption, it is the most budgetary. Savings result from a perfectly level surface. Considering the cost of work and the price of the material itself, Venetian plaster is the most expensive.


For plastering work you will need a set of tools. This should be sandpaper or a special machine, two types of spatulas, brushes, polyethylene film, putty and primers.
The technology for applying decorative plaster is not very complicated.
At the beginning of work, the surface is cleaned and traces of corrosion are removed, old paint or wallpaper. The entire surface is treated sandpaper. Remaining dust can be removed using a vacuum cleaner or brush. Cracks or gouges may appear on the wall. They should be sealed with putty and wait for it to dry completely.


After this, it is worth treating the surface with a primer. It must be applied twice with an interval of 3-4 hours. Performance this stage work is required. The primer will improve the adhesion of the plaster to the wall.
During the drying process of the primer material, the entire work area should be covered with polyethylene film. It is advisable to cover furniture and all mirror surfaces. For reliability, the film is fixed with construction tape. Then you should start preparing decorative plaster.
For application structural material use a spatula with a wide base. The plaster is applied to the wall and then stretched using a wide spatula. The first layer can be of different thicknesses, the main thing is that it is even. You can continue working only after 5-12 hours. During this time, the plaster should thoroughly adhere to the wall and primer.


After this, the entire surface of the wall is treated with a plastic trowel. You can move in a circle or chaotically. Due to the hard granules in the decorative plaster, grooves are formed on the surface. Once the material dries, they will create the effect of natural and natural materials.
After this, you need to leave the walls to dry for at least another day. Then a special primer is applied and rollers and brushes are used. With their help, the specialist applies the first layer of paint, and then the second. The last coat of paint should be a tone or two lighter than the first. The last stage of work will be applying a layer of wax.
When working independently, it is best to apply decorative plaster with a wide spatula. It takes quite a long time to dry, so you can apply it to all the walls at once. In order for a pattern to form on the surface, the thickness of the entire plaster must be three millimeters. In this case, it is important to apply the product over all walls or ceilings.


Without allowing the material to harden, you can proceed to the next stage of work. Brushes, stencils, stamps, rollers and a trowel will come in handy here. Thanks to uneven patterns, the plaster will acquire a certain texture. The resulting solution cannot be pressed deeper than one and a half millimeters.
If you do this, the material will not be durable and will begin to peel off very quickly.
A day after completion of work, the entire surface must be primed. Then the walls are treated with wax. It will be possible to touch and place furniture in this room two days after the completion of all construction work.
Venetian plaster is more capricious and difficult to work with. When self-cooking solution, use a spatula with a wide base. The surface is leveled using a trowel.

You should not press the tool too hard. All movements should be chaotic. A second and third coat of Venetian plaster should also be applied. The interval between coats is eight to ten hours.
Then the Venetian plaster trowel is pressed firmly against the surface and passed over the entire wall. This should be done until a metallic sheen is achieved. At the very end, the wall needs to be waxed and gently sanded.
It is quite possible to prepare decorative plaster yourself. This will take a little more effort and time, but will save the family budget quite significantly.

Decorative plaster should always be purchased with a reserve of at least 10%. It will be needed if the material dries out or falls on the floor during application.
The issue of saving is always very relevant. This is especially true for estimates for repair work. U experienced craftsmen There are some rules and secrets that can reduce material consumption per square meter.
For rough work, they suggest using the most inexpensive cement-based mixtures. At the beginning of work, you need to try to level the walls as much as possible. The differences should not exceed five millimeters. If the walls are too crooked, you should use plasterboard. This budget option will help you quickly and economically give your walls a smooth surface.


You cannot skimp on primer material. It is best to use those products recommended by the decorative plaster manufacturer. The most important thing is to plan everything correctly before starting the renovation. Correctly calculated quantities and selection of successful consumables will help you save money and protect you from additional purchases.
When using Venetian plaster, you should watch video tutorials or sign up for special courses. We must not forget about rough samples. They are best done a few days before the start of the main work. Drywall is perfect for this. Decorative plaster is a very expensive material, so you should carefully prepare for its application.


A novice master should apply decorative plaster to small areas walls These can be arches or small structures based on plasterboard. Small defects will not be so noticeable on them. But a large wall canvas will not make it possible to hide the first experience of a novice master.
An interesting design option for the corridor and part of the living room would be brick or brickwork. It will look more elegant if you make an imitation brickwork using decorative plaster. Imitation significantly saves space. Time for construction works It will take much less than using real brick.


There are two ways to create imitation brickwork. In the first case, the wall is drawn manually, and in the second, special metal stencils are used. Decorative plaster is poured into them.
When working independently, a novice craftsman should use a narrow metal spatula. This tool will help smooth out the edges of the “bricks” and add a little texture.
Whatever method and type of decorative plaster is chosen, it is important to treat the matter with the utmost care and study in advance all the features of applying and preparing decorative plaster. Then a wonderful result will not take long to arrive.


Watch the following video for a master class on applying decorative plaster "Velvet Relief".
When renovating an apartment or house, the question of decorating walls, ceilings and floors arises. Use paint, wallpaper, or even ceramic tiles no longer impressive.
Nowadays, finishing with decorative plaster is becoming increasingly popular.
And it can be applied to both internal and external surfaces.
Decorative plaster is a type of finishing that creates an imitation of natural stones, fabrics, leather, wood and, most exquisitely, marble. Each drawing, each line is applied by hand, which means it is unique. This uniqueness makes it possible to create your own individual interior. Decorative plaster is used in all styles - from classic and Provence, to loft and hi-tech. The next property is the ability to paint the material in the desired color and shade. Also, if necessary or if you are tired of the design, you can change the color. It will be enough to simply remove the protective layer and apply the desired paint.
A special feature is the use of finishing inside and outside the house. There are types that are resistant to water, dirt, mold and fungi, as well as direct rays of the sun. Therefore, as a house cladding, plaster is an excellent option that will stand out with an extraordinary pattern or texture. As for the apartment, you can decorate the outside of a loggia or balcony. The material is suitable for any room, be it a kitchen, hallway, bedroom or partition in a room.
The finish can be applied to almost any surface - concrete, brick, plywood, osb boards, csp and others. Each of them requires preliminary preparation for application. Material consumption is on average 0.5 - 2 kg of ready-made solution per 1 m2. To calculate how much it will be needed for the selected surface, you need to multiply the cost per 1 sq.m by the area of the wall/ceiling and by the number of layers of putty.
Like any material, decorative plaster for interior decoration has its pros and cons. As for the advantages of plaster, there are a huge number of them:
Only some types of plaster have disadvantages, for example, the expensive price and the difficulty of applying some patterns. There is also one type of material that still requires a perfectly smooth surface.
Plaster, depending on its future qualities, application, composition and application technology, is divided into types. The type of base material available is shown in the table below.
| Variety | Peculiarity |
|---|---|
| Acrylic (Polymer) | The main component is acrylic polymers and resins. The material is very flexible, which allows you to create any designs without much effort. It also has water- and moisture-repellent properties. Used for interior and exterior decoration. |
| Mineral | The basis is made up of small pebbles, crumbs and dust of natural stones (marble, jasper, onyx and others). This is the most environmentally friendly type of finishing. It is vapor permeable, moisture and waterproof. Often used in finishing bathrooms and kitchens. In stores they sell it as a ready-made white liquid. |
| Silicate | The main component is liquid potassium glass. Used to decorate house facades and balcony decoration. The material dries very quickly, and therefore the application of patterns should be quick. It is better to entrust this procedure to experts. The material has excellent resistance to moisture, water, dirt, fungi and even mold. |
| Silicone | Based on silicone resins. Silicone is completely resistant to water and dirt, as well as direct sunlight. Due to this, it does not fade and does not change external characteristics. Used for decorating external walls. The price of the material is not cheap. In stores you can buy it in ready-made liquid form. |
According to the type of plaster filler, there are:

It is also divided into finishing of external and internal surfaces. Types of decorative plaster for interior wall decoration:
Types of decorative plaster for external wall decoration:

In order to apply the plaster so that it adheres well and lasts a long time, you need to properly prepare the desired surface. Step by step processing walls with photos:
While the last layer of the primer dries, you can begin the stage of preparing the plaster itself. Cooking instructions are always written on the packaging. Yes, of course, and they’re ready right away. liquid material, but the dry mixture needs to be kneaded, for this we will need:
The dry mixture is stirred with water in the proportion indicated on the label. Then add the selected color and leave for a few minutes for the materials to adhere. Afterwards, mix again with a drill. You can make plaster with your own hands from ordinary slaked lime and stone chips in a 1:1 ratio. Then add a little soap and add water. Tinting also occurs at the end. Working with the material is impossible without the use of application tools. They help to apply the desired texture and pattern.

The following tools are used:
To give the plaster strength, matte or glossy look you will need:
Important! You can cook and work with finishing at temperatures above 10 degrees Celsius. There should be no drafts in the room where the material is used. It is better to dilute the required volume of plaster immediately, so that in the future there will be no visible difference in color and texture.
You can decorate the walls in different ways. Depending on the type of plaster, the desired texture, relief or pattern. Choosing the material is up to the owner of the room, who creates his own design. Application methods are different. Types of decorative plaster finishing for interior wall decoration:

Application technology:
The application technique is similar to the previous one in that a new layer is applied to the previous one that has not dried.

Application technology:
Decorating walls with decorative plaster is a modern and creative way to decorate your home. With its help you can create spectacular and unique textures and designs. The finish can be applied to almost any surface. Decorating a house both inside and outside helps in creating uniform style. The finish has many advantages, durability and ease of application. That is why we recommend purchasing this material.


