In this article we will talk about how to make a built-in wardrobe with your own hands. Step-by-step instruction will help you understand the nuances and do everything right the first time.
Let's start with the fact that many people make the mistake of comparing a wardrobe with an integrated one. The doors of the built-in wardrobes open depending on the selected technology. If they open exclusively using a roller system, then it can safely be called a coupe.
If you cannot classify yourself as experienced craftsmen, who have been practicing in the production and installation of sliding wardrobes for a long time, we recommend starting with a less complex model - a rectangular one.

Perhaps you are interested in radius cabinets? They look interesting, but you will have difficulties in manufacturing and installation outer surface. Even a craftsman with experience in furniture making should not undertake the assembly of such a structure alone.
Where to place it? The easiest way is to place the cabinet in a closet or in a niche. This option simplifies your task: the tire, bottom and all the walls will already be there, all that remains is to install the doors and make the internal filling. A significant advantage in saving materials and minimal time consumption.
Select the contents of the wardrobe. How will clothes be distributed in the closet? Outerwear, for example, you need to hang it near the door so that the moisture from it does not touch other things. Think through each drawer - the design of the furniture depends on it.
Choose what the structure will be made of. There is no need to save, since reliability and reliability depend on the material. appearance furniture. For example, wood. It is not suitable for installation in a niche, because the humidity there is higher than in the room. The tree will begin to warp, lose its texture and even its shape. But! If you treat the wood with a protective material (drying oil, water-polymer clay), there will be no problems.

But what raw material is not worth purchasing is drywall. Not only is it quite weighty and fragile, it is also unreliable. It is impossible to make a durable structure from it. In addition, you must first build a strong base and only then attach the drywall.
The ideal option for a wardrobe is still chipboard, as well as MDF and laminate. They are all durable and high quality. They are lightweight and moisture resistant in operation. If you choose laminated chipboard, then its thickness should be at least 0.8 cm. Its average cost varies from 190 rubles per square meter.
If desired, you can use glass doors, their prices start from 20,000 rubles. They are made of durable glass, therefore they are reliable, and the formation of cracks can be prevented due to a durable reinforcing film. By the way, you won’t be able to install rollers on such doors yourself; you will need the help of a professional.
Having depicted ready plan cabinet, make calculations. Double-check them to avoid mistakes in the future.

It’s not difficult to choose the number and dimensions of doors, but remember the standards:
There are three main ways to hang doors:
After ready-made drawings and calculations, start with a niche. Its surface must be cleaned, getting rid of old decoration and level with putty.
If according to the design the cabinet does not have walls, then the niche can be painted in any color or covered with wallpaper. If the furniture will be installed with top, bottom, back and side walls, then the niche must be absolutely flat. A plumb line or level will help make sure of this.
Measure the diagonal of the recess: first from the upper right corner to the lower left, and then vice versa. As a result, they should be the same. If errors are nevertheless identified, they can be corrected using cement or plaster. Getting rid of unevenness is necessary to avoid distortions in the wardrobe.
So, preparatory work completed, it's time to start drawing. Make marks in the places where the guides are secured along which the doors will move.
If after installation there is a gap between the door and the wall, fix it with a hexagon. Just tighten the bolt that secures the lower rollers.
Do you doubt whether the wardrobe is assembled correctly? Several quality indicators will help dispel doubts:
Now you know how to make a built-in wardrobe with your own hands. The step-by-step instructions are clear even to novice craftsmen, but if you still have questions, feel free to ask us in the comments.
Nowadays, all interior designers suggest saving the area of rooms so that there is space and free space. An excellent solution for this is built-in furniture, such as a wardrobe. Enough profitable solution not only taking into account space savings, but also from the financial side.
Built-in wardrobe, unlike conventional design, has a number of significant advantages. It holds much more things, less material is needed for manufacturing, due to which the cost of such a design is much lower. In addition, space is saved and space is freed up for other things. Basically two types of arrangement are used:

Installing a built-in wardrobe requires precise measurements. Due to the tight-fitting design, installation problems may occur due to improperly aligned surfaces or measurement errors.
On the modern market there are many materials from which you can make beautiful facade for a built-in wardrobe. Since the dimensions of such a structure are usually quite large, you can think about special design, for example, it is unusual to decorate the doors. Here you can show your imagination and come up with a personal sketch, or find something you like from the already proposed options:


To decorate the facade of a built-in wardrobe, you can also use various accessories and decorative elements. However, it is important to remember that any design should not harm main function closet - storing things within easy reach. Therefore, the doors should open easily and freely.
Usually there is a lot of space in such a closet, so you can distribute it wisely, leaving space for all the necessary and necessary things. The main elements that can be in the closet:

It is best to divide the closet into three levels, where mezzanines with rarely used things will be located at the top, clothes will be located just below, and shoes will be stored on the lower tier. You should not place heavy objects on the very top, since under strong pressure the structure may not withstand it, break and collapse.
After the location, material for the facade, as well as the internal filling of the cabinet have been chosen, you can begin to develop a drawing. It is best to opt for something simple and at the same time practical. It is necessary to make a drawing based on the size of the room itself. Each apartment may have its own flaws associated with the curvature of the walls and floor, so be sure to constantly adjust and measure load-bearing elements so that, in the end, everything turns out smoothly and beautifully. 
Since a built-in wardrobe is different from a regular one, it requires a special approach. Mounting to the wall can be using brackets or regular baseboards. True, the second option may not look very neat and stand out, but it costs much less. 
Doors can be hung in three ways: using top and bottom rails, as well as a monorail. The most the best option is the bottom design. It's easy and simple to do, and it's inexpensive. The rollers should also be chosen very carefully so that they are strong and can support the entire weight of the door. It is imperative to install stoppers for the doors so that they do not hit the cabinet every time they are used. 
If you follow all these rules, you can quickly and easily make a built-in wardrobe yourself. It's important to remember that there are no one-size-fits-all instructions here. Each design is individual, taking into account the characteristics of the room itself. You can use generally accepted basic rules and apply them to your project.
Detailed instructions on how to make a built-in wardrobe for a niche from gypsum fiber sheet. And what is the difference between gypsum board and gypsum board?
All the details about the location of the built-in wardrobe, the design of its facade, and the internal contents will help you make a similar structure yourself. The main thing is to follow some rules and follow safety precautions so that the manufacturing process brings only pleasure.
In this article I will tell you how to make a machine for cold forging with which you can make various decorative elements from metal rods or tires, you can decorate your garden with them.
In order to make a cold forging machine, you will need:
* Metal corners in sizes 63 mm and 40 mm
* Ball bearing number 6310
* Rod from front shock absorber from passenger car
* Bearing from a car pump
* Welding machine, electrodes
* Quick clamps
* Protective welding mask, gaiter
* Bench vice
* Ruler, marker
* A can of hammer paint
* Angle grinder and cutting disc
* Safety glasses, earmuffs and gloves
* Masking tape
Step one.
First of all, we measure 70 mm from the base of the shock absorber rod, for greater accuracy we make markings masking tape.


Forged metal products add color to any interior and look very aesthetically pleasing. But not every owner of a house or dacha wants to have standard solutions that the market offers. In addition, forged decorative elements are very expensive.
Hot forging requires serious skills, equipment and work space. The ideal solution To realize your design fantasies, use cold forging devices. Not everyone can afford to buy such machines, but making the device yourself is not so difficult.
When processing metal using this method, heating is not required. Consequently, no furnaces, no temperature control, no skills in working with hot metal, no special work areas, etc. are required. In addition, there is no danger of serious burns.
Cold forging devices involve bending and pressing of metal. Machines for performing these processes can be either electric (you will need an electric motor and gearbox) or manual. They are easy to make with your own hands and easy to maintain. The design of the units themselves is absolutely elementary, but it is worth knowing that the process of hand forging itself requires considerable effort from the worker.
Unlike decorative elements, obtained as a result of processing hot metal, the cold forging product, if necessary, can always be remade. It unbends as easily as it bends.

The method of creating decorative elements from metal without heating is very convenient when you need to make many of the same ones. In this case, it is made homemade device for a specific drawing with specific dimensions and template actions are performed.
A bending machine significantly saves time, effort and financial costs on equipment of the premises and the metal processing work itself.
The cold forging device allows you to perform absolutely all work, performed by a blacksmith who processes hot metal. Hand tools will cope perfectly with the production of such decorative elements as:
In the cold forging process, exclusively soft metals are used, such as aluminum, duralumin, steel, copper, brass, magnesium and nickel alloys.

To create a decorative forged metal interior, you will need several types of parts. Among them are spiral-shaped rods, arcs, spirals, and various sheet metal parts.
It is almost impossible to make a universal machine for cold forging with your own hands, so to create each element you will have to make a separate device. Such devices include the following units:
All units designed to perform the above tasks can be either manual or electric.

To operate the latter, you will need an electric motor and gearbox. Electrical machines, having an engine and a gearbox, they perform work much faster and make the lot easier for the worker himself.
Making a machine of any of the above types with your own hands at home is very simple. You don’t need any fancy tools or expensive mechanisms and materials for this. Everything you need for such a device can be found in almost any garage.
Regardless of what kind of device you plan to make, you will need the following materials:

To organize the process of manufacturing a unit for cold forging, you need to stock up on the following tools:
Spiral-shaped elements are most often used to create a “forged” interior. So let's start looking at production process from the snail machine.
A homemade electric unit will require, in addition to the usual set of parts, the use of a motor and gearbox. The gearbox is used to reduce engine speed. But we'll talk about this later. In the meantime, let's look step by step at how to make a hand-held device.
We also note that one machine can make spirals of different diameters, but for this you will need a removable volute. This can be achieved in two ways: solid metal removable circles with a welded scroll, or one circle with removable parts of the spiral.

The homemade apparatus for cold forging is ready. You can lay the rod, fix it, rest against it with a bending barrel and walk around until you get the desired product.
The only difference is that the engine must rotate the working circle through a reduction gearbox. The bending barrel is welded directly to the circle without affecting the gearbox. Otherwise, the manufacturing principle of the unit is absolutely identical, and the gearbox and electric motor only complement it.
Admiring the beauty of an openwork metal fence or admiring the incredible twisted pattern on the railing of an iron staircase, few people think that they were made using the cold forging method. You can learn to embody beauty in metal without special effort. To do this, it is enough to have minimal skills in working with metal and have special machines for cold forging.
What is cold forging? What machines are needed for it? What can be made on these machines? You will find answers to these questions in our article.
It would be more correct to call cold forging - mechanical bending of a metal rod on specialized machines to give it the shape intended by the manufacturer. Bending rods in the machine can be done either manually using levers or using electric motors. In addition to metal rods, cold forging can be used to bend small-diameter pipes, narrow iron strips and fittings. Using the cold forging method the following are produced:
 Elements made by cold forging
 Having mastered the cold forging method, you can easily start your own business producing metal products. At the same time, you will only need initial financial investments for the purchase of machines, and if you make the machines yourself, you can get by minimal costs.
Below we provide you with instructions for self-assembly machines for cold forging.
Making a “snail” machine, this is one example self-design, while giving advice with an exact indication of the dimensions of all parts does not make sense. You need to be guided by your idea of the operation of the machine, how and what will bend, how many turns of the spiral will be enough for high-quality work, what size the lever with the tabletop will be. If you understand the essence of the machine manufacturing process, then the assembly itself will not cause any particular difficulties.
 Machine “snail”
 Manufacturing of main machine components
Frame.
The process of bending an iron rod exposes the machine to heavy loads, so when making the frame for the “snail”, only metal corner, channel or thick-walled pipe. Don't make a frame out of wooden beams, such a table cannot withstand prolonged loads and collapses.
Tabletop.
The tabletop for the “snail” is made of a metal plate cut in the shape of a circle, at least 4 mm thick. From the same slab, a second tabletop is cut out, repeating the shape of the first. The snail segments will be placed on the second tabletop and the products will be bent. During the cold forging process, the tabletop takes on the bulk of the load, so there is no need to save money and make it from a thinner sheet of iron.
Main shaft and lever.
The main shaft is placed centrally between the tabletops and is attached to the base using four right triangles. The shaft can be made from a thick-walled pipe required diameter.
The lever is attached to the shaft using a ring and rotates around it; in addition, a roller is installed on the lever for bending the rods on the upper tabletop.
 Machine diagram
 Marking and installation of attachments
Depending on whether you want to produce only the same type of samples or you will need more art products, there are three options for the snail device.
Option #1.
This is the simplest of three options, its essence is that the outline of a spiral is drawn on the tabletop.
 Drawing of the snail segments
 At its core, this is a drawing of future products that you will produce on the machine. After applying the diagram, it is enough to cut out several segments from thick strips of iron of different widths that follow the line of the drawing and weld them to the tabletop according to the markings. With such a static “snail” you can make simple bends.
Option #2.
The second option is the most popular among homemade machines; it involves making a collapsible snail from removable parts. Holes are drilled along the contours of the markings into which threads are cut. Next, templates for the stop segments are made from cardboard or plywood and metal overlays are made from them. Finally, holes are drilled in the pads, which should coincide with the mounting sockets on the tabletop. To secure the segments, bolts are mainly used, but you can also make cylindrical stops. This “snail” design will allow the production of spiral-shaped workpieces with different radii on one machine.
 “Snail” made of metal strips
 Option #3.
In the third option, instead of collapsible stop segments, several removable modules with different options snails that change as needed. The module is made of a piece of iron onto which segments repeating parts of the spiral are welded.
 Snail modules
 Machine assembly.
After assembly, test bend the rod.
To learn more about assembling a snail cold forging machine, watch the video:
This machine is designed for uniaxial longitudinal twisting of a workpiece from a transverse or square rod.
 Torsion bar machine
 A channel or I-beam is used for the base of the torsion bar machine. A thick iron strip is attached to it by welding, onto which a vice is installed to clamp the stationary part of the rod. The vice is secured with four bolts with a diameter of M16 or more. To increase the clamping strength of the bar, corrugated sheet steel plates are welded onto the vice. On the opposite side of the base, guide rollers are installed, to which a clamping unit for the movable part of the workpiece is attached. It is made of a steel bushing, in which it is necessary to provide holes for clamping bolts located at an angle of 120 degrees. The bolts must have a flat end and be made of high quality steel. Both clamping devices should be positioned coaxially, for this they must be checked using a level, a plumber's square and a caliper.
 Types of machines
 Next, you need to make a handle for turning the moving part of the clamp. Its lever should hit as long as possible to reduce the applied force. It is better to make the handle itself with a rubber bushing to prevent the hand from slipping during operation.
After the machine is fully assembled, it is checked for the reliability of the moving elements and the accuracy of the deformation of the bar. After checking, the machine is attached to the support frame.
 Simple model torsion bar machine
 How to make a torsion bar machine with your own hands, watch the video:
To qualitatively form a corner in a product produced by cold forging, you will need a machine called a “bend”. It consists of a steel plate with a movable stop on which there are two support shafts and a lever.
 Machine “gnutik”
 The workpiece is placed between the wedge and the support shafts. After this, with the help of a lever, the wedge is shifted towards the shafts, which leads to bending of the workpiece.
 Computer model machine
 Making such a machine is quite simple, the main thing is to follow the given drawing and use tool steel, since during operation a large load is placed on part of the device.
You can also watch how to make a “gnitik” machine in the video:
It would be more correct to call this machine a controlled wave. The equipment of the machine consists of a pair of steel disks with a diameter of 140 mm, which are attached with bolts to worktop. The axis of rotation of the universal wrench is fixed to the drive disk.
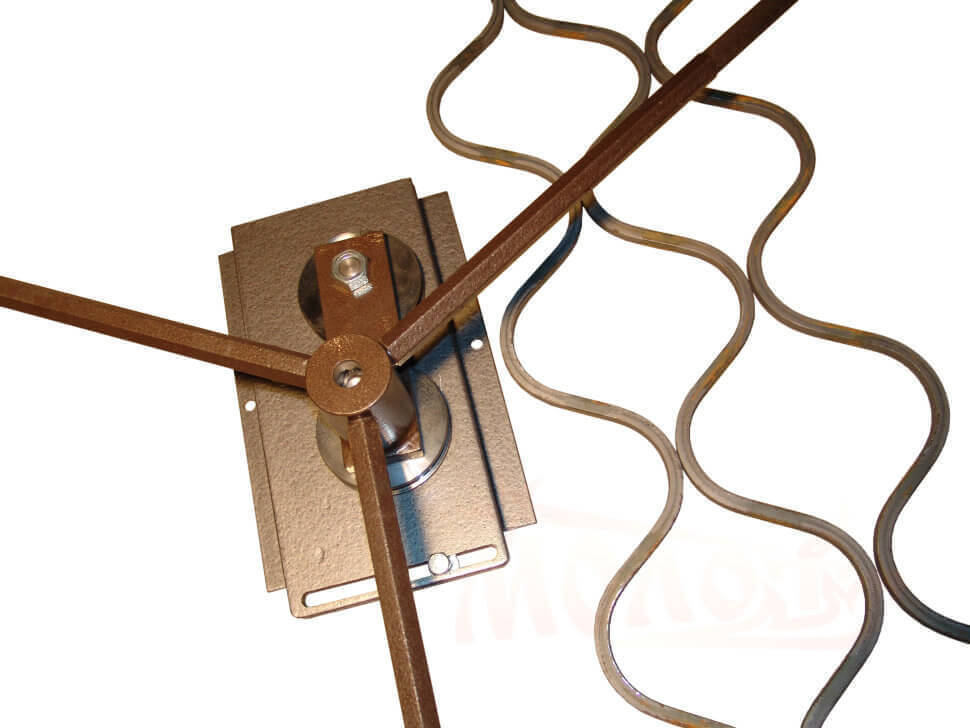 Machine “wave”
 Wave control occurs as a result of changing the distance between the disks. When the bar is rolled around the drive disk with a knob, a pattern is formed, after which the bar is removed from the conductor and a pattern is formed on the other side.
You can watch the machine in action in the video:
A press is needed to form the ends of the rods. This machine works on the principle of a flywheel; first, by rotating the bar with weights, the screw striker is pulled back until it stops. After this, a replacement stamp is inserted into the slot and the workpiece is placed. Next, quickly unwind the barbell in reverse side and leave it to rotate freely. Finally, the striker hits the stamp shank strongly, due to this, a force sufficient for stamping is developed.
 Rolling press
 As for the manual rolling mill, you can make it yourself, but you still have to order special steel rolls, bearing bushings and shafts, and buy gears in the store. Only tips can be produced on such a machine “ goose foot" and "leaf".
Elements produced by cold forging are connected in two ways:
Painting finished products produced with blacksmith enamels or paints for metal on acrylic base.
 Connecting parts using welding
 We invite you to familiarize yourself with the options for products that you can make using the cold forging method:


As can be seen from all of the above, the cold forging method does not require large financial costs and is quite easy to learn, so if you decide to start learning blacksmithing with this method, then you did the right thing.


