It's always nice to have garden plot oven for cooking shish kebab, pilaf and fried meat. At the same time, I want it to be not only functional, but also beautiful. A brick structure will look especially impressive. You can fold it yourself.
Shashlik is a favorite dish of Russians on vacation. The easiest way to grill shish kebab is to use a disposable grill and skewers. But it is much more convenient and civilized to do this at the dacha, in a more complex device created with your own hands. All such devices - grill, barbecue, barbecue - are very helpful to the country cook, but differ only in some design features.
Grill, grill and barbecue are designed for frying meat, poultry, fish, vegetables and mushrooms over coals. They differ only in the complexity of their design and additional capabilities.
This is the simplest device for frying: a rectangular metal box on legs without a grate for coals. Smoldering coals lie right at the bottom of the grill, and the heat from them is directed from bottom to top. On the side walls on top there are recesses for skewers, and in the lower part there are perforations to create traction. It is often foldable and does not have a lid. The easiest way to take it with you on a picnic or on a camping trip along with skewers or a grill.
The grill is distinguished by the fact that it has a charcoal grate and a lid, which provides heat from all sides, not just from below. But if you put it aside, the unit will work like a regular barbecue. In the grill, you can regulate the air flow to the coals and the fried product, for which purpose in the lower and upper parts dampers are made. Sometimes it is equipped with an umbrella to catch falling embers. The lid is a very necessary thing. Firstly, the speed of cooking increases; secondly, the finished dish turns out to be stewed rather than fried, which means it’s more healthy.
There is still a lot of controversy about the word “barbecue”. It seems that the best interpretation is its origin from the French “barbe et queue” - “from beard to tail.” Initially, it was not pieces that were fried on the grill, but whole lambs or piglets. In Russian, this device received the affectionate name “barbecue”. Barbecue differs from barbecue in that it has more complex device. There, like in an oven, there is a grate for coal, which ensures good draft, and a grate for the product that is to be fried. Like the barbecue, the barbecue does not have a lid. This is a more complex and expensive device. Ready-made “mobile” barbecues are widely sold, which are a metal structure on high legs, often with a roof and additional folding shelves. They are inconvenient because in bad weather it is advisable to remove them from the site. In more expensive models, the distance between the grate for the product and the grate with coals can be changed, which allows you to regulate the intensity of the heat and makes cooking very easy. The heat in a barbecue is also directed from bottom to top.
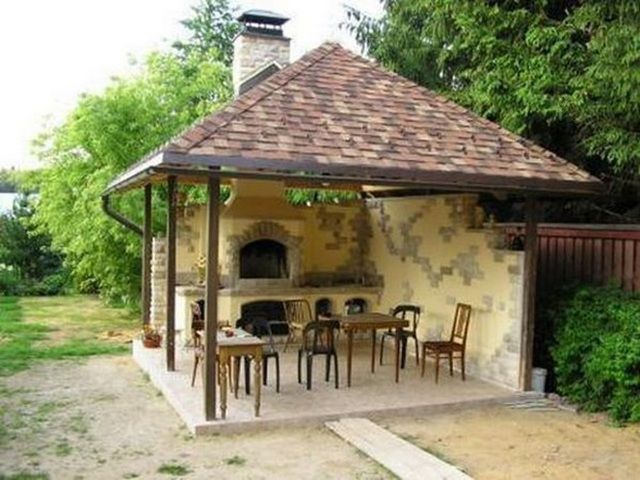
But often the word “barbecue” is used to describe large building on the site, “garden fireplace”. Typically, it is built of brick or stone, with a substantial roof and a preparation table. Often a cauldron (cauldron) and a sink are inserted into the “garden fireplace” for washing meat and vegetables.
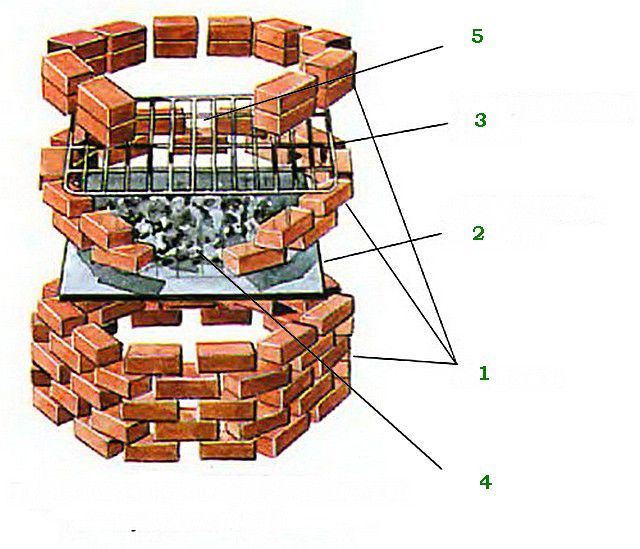
A cauldron is a round cauldron made of cast iron. Aluminum cauldrons are undesirable; they burn out quite quickly and do not hold the correct temperature.
You can cook anything you like in a cauldron on site, but the optimal dishes are pilaf and cauldron kebab. IN ordinary kitchen They are difficult to prepare - the odors are too unpleasant and intense when the oil is heated.
A brick oven with a cauldron is universal: if you remove the cauldron, you can fry shish kebab; if you try to lay out the round tray evenly and neatly, you can use it as a tandoor; If the round hole is covered with a cast iron sheet with burners, they can be used to fry in frying pans and cook in pots.
A barbecue oven can be built on an open veranda, having previously taken care of insulating the floor  You can build a roof over the barbecue complex, which will allow you to cook outdoors even in rainy weather
  The barbecue oven can be made in any shape and style
  Country style barbecue looks impressive in the garden
  The barbecue oven can be made in a corner, it all depends on preferences
  A small outdoor stove can be very convenient and functional
  A brick barbecue oven can be finished with a a natural stone
  A barbecue oven can be compact, with a small firebox
You can build a barbecue oven with your own hands if you follow the sequential guide, or “order”.
The word has two meanings:

 Before you start bricklaying the stove, you need to draw a sketch of the future structure
  The oven for the cauldron can be made miniature, consisting of 13 rows brickwork
  Most common model brick oven- two-story design with a compartment for storing firewood under the combustion chamber
  The ceiling under the cauldron can be placed directly under the exhaust chamber
  A brick oven can combine several functions: barbecue, smokehouse and barbecue
Before you start building a stove, you need to decide on the location of its installation, sketch out a sketch of the future model and select suitable material for masonry.
The stove should not be placed under trees or close to a flammable fence. It is optimal to place it close to your favorite place to eat on the site. The area should be large, then it will be convenient to cook. If desired, you can build a stove with a sink, then you need to supply water and sewerage to it. If this is difficult, then the stove is placed near the garden water tap.
The barbecue oven can be made of river stone (this is very beautiful), expanded clay blocks or ordinary red brick. But surfaces in contact with fire are laid out from special fire-resistant bricks, because all the materials listed above cannot withstand the high temperature in a barbecue or under a cauldron and crack. The same applies to masonry mortar. The places where the flame burns are laid out with a special composition. The solution for the rest of the kiln is also specific: cement will not withstand even low temperatures, so instead of the cement part of the solution, clay is used.
An outdoor stove made of river stone looks impressive, but requires certain masonry skills
Before calculating the amount of building material, you need to decide on the model of the “garden fireplace”. The following aspects should be taken into account:
We chose a complex stove to build. This is a barbecue grill with a cooking stove and a cauldron, a project by master Valentin Brui called “Stonehenge”.
The calculation of the material is done after selecting a model with an ordering diagram. The approximate number of bricks in each row is calculated, their type (refractory, silicate, ordinary) and shape are taken into account. Approximate calculations are made as follows: count the bricks in the first, continuous row; the resulting number is multiplied by the number of rows and the so-called filling factor. For barbecue ovens it is 0.65. We take into account that approximately 15% of bricks will be scrapped; this number must be increased to 30% if cutting bricks is planned. At the same time they break.
Before starting bricklaying, it is necessary to prepare the foundation for the future furnace.
The required area for the foundation can be marked using pegs and thread
The foundation must be poured in one go to avoid cracks.
For waterproofing, the hardened slab must be covered with roofing felt in two layers.
Ordinary brick must be soaked in water before laying, otherwise it will absorb water from the mortar, and the mortar will dry out quickly and be weak.
Sometimes brick is used instead of concrete for the foundation. A concrete foundation is stronger and cheaper, but a brick foundation is easier to put together and dismantle if necessary.
We place ordinary bricks on a mixture of clay and sand, since the cement mortar will not withstand the temperature. We try to maintain the width of vertical and horizontal seams at 10 and 5 millimeters, respectively. When laying refractory bricks - 3 millimeters. The refractory brick is placed on fireclay mortar (a heat-resistant mixture of fireclay powder and refractory clay).
In the first row of the furnace body it is necessary to provide space for doors
The second row of the body is not yet fully laid out
The “circle” is made of plywood, bricks are laid on it
The semicircle shape for the firewood arch can be achieved by thickening the mortar
The base of the firebox is made of refractory bricks
Covering the firebox with shaped fire bricks
The second row of the firebox resembles Stonehenge, after which the stove is named
To ensure that the bricks form a cylindrical shape when laying, they are sawed off on one side
The lining is also made from refractory bricks
In the second row of lining we try to carefully maintain the proportions
We continue the order, gradually forming a circle
The ceiling under the cauldron is constructed from refractory bricks
The insulation serves to thermally insulate the firebox and control thermal expansion
We begin laying the third row of the furnace body after completion of the firebox
We complete the installation of the blower door, blocking its opening with locking bricks
In the fifth row we begin installing the fire door
In the sixth row we block the horizontal smoke channel
In the seventh row we begin to lay the back part of the firebox
In the ninth row of the building, we block the fire door opening with a locking brick
In the tenth row, using thin plates we align the level of vertical bricks with ordinary ones
To give an aesthetic appearance, the ends of the bricks forming the edges of the tabletop are rounded, and the upper layers of bricks are polished
The slab must be flush with the surface of the bricks forming the countertop and perfectly horizontal
The construction of a lining for a barbecue unit begins with the perimeter of the hearth
The absence of rigid fixation of the hearth bricks with mortar promotes their mobility and reduces the influence of thermal deformations on the structure of the barbecue
If necessary, the depth of the barbecue pit can be reduced by dismantling the hearth bricks and adding a layer of sand under them
Between 13 and 14, as well as 14 and 15 next to each other, grooves were selected in the fireclay brick for a frame for attaching skewers

To make delicious dishes in the country, a good option would be to use a brick barbecue. Making a design with your own hands is quite simple.
Our article will introduce you to the principles of operation of a mini oven, you will find out what it can consist of.

Barbecue is the most popular method of cooking outdoors. This design is similar to a barbecue and has a standard device.
Barbecue specialists who have rebuilt a lot of outdoor stoves with their own hands know that a barbecue cooks food from below using smoldering coals.

The food is not fried on top. Therefore, you have to constantly turn the skewer.

With barbecue things are different. The meat is placed on the grill; the grill itself becomes slightly lower than the side walls. This is the whole essence of the work of this design. In a barbecue oven, the tray looks like a solid sheet, without grates.

While the coal is smoldering, the food is gradually fried due to reflection from the walls of the oven itself.

The walls of the barbecue are high, due to this a smoke cap is formed above the products, they are slightly smoked in it, this gives them a special aroma. If you put a piece of tough pork in such an oven, during the process of roasting in the oven it will become soft and juicy.

You might think that the height above the walls of 25 cm does not matter, but this is not the case. The culinary process is a delicate matter; food is susceptible to the slightest change in temperature.

If you pay attention, you will notice that most picnics in nature or at the dacha are not complete without a barbecue oven; the grill is not so popular. There are quite a few designs of brick barbecue ovens, so you can easily choose a convenient option for yourself.


How to build a barbecue yourself?
At first glance, it seems that cooking in a barbecue oven is not simple, which means that the design is complex. However, this is not true; building a stove with your own hands is quite simple.
It is those who love countryside gatherings who build stoves with their own hands. Every owner always has the materials for its construction at hand. Every man held bricks in his hands, which means that building a stove would not be difficult for him.
First, they put up brick walls, then measure out the place where the firewood tray will stand, the last step is installing a grate for food.

When building a barbecue oven, it is important to think about its appearance. A beautifully crafted design will the best decoration summer cottage plot.

If we speak in in simple language, the barbecue oven is the most primitive brickwork. They make it in the shape of the letter “P”. Such a simple structure will be an excellent option for outdoor cooking.


Skilled builders install mounts for skewers on the stoves; this greatly simplifies the work when frying meat; you don’t need to hold anything with your hands, just turn it over.

The barbecue oven is assembled from standard red brick, which is always available on the site. It is impossible to coat layers of brick with ordinary clay; here you need high-quality cement mortar.

At the completion of the construction of such a furnace, a pipe is always removed; it serves as an exhaust hood, a canopy from bad weather and strong winds.

If there is an exhaust hood, such a stove can easily be placed in a gazebo, on open terrace, it will not emit acrid smoke directly into your face.

Grills and barbecues have become very popular with absolutely everyone lately. Who doesn't love eating delicious food outdoors?

Without exception, everyone loves the taste of juicy, roasted meat. It is for such pleasure that it is worth using all your strength and experience to build such a stove. You will be proud of your invention, and also delight your loved ones with new kebab recipes.


Outdoor recreation in a country house or cottage is not complete without cooking in the open heat. You won’t surprise anyone with banal kebabs or baked vegetables, but in such conditions you can cook real pilaf or other complex dish only in a special fryer. This is a barbecue oven, the design of which includes the installation of a cauldron.
A barbecue oven is a permanent structure for cooking. various dishes to the heat of hot coals. The peculiarity of this installation is that the cooking process is carried out on a metal grate without an open flame, and the fryer is not covered with a lid.
In terminological terms, the concept of “barbecue” means a method of baking meat or plant products over smoldering coals at a temperature in the range of 100–130°C.
For the convenience of cooking, such devices are modernized by adding additional compartments and installations. A design that combines a barbecue oven, a roasting pan with the ability to install a cauldron, and an extension with a sink has become very popular. It should be noted that the roasting pan can be easily converted into a regular stove by removing the cauldron and placing cast iron rings on the hole different sizes, forming a continuous surface.
A large barbecue oven has many positive and several negative qualities.
| pros | Minuses |
|
|
The design using red and fireclay bricks looks very solid  The barbecue oven can also be placed in the corner
  Complex construction requires the help of professional builders
  Light finish has an attractive appearance
  A creative approach to construction will help make original decoration for the dacha
  The unusual shape of the barbecue oven attracts the eye
The construction of a barbecue oven structure must be preceded by preparatory activities on choosing a construction site, drawing up drawings and diagrams.
When choosing a site for construction, you must be guided by the following rules:
The size of the future barbecue oven plays an important role.
If the surface with the sink, barbecue grill or cauldron is placed too low, then after a while your back will get tired, and if the working surfaces are located too high during the cooking process, you will not be able to avoid burns.
To find the golden mean, you should follow the rule - optimal height The working surface of the barbecue oven should be slightly below the level of the cook’s elbows.
If the width of the selected area does not allow making a wide structure, then this optimal parameter we can consider the value to be 240–250 cm. Such a stove complex will be compact and convenient. The width of the roasting pan should be 63–65 cm.
The size of the stove for the cauldron will be 3.5 bricks on each side, which corresponds to 87 cm.
Various materials are used to build barbecue ovens, including brick, metal, stone and clay.
The latter can be used to make a monolithic structure.
Clay was used in ancient pottery. The first historical mentions of such structures were found in III millennium BC. Nowadays, this type of furnace is used extremely rarely. To make it you need a special type of fatty clay.
Stone barbecue stoves are more common, but are not widely popular, since their construction requires rubble stone, sandstone and limestone. The disadvantage of this material is that it different shapes, which is why each element has to be carefully selected to each other.
Furnace complexes made of metal are widely used nowadays due to the relative cheapness of the material and the ease of its processing. A large number of ready-made designs go on sale. At home, such structures are made in compact sizes.. For this, steel sheets or pipes with a thickness of at least 5 mm are used. A popular option is to use old propane tanks. The wall thickness and dimensions of these containers are suitable for the manufacture of such structures.
The most convenient, high-quality and durable material for the stove is a brick. He has standard sizes and shape.
It should be noted that not any type of brick is suitable for building a barbecue oven.. For example, silicate cannot be used. For braziers, ovens and other structures operating at high temperatures, fire-resistant red and fireclay materials are used. The combustion chamber is lined only with the second type.
In addition to the main building material, required:
All these materials require careful calculations.
To build a barbecue oven you will need 810–820 fireproof red ones, as well as 30–35 fireclay ones. The thickness of the seams between them is 3–5 mm.
Since the barbecue oven will combine several working areas, its design will take large area land. In order for this complex to be stable, it is necessary to make a permanent foundation. A slab foundation is suitable as such.
To calculate the exact amount of concrete, you need to know the total volume of the base. To do this, you need to use a special geometric formula. Since the foundation will be made in the form of a flattened parallelepiped measuring 270x100x20 cm, the volume of the concrete mixture must be calculated using the formula V=h³, where h is the length of the side of the figure. Using an example, it will look like this: 2.7∙1.0∙0.2=0.54 m³.
Using the same formula, the volume of sand and gravel is calculated. The base requires a layer of each material 10 cm thick. It follows that sand is required: 2.7∙1.0∙0.1=0.27 m³. This is the same value for gravel.
To prevent the foundation from cracking under the weight of the stove, it is necessary to strengthen it. For this you need metal carcass. For its manufacture, reinforcing bars with a thickness of 12 mm are used. Metal structure It is a three-dimensional frame in the form of two gratings, which are connected to each other by pieces of reinforcement 15 cm long. The size of each cell in the frame is 10x10 cm.
It is more convenient to calculate this material in linear meters. To do this, it is necessary to determine the total length of all the reinforcement for the frame. To do this, you must first calculate the number of rods located along the length of the frame, then along the width and between the gratings.
The rods are calculated according to the length of the structure. The length of each of them is 95 cm. It is necessary to determine how many rods will be placed along the length of the foundation if the distance between each of them is 10 cm. For this you need 270:10 = 27 pieces. It is necessary to add one more rod, since it will close the structure from the other edge of the frame. To find out how much it is in linear meters, you need 27∙0.95=26.6 m.
The same calculation principle is used to calculate the amount of reinforcement along the width of the base. For this, 100:10=10 pieces, in linear meters it will be: 2.7∙10=27 m.
It is necessary to add these values to get the overall parameter for one grid: 26.6+27=53.6 m.
Since the design provides two gratings, then 53.6∙2=107.2 linear meters.
Now you need to calculate the number of reinforcement elements connecting the two parts of the frame. These rods are located along the perimeter (at the intersection of each rod), as well as inside the structure, at a distance of 90 cm from each other in rows.
From previous calculations, the number of rods along the width and length of the frame is known: 28 + 10 = 38 m. This value must be doubled, since the elements are located along the perimeter of the structure: 38∙2 = 76 pieces. Inside the frame there are two more rows of 10 pieces, so 76+20=96 pieces. It is easy to determine this value in linear meters: 96∙0.15=14.4 linear meters.
To calculate the required amount of waterproofing material, you need to find the area of the base. The area of this figure is determined by the following formula: S=a∙b, where a is the width, b is the length of the rectangle. Let's substitute the values: 2.7∙1.0=2.7 m².
When the site for construction has been selected and prepared, drawings and diagrams of the future structure are drawn up, and necessary materials purchased, you can begin the actual construction of the barbecue oven. To do this you need to do the following:
In order for the barbecue oven and its working elements to please you for a long time, you need to use it correctly:
You can build a barbecue oven with your own hands, if you strictly follow the instructions and treat this process responsibly. This design will serve you for a long time and will fully meet your expectations.
Country holidays in Sundays V in most cases associated with cooking delicious meat, fish and vegetable dishes on hot coals. Of course, you can always a quick fix organize a small barbecue, even by simply digging a hole in the ground and coming up with some crossbars for a net or skewers. But, you must admit, the products will be prepared of much higher quality and tastier, with less fuel consumption, if special structures are used - barbecue, grill or barbecue.
In general, it would probably be a sin for owners of suburban areas not to have such devices, stationary or portable, at their disposal. The stores offer a fairly wide selection of such devices welded from metal. However, if the owner of the site has at least basic skills in carrying out construction work or in processing and welding metal, it probably won’t be a particularly big problem for him to build a barbecue with his own hands, of varying degrees of complexity.
First of all, we need to figure out what we should get if the goal is to create a barbecue.
The etymology of this name is not entirely clear - there are several versions of its origin. The most plausible option seems to be one that connects him Withancient Greek, and then the Latin word “barbarus”, which meant an alien, a stranger, alien to culture. In our language, the word gradually transformed into “barbarian”.
Perhaps the method of cooking of these semi-wild nomadic tribes - barbarians - on open fires or in stone cave hearths formed the basis of the established name. But, you must admit that we all really, really like this “barbaric” method!
Have you decided to build a barbecue oven?
But before moving on to the article about barbecue, be sure to read how to lay a brick -.
In addition, the tandoor is an excellent solution! You can also read about DIY projects on our portal.
But the question immediately arises - there are many recipes for cooking on the grill, on the grill or using barbecue culinary technology. What is the difference, what is the subtlety that distinguishes one from the other?
By and large, the difference is small, but it still exists.
 The simplest one in the “family” is a regular grill
 This, as you can see, is the simplest of the listed devices. Cooking meat on it requires some skill, since the heat comes only from below, and it is important not to overcook or overdry the side of the food facing the fire.

Hot air in a closed volume is distributed more evenly, and the frying process occurs simultaneously on all sides. Of course, combustion requires channels for air intake and smoke outlets, so grills are often supplemented with a small pipe.
 For a barbecue you need a fireplace that is closed on three sides...
 Another option is when there is always a side around the barbecue grill, a wall that does not allow the heat to immediately disperse to the sides from the slightest breeze.
 ...or the grate is surrounded by a side wall that retains the heat at a certain height from the products being fried
 The walls of this side or hearth also heat up and participate in the cooking process. It turns out to be a kind of thermal cushion that envelops the product from the bottom and from the edges, and in the case of a hearth type of barbecue, also to some extent from above. It is clear that in such conditions the meat cooks faster, and there is much less risk of drying it out or even burning one of the sides than on the grill. As a rule, on all barbecues one or another possibility of adjusting the height of the grate above the coals is thought out.
Artificial draft is not created in a barbecue - the slower it moves hot air- all the better. In a hearth-type barbecue, of course, you cannot do without organizing smoke removal, but the pipe should not be high - usually from the level of the fryer to the top head - no more than one and a half meters.
Honestly, all three of these culinary devices are so “related” to each other that very often they can easily and simply transform into one another. For example, a grate installed or suspended below the level of the walls of the barbecue immediately transforms it into a barbecue. And if you close the lid on the barbecue or close the hearth door, then, accordingly, you can cook according to grill technology.

Perhaps the reader will object to such a gradation of devices for cooking over an open fire and coals, since there are a lot of different opinions expressed on this matter on the Internet. However, later in the article we will consider those options for manufacturing or constructing a barbecue roaster that meet the criteria described above.
BBQ Forester
Options will be considered in sequence from simple to complex, from temporary to portable braziers, and then to stationary complexes.
This option is available to literally everyone, even people completely incompetent construction skills. The method of constructing such a barbecue grill itself is in many ways reminiscent of a child's game of blocks.
To work you will need:
— About a hundred bricks (item 1). Their number may be smaller - it all depends on the height of the future “structure”.
— Metal sheet (item 2) and grille (item 3). The size of these elements should be approximately equal. In fact, their length and width will determine the size of the fryer.
The masonry will be carried out “dry”, that is, no mortar will be needed.
A similar roasting pan can be left on the site on summer period, but if there are fears that bricks and metal parts may simply be “taken away” in the absence of the owners, then not difficult at all disassemble it to cover the materials in the utility room. If necessary, building a barbecue again will not cost a ton and will not take much time.
If the owner of the house has good skills in metal processing and welding, then a portable barbecue model can be a very good option. The task will be further simplified if there are old unnecessary metal barrels or gas cylinders.
In principle, you can even do without welding - this is the option that will be discussed. The pictures in the left column of the table can be viewed in more detail by enlarging them with a mouse click.
| Image | Description |
|---|---|
 | Take an ordinary standard metal barrel in good condition. It is important that flammable products (for example, gasoline) are not stored in it beforehand. External markings are immediately made on the barrel - two parallel lines between the bottom and the lid. The area to be cut should be approximately ⅓ of the surface. The figure shows markings made with two strips of electrical tape (blue arrows). Pay attention to the location of the filler neck of the barrel - almost at the level of the far marking line, with a slight shift back (red arrow). This is important as the neck will then be used for the chimney. |
 | The transverse cutting lines are marked approximately 50 mm from the flanging joints of the lid and bottom, and must run strictly parallel to them. Then, using a grinder, the intended window is cut out. It is very important to make the cuts as evenly and accurately as possible, since the cut fragment will be used as a lid, and the gaps when closing it will have to remain minimal. |
 | Further work will be easier if you immediately build a stand for the future barbecue. There can be a lot of options here, but as an example we can give a simple design that does not require welded joints. The diagram is shown in the figure. You will need pieces of pipe Ø 40 mm - 4 pieces 750 ÷ 800 mm long (this height will ensure the most comfortable use of the fryer), and 2 pieces long, equal to length placed on the horizontal surface of the barrel with the addition of another 150 mm for the top fastening units. The legs are connected to the crossbars with bolts, for which holes are drilled in the pipes (shown by the arrow) |
 | Now it’s time to make jumpers that will add rigidity to the structure of the stand. It will be cheaper and easier to make them wooden, or more precisely, plywood with a thickness of at least 10 mm. To do this, two strips 700 mm long and two 900 mm long are cut out, with a total width of 150 mm. In two of them, using a core drill, holes Ø 42 ÷ 45 mm are selected, equidistant from the center and the distance between the intended centers of the holes is 500 mm. In the other two, the holes are the same, but the distance between their centers is increased to 750 mm. This will give the legs a slight inclination, which will increase the strength of the structure. The first pair of plywood blanks is placed on the tube legs of both metal halves of the frame (blue arrow). For greater rigidity, the jumpers are connected to each other using self-tapping screws with a crossbar, also made from strips of plywood (red arrow). By the way, this jumper can be made wide - then it will also serve as a fairly convenient utility shelf. |
 | Now - how to fix this wooden spacer and lintel at the desired height? The easiest way is to attach ordinary clamps to each of the legs - they will not allow the plywood parts to fall down. It is important to place this unit no closer than 400 mm from the top crossbars so that the wooden parts do not burn from the heat when using the barbecue. Such fixation with clamps will allow, if necessary, to quickly disassemble the entire structure by simply loosening the nuts and removing the parts from the legs. The lower jumpers are installed in a similar way, in which the holes are spaced slightly wider. The height of their location is 100 ÷ 150 mm from ground level. There is no need to connect them with a cross member. |
 | That's it, the barbecue stand is ready. You can place the barrel on top and continue working. The barrel cylinder is securely placed between the metal crossbars (blue arrow), and its ends rest against the connecting nodes (red arrow), which prevents its movement in any direction. Under the weight of the barrel, the entire structure of the stand, located at a slight slope, will finally wedge inward and will be motionless. |
 | We continue to work on the barrel itself. The main tools are a drill, a screwdriver, spanners, since all connections will be threaded. It is undesirable to use aluminum rivets, since the thermal resistance of this metal is low. First of all, brackets are installed on which the frying grid will be laid out. These are ordinary steel corners, bolted just below the level of the cut opening on one side - and horizontally to them - on the opposite side. Placement of corners - depending on the size and rigidity of the existing grille, so as to ensure its reliable installation with support at least on all four corners, and if necessary, with additional corners to avoid deflection. |
 | Most often, a collapsible grate of two halves is used - it is easier to install it in the cavity of the barrel. The figure shows just such an option. Arrows indicate installed brackets. |
 | It's time to tackle the hinged lid. On the back, high part of the opening, ordinary steel window hinges (non-removable) are attached to screws. |
 | The second half of the loops is screwed to the fragment cut out earlier from the barrel. It is necessary to very accurately measure the location of the hinges so that the resulting lid fits exactly to the size of the window and closes it as tightly as possible in the lower position. |
 | Now the chimney is next (red arrows). The plug in the drain neck is removed, and a threaded coupling of the appropriate diameter is screwed in instead. so as to form a protruding threaded pipe (item 1). A 90° bend (item 2) is screwed onto it, to which you can then connect a low pipe, placing it in such a way that the exhaust smoke does not become an obstacle for the person preparing food. At the bottom of the end of the barrel, it is additionally fashionable to make an adjustable blower (blue arrows). To do this, several holes Ø 10 ÷ 12 mm are drilled (item 3), and a damper is placed higher on the axle bolt, which can be used to regulate the flow of air into the firebox. This can be especially important when cooking in grill mode, since if the lid of the frying pan is closed, combustion without oxygen may simply stop. |
 | The final touches remain. The chimney pipe is being installed (blue arrow). There must be a handle that will open the lid of the barbecue. It is advisable to make it from a material that will not heat up too much. The options may be different, for example, as shown in the figure (orange arrow). If you wish, after preliminary cleaning you can coat the top of the barrel with special heat-resistant paint. The master who made the barbecue about which the story was told additionally attached a thermometer (red arrow) to the surface of the lid, which allows you to monitor the temperature during the cooking process in the “grill” mode. Essentially, the barbecue assembly is complete. |
Similar or to a certain extent modified, according to the wishes and imagination of the master, barbecues can be made from their old ones gas cylinders. (At the same time, care must be taken when cutting the container for the first time, since there may be an explosive residual concentration of gas inside. It is recommended to rinse the container several times with water, and make the first cut also in a water-filled state).

A creative approach makes it possible to significantly expand the functionality of the manufactured structure. For example, it is easy to provide an additional “option” for the smokehouse by installing an additional chamber at the smoke outlet from the main roaster. Another option is to install a separate combustion chamber below, which will be used specifically in the smoking mode of products. And to maintain the required temperature and smoke concentration required for smoking, an adjustable damper is installed on the chimney. A good example such a model of barbecue grill with the ability to switch to smoking mode is shown in the attached video.
If the structure turns out to be heavy, then it can be equipped, for example, with a single-axle wheel drive. This will allow you to easily move it around the site or put it in a barn or garage when it is not in demand.
Those owners of country mansions who they love solidity and solidity, they will probably prefer something more monumental, stationary, built of brick for years. Well, in this matter, there is nothing impossible for the independent construction of a barbecue grill or even a whole complex or, in other words, a barbecue area.
First of all, you need to decide on a location. A number of rules are taken into account:

Once the location has been chosen, construction begins. And it always begins with the construction of the foundation.
BBQ GREIVARI
Any brick stationary structure always has considerable mass, which means it requires a reliable foundation. In the case of building a garden barbecue stove, you can use both strip and slab, monolithic foundation, but the second one is still preferable. It is recommended to pave the area around, one way or another, and this will already be the basis for, for example, laying ceramic tiles. In addition, a monolithic foundation, even with a slight depth, will be a stable foundation for the structure being built.

Now all that remains is to wait for the slab to harden and gain the necessary strength. The first 3 are recommended — Regularly moisten the surface for 4 days and protect it from drying out and cracking, covering it with plastic wrap. The formwork can be removed in a week, and then we can proceed to further construction work gelatinous earlier than after 3 weeks - by this time the concrete should gain about 70% of the strength necessary to withstand the increasing load of brick walls.
On the finished foundation you can build the chosen one. We will not consider overly complex complexes. For a novice builder, one of the fairly simple models, which, nevertheless, have good functionality, will be enough.

Any person with basic mason skills should be able to assemble such a stationary barbecue roaster. There is nothing complicated - no ordering is even required. The given diagram will be sufficient, which can be taken as a basis and, if desired, changed in terms of the dimensions of the building or its individual elements.

The design can be changed a little. For example, the photograph above shows that several levels of placement of the roasting pan and grates are provided, respectively, by several rows of transverse laying of bricks. In addition, transverse bricks protruding from the outside can become a support for side tables, which are very convenient for preparing and cutting food right at the barbecue. To do this, it is easy to lay out another brick wall on one or even both sides.

This simple barbecue grill does not involve directional smoke exhaust. True, if such a structure is supposed to be placed in a gazebo, then you can hang a smoke-collection hood on top, like a kitchen hood, and then lead it outside.
The task can be somewhat complicated - build a barbecue with the hearth and chimney completely closed on three sides. It is clear that labor intensity and total costs here they will be significantly higher, but the building itself already looks much more solid and can become a decoration of the site.
There’s probably no need to say a lot here in words - much more information will be provided by the detailed order of the masonry. All that remains is to make some notes on it:

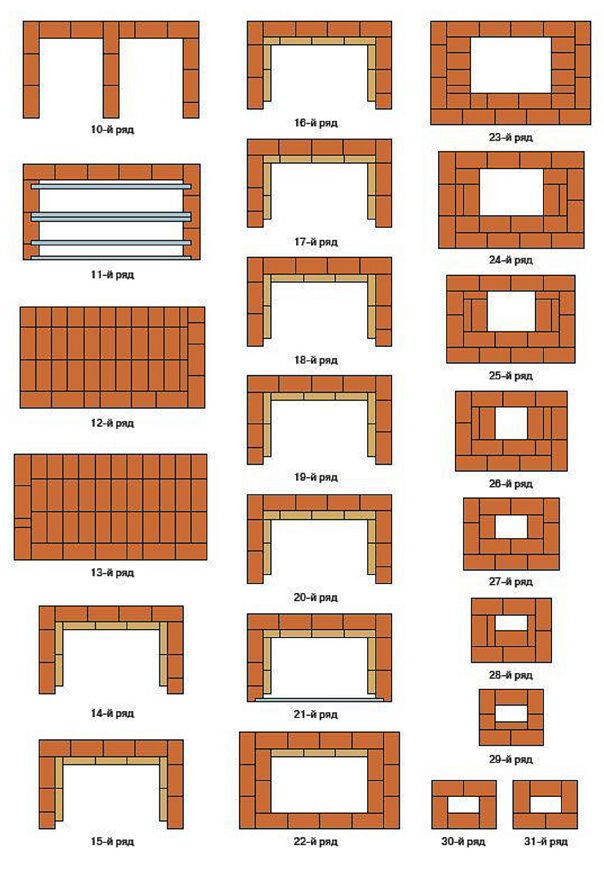 Continuation of the scheme - ordering from the tenth row to the very top of the pipe
 As you can see, in this case there is nothing critically complicated: the main thing is consistency, extreme accuracy and accurate calculation when laying each row, with mandatory control of the horizontal and vertical walls.
Again, this structure can be basic, around which it will be easy to attach cutting tables.

Well, those who still want to build a more complex complex on their own, with wide functionality, with a stove, oven or cauldron for cooking pilaf, are invited to familiarize themselves with the detailed video instructions. This will help you quickly assess your funds and construction capabilities in order to accept correct solution by choosing an acceptable model.
There are a huge number of different projects, for example, corner barbecues, complexes with a cauldron, with a gazebo, etc. The choice of models is limited only by imagination. You also need to take into account the features of landscape design and the design of the gazebo.
What to look for when choosing a brick barbecue project:
Particularly popular among residents country houses and summer residents enjoy a brick barbecue with a cauldron. With them, any event turns into a chic celebration. You can invite your friends over for the weekend and cook delicious meals outdoors.
The cauldron is ideal for these purposes. This model will allow you to enjoy the taste of aromatic Uzbek pilaf, dolma or juicy meat with vegetables. A barbecue oven with a cauldron can be purchased at an adequate price, but if you want maximum comfort, it is better not to get carried away by excessive savings.
A stove with a cauldron can also be used as a regular stove. This makes it possible to cook soup and prepare absolutely any dish. To do this, the hole is covered with a special cast iron sheet.
Conclusion
Having built a barbecue complex on the territory of his country house, you will go to new level comfort. You will not only cook your favorite dishes, but at the same time you will be able to enjoy socializing in the fresh air with your loved ones.
But to achieve such a result, you need to study various projects barbecue and choose the one that best suits your requirements. First of all, pay attention to technical specifications and characteristics on which the safety and reliability of the furnace depends. And only lastly - on appearance designs.


