Many consider it a real headache. After all, this small room is endowed with enormous functionality. In this article, our editors have prepared the most effective and modern ideas on how to renovate a bathroom competently and without hassle. And photos of current interiors will clearly demonstrate what your toilet room, if you correctly use the information from the Homius editors.

shower cabins
Related article:
Choosing an interior style, designer advice, piping layout, floor waterproofing, space zoning, lighting design, finishing materials - in our publication.
A spacious room gives more space for the manifestation of imagination. It can be equipped not only with the necessary set, but also with an optional open or closed shower, installed for storage, additional equipment, and much more. To choose color range There are also fewer requirements than when renovating a small bathroom. In the photo below you can see spacious rooms, for the design of which non-standard solutions for bathrooms were used.
Choosing an interior style is one of the most important tasks that needs to be solved at the initial stage of renovation. Minimalist design trends are perfect for small spaces. They are characterized by strict functionality, the absence or minimal content of decorative elements, and the use of regular geometric shapes.
Today, the choice of designers when decorating an interior increasingly focuses on. It uses a light color scheme, natural materials and a large number of reflective surfaces. A room in a Scandinavian style is cozy.
Large rooms less demanding on the chosen interior style. They allow the presence of various volumetric textures and shapes. You can learn more about the interiors of bathrooms made in different styles using the video.
Related article:
In the publication you will find design styles, layout options, nuances of choosing colors, lighting, fashionable tiles, furniture, designer plumbing, designer advice.
The building materials used in the finishing of bathrooms are subject to increased demands. Materials must be wear-resistant, withstand conditions of high humidity and temperature changes. The surface in the bathroom gets dirty quite quickly, so it is important to choose materials that are resistant to detergents. In this section we will look at the characteristics of the materials that are most often used for finishing bathrooms.
Before finishing the room, you should carry out preparatory work. They consist of leveling surfaces and priming. Only after this the finishing of the room is carried out.
After all the finishing work has been completed, you can begin working on the furniture. It is important to adhere to standards that are aimed at ensuring comfortable access to the interior item. The rules for installing plumbing equipment in accordance with SNiPs are described in detail in the video below.
If, in addition to the necessary plumbing fixtures, you plan to install storage areas and any furniture, it is important to ensure easy access to them.

Article
A bathroom can be renovated exquisitely, even using the simplest building materials. It is not necessary to purchase elite porcelain tiles and lay them on the walls right up to the ceiling, order stretch ceiling, spend money on arrangement heated floors With marble, all you need is a desire to do repairs, the ability to use tools and a little bit of good taste.
Under the word “budget”, the article will consider finishing options with the most affordable materials:
In addition, the secret of creating an interior in style will be revealed and it will be proven that brick as a finishing material in the bathroom is not inferior to other materials. After all " budget renovation"can also be stylish.
Painting walls is considered one of the easiest and least expensive finishing methods. It is important to choose the right paint and prepare the surface of the walls.
Advice! Create a design project for your bathroom. It is not recommended to paint absolutely all surfaces; it is advisable to cover the areas near the bathtub and sink with moisture-resistant panels or decorate them with an apron made of inexpensive ceramic tiles.
Bathroom paint should have antibacterial properties and be moisture resistant. Otherwise, the appearance of fungus and peeling of the coating cannot be avoided.
Traditional oil paints do not have this advantage, and also quickly become covered with cracks, so it is better to immediately abandon this option.
When choosing shades, remember that bathrooms small area inappropriate to paint in dark colors, since visually this will further reduce the space. Do not overdo it with the number of bright spots or complex patterns and their quantity so that the interior does not look vulgar. Soft pastel shades will visually expand the room and fill it with light.
Please note that paints can be matte, glossy or semi-gloss. Of this variety, it is matte enamels that best hide small defects on the walls, while drops and streaks are clearly visible on glossy surfaces. However, if you cannot make a choice, consider a combination of glossy and matte surfaces. This technique will make your bathroom modern and stylish without significant costs.
bathroom paint
Don’t forget to remove all the furniture from the bathroom, remove the mirrors, cover the faucets with masking tape, and cover the plumbing fixtures with film or newspaper, because preparing the walls for painting is the dirtiest and most time-consuming stage.
You should not apply new layers of paint over the old peeling one, nothing good will come of it. If you have a drill in your arsenal, get a couple of sanding attachments for it and clean off the old paintwork from the walls. Remember safety precautions.
Paint can be removed using thermal methods, for example, using a torch or construction hair dryer. Heat a section of the wall and scrape off the peeling coating with a narrow spatula.
When all the old paint has been removed from the walls, it is necessary to repair cracks and potholes and knock down protrusions.
Prepare paint and tools, follow manufacturer's instructions. To apply paint you will need a roller, brushes, if you have a spray gun - great. Before purchasing, measure the area of the surfaces to be coated and adjust the amount of material taking into account the volume. For high-quality painting, it is better to apply two layers, keep this in mind when purchasing.
Free yourself from unnecessary items workplace near the walls, if you are not going to redo the floor coverings, then cover them with film or paper. Carefully protect the bathtub and sink from contamination.
Start your work from the most inconspicuous corner, in this place you can learn the properties of the paint in practice and, if necessary, dilute it to the optimal consistency. We recommend painting the walls with a roller, and using a brush to treat only hard-to-reach areas, corners and borders of joints of different colors. Panels in the bathroom are still in fashion; if you plan to make them, mark the height on the wall and draw a horizontal line.
Apply primer deep penetration on the wall. It will not only improve the appearance, but also increase the durability of the coating and reduce the likelihood of paint peeling.
Apply a second coat of primer over the first and wait 24 hours
Pour a portion of paint into a special plastic tray for rollers. Dip the roller into it, turn it several times, remove excess paint on a horizontal surface.
Practical advice. To minimize the chance of paint getting on the floor, give the roller a spinning motion before blowing it out of the tray.
Start painting from top to bottom, this method reduces the likelihood of drips forming, they are immediately smeared, and the roller “rolls” over them. Paint carefully, do not allow any omissions. Don't be upset if the first coat looks ugly, this is expected. The fact is that there are areas on the wall with old and new plaster, remnants of un-removed coating, etc. They all absorb paint differently, which is reflected in the appearance. The second coat will correct all problems, the finish will be uniform.
Paint in small areas, immediately correct difficult places with a brush. The paint should smooth out lint marks on its own. If this does not happen, add solvent to it. Pay attention, so that he is conscientious, read the instructions for use. If in doubt, test the solvent for compatibility with a small volume of material; if the paint has curled, change the solvent.
It is advisable to apply the second layer when the first one is not completely dry, this increases the adhesion coefficient between them. It’s easy to check the readiness of the surface - run your fingertips along it, they should not get dirty, but only “creak” a little.
If you are making a multi-colored panel, then you need to paint the surface in the second color only after applying two layers of the first. In this case, start working from the top of the wall; the panel is finished last. This way you will be protected from paint getting onto finished areas. Glue along the border line masking tape. Make sure that the paint does not flow under it; paint only with a brush, moving in the direction opposite to the tape. Never apply tape to paint that is not completely dry, this is very important. If it is glued to a freshly painted surface, then during removal from high probability Some of the paint will be removed along with it, and everything will have to be redone.
The cost is slightly more expensive than the first method, but in terms of design indicators it is much better. And the preparatory work is greatly simplified; there is no need to remove old coatings, level the walls and seal cracks in them. The sheathing for the panels can be made from wooden slats or special plastic profiles with clips. We recommend using the second option. The cost of plastic additional elements has almost no effect on the cost of repairs, and the work is greatly simplified. In addition, the plastic profile is not afraid of moisture, which is very important for bathrooms. Wooden slats need to be impregnated with antiseptics - an additional waste of time.
Count the quantity required panels, make a reserve of 5–10%. If you have little experience, but the bathroom has a lot engineering communications, to close which you will need to trim the panels, then take a reserve of 10%. At the same time, estimate the number of starting profiles, external and internal corners. They are sold at a standard price, cost a penny, and there is no need to save money.
The panels are arranged vertically, the sheathing must be made horizontal. The distance between the planks is 50–60 cm. Make markings on the wall, making sure that the lines are parallel. The sheathing is fixed with dowels, drill holes with a drill and hammer drill, use drills with pobedite tips. To prevent the floor from getting dirty with construction dust, cover the area near the wall with film or paper. Once all the holes are made, remove it immediately. Don’t leave cleaning for later; practice shows that no matter how carefully you work, garbage will definitely spread throughout the bathroom.
Make the holes a few centimeters deeper than the length of the plastic part of the dowels, otherwise you will not be able to insert them all the way, dust will interfere. First, drill the two outer holes, attach the profile, then fix it in several more places. The horizontal distance between the dowels is 60–70 cm.
How to fix elements in one plane?
Take measurements of the wall in at least three places. If they have a spread of no more than a centimeter, then the work is noticeably simplified - all panels can be cut to size at the same time. To do this, you need to find out the shortest one and use it to cut all the others. Stack the panels in stacks of 5–10 pieces. on a flat plane and use a grinder with a metal disc to cut it. A discrepancy of up to one centimeter will be hidden by the ceiling and floor profile. It is installed at the top between the wall and the stream and at the bottom at the junction of the wall and the floor. Place plastic corners on the sides.
Take the exact dimensions of the last panel and cut it lengthwise. You can cut with a mounting knife or grinder. If you use a knife, the operation must be done in two stages. First - cut top part and transverse stiffeners. Second - bend the panel, at the bend on the second side, use a mounting knife to completely cut off the required part.
Finish the remaining walls in the same way. Practice shows that it is better to make the area near the bathtub from ceramic tiles. You don’t have to cover the entire wall, just an apron. The main thing is to close the area that constantly gets water during water procedures.
For wallpapering, you can use only waterproof types. This finishing method has a number of undeniable advantages.
Disadvantage: wallpaper is inferior in terms of physical strength traditional materials. But, if you behave carefully and avoid mechanical damage, the period can be calculated in many years. In addition, defects on the wallpaper can be easily eliminated; after pasting there will always be a small amount of materials. Don't throw it away, keep it “just in case” for repairs.
It goes without saying that only waterproof ones. When purchasing, pay attention to physical strength, and it depends on the material of manufacture.
| Wallpaper type | Brief performance indicators |
|---|---|
| The most modern, characterized by high performance mechanical strength, may have prolonged direct contact with water. Available in wide range colors, can be plain or with various patterns and ornaments, with a structured or smooth front surface. Disadvantages - relatively high price, the need to use special glue. | |
| Cheaper segment operational characteristics inferior to vinyl. It is recommended to use in areas of the wall that are not exposed to splashes of water. | |
| They are made from a special polymer film and have a huge number of design solutions. Disadvantages - relatively high price and complexity of finishing. In addition, they can only be used on perfectly flat surfaces. |
How to glue wallpaper correctly so that you don’t have to constantly re-glue the peeling areas?
Most important point production of work, of course, not counting the correct choice of wallpaper. The linearity parameters of the wall affect not only the appearance of the wall, which is very important, of course. On uneven wall It is even theoretically impossible to glue waterproof wallpaper. This means that there will definitely be air pockets and other places where the wallpaper is not glued. While using the bathroom, these areas constantly increase in size, and this continues until the peeling becomes noticeable. Repair will be required; perfectly aligning the wallpaper after repair is quite difficult, and in some cases impossible. What are the requirements for the wall surface?

Surfaces must be primed in two layers, this increases the reliability of adhesion and serves additional protection from moisture penetration.
Calculate the surface area, make a small reserve. Each roll of wallpaper indicates the length, width and total area. Use this information when purchasing materials. Do the same when choosing glue.
Measure the height and width of the wall, cut required quantity stripes The stripes, depending on the pattern, can be applied end-to-end or overlapping. Cut with a small margin in length, it will then be removed with a knife, the uneven cut will be buried in the ceiling and floor skirting boards.
Practical advice. It is most difficult to glue wallpaper in the corners of the room. The fact is that they can have slopes, and this has a negative impact on quality. To prevent such consequences, never make strip joints at the corners; try to have them in the middle in these places.
If you do not pay attention to this nuance, then on the entire adjacent wall the stripes of wallpaper will be slanted, and this is a big waste.
To apply glue you will need a large room; the bathroom, as a rule, does not have such dimensions. Decide where exactly you will prepare the wallpaper. Take measures to prevent contamination of floor coverings, do not allow glue to get on front surface. When wallpapering walls, neatness is one of the important conditions quality work.
Carefully squeeze out the air from under the wallpaper. You can use rubber spatulas or rollers. But it is best to do the work with clean, dry hands. This way you will feel the irregularities and be able to eliminate them in a timely manner. It happens that an air pocket is discovered late, several strips of wallpaper have already been pasted. It's not a problem. Poke the air bubble in 2-3 places with a needle, after which you can press the wallpaper again, it will take the desired position.
Without pressing, cover the switch with wallpaper and make a diagonal cut through it. Carefully cut out the edges and press the wallpaper to the wall
Once the glue has completely dried, cut off the excess length and attach the baseboards. Skirting boards are attached liquid nails or in other ways, taking into account the material of their manufacture.
The style is quite fashionable among young people, but it is difficult for older people to get used to it. The loft style is a method of renovating various premises, including industrial ones, with minimal financial losses. All structures remain in the same place, construction works surface finishing is carried out without the use of additional materials. Leave old plumbing and sewer pipes in the same place, you can remove them old paint and apply a new one. There is no need to try to make them match the wall; on the contrary, use contrasting colors that emphasize the placement of pipelines. If problem areas are identified, correct the problem immediately.
As for the walls, you can remove old plaster to the brick, fill large depressions with cement-sand mortar, but do not level or rub in. Wipe the brickwork with a wire brush, trying to highlight the position of each brick. The older the seam and brick, the better, the more modern the loft will be considered. Everything should be simple and natural, no plastic sheathing, plasterboard, etc. finishing materials.
Professional builders recommend finishing the section of the wall directly next to the bathtub with ceramic tiles, and making the remaining surfaces look like a loft. This approach will allow us to combine modern fashionable design premises while maintaining the usual level of amenities.
Previously, renovating a small bathroom came down to replacing outdated or broken plumbing fixtures with new ones and changing finishing materials. Nowadays, when people strive to make their home not only comfortable and functional, but also especially beautiful, using various stylistic directions, repair turns into a rather painstaking process. In old buildings there were still small bathrooms, moreover, very often divided into a bathtub and a toilet. In order to competently organize the renovation of a small bathroom and toilet, you need to learn some of the tricks used by designers in order to achieve the greatest convenience and comfort. Today Dekorin will share some of them with you.

The first thing you need to focus on when starting a bathroom renovation is the layout. Drawing up a project is the main stage that determines all further work that will be required to renovate a small bathroom. It is important to decide on the amount you are willing to spend on repairs. There will be quite a lot of expense items. In addition to purchasing materials and plumbing, you need to take into account the work of qualified specialists who will carry out all repair work. Even if you decide to do everything yourself, some help may still be needed. By the way, in order to demolish a partition or create a niche for built-in plumbing in a load-bearing wall, permission from the relevant authorities will be required.
The project should reflect the renovation of a small bathroom and toilet from “A” to “Z”. In the project, it is important to take into account the location of plumbing fixtures and furniture, the laying of additional communications, niches and projections in the walls, finishing options, placement of mirrors and lamps. In everything, accurate measurements and calculations are necessary, since what lies ahead is the purchase of all the necessary interior items and materials.


When choosing surface finishing options, you need to take into account the microclimate of the room - high humidity, temperature changes and evaporation. The most common use of ceramic tiles, porcelain tiles and plastic panels, although in some cases, the renovation design of a small bath may involve painting the walls or another option. WITH color scheme To decorate the bathroom, you also need to decide in advance. We will look at what colors and shades are best to use in the article below using the example of individual rooms.
Many old-style apartments, for example, Khrushchev-era apartments, have a combined bathroom, and this gives big advantage in organizing space as functionally and aesthetically as possible. If it is separate, this problem can be eliminated by dismantling the partition wall. Combining a bathroom will expand the area and make it possible to renovate a small bathroom combined with a toilet (photos show similar options) in the most successful way.


In addition to dismantling the wall, it is also necessary to get rid of all the previous finishing, after which the necessary communications and electrical wiring are laid, as well as work on treating the surfaces of the floor, ceiling and walls.
Repairing a combined small bathroom, first of all, involves equipping it in such a way as to make the space as spacious and functional as possible. The effect of a spacious room can be achieved by using light colors for the walls and ceiling. The ceiling part is being decorated suspended ceilings, having a mirror surface or a suspended structure made of plasterboard, which can be made two-tier, equipped with spotlights. The floor mainly involves the presence of tiles. Floor tiles should have maximum strength characteristics; it is better that it has a rough surface for greater safety in the bathroom. By color - it can be like dark version, and light.


Repairing a small bathtub in a Khrushchev-era building, as seen in the photo, will look best in light colors walls Mirror surfaces on the walls also contribute to the visual expansion of the space of the room. If the finishing material is ceramic tiles, you should choose a model of medium or small sizes; the presence of a pattern on the finishing surface is, in principle, undesirable; in extreme cases, it should also be small so as not to “load” the space.


Repairing a small bathtub in a Khrushchev building requires the presence of the necessary plumbing structures. For a combined bathroom this can be a bath, toilet, shower, bidet and washbasin. In a small space, it is impossible to install all the equipment, so we choose the bare essentials. The best option would be a shower cabin, as it will take up much less space than a stationary bath. If you still choose a bathtub, it can be standard (longitudinal) or corner, which will also leave some area free. Having started the renovation of a combined small bathroom, you must immediately decide on the model of the toilet (a wall-hung structure will require installation). The wall-hung design of the toilet will also help to gain space.

Furniture for a small bathroom should be chosen to a minimum: it could be a neat stand with shelves for various accessories, a bedside table for a washbasin, etc. Often, a place under the bathtub is allocated for storing detergents and cleaning products, hidden from prying eyes using a frame with doors or curtains. In small apartments, one of the problems is installation washing machine, which should be located in close proximity to communications (kitchen, corridor or bathroom). It can be installed in a spare place if a small bathroom with a shower stall is being renovated, or it can be “hidden” in a bedside table under the washbasin.
If the family is quite large, combining a bathroom will not always be a profitable option; having a separate bathroom and toilet will become much more convenient. There can be quite a lot of ideas for renovating a small bathroom, but the basic principles of its design remain the same - light finishes, multi-level lighting, the presence of mirrors and a minimum of furniture.


When renovating a small bathroom, you should take care of having a good exhaust system, since there is a constant accumulation of steam in a closed room of 3-4 square meters. m. may lead to adverse consequences for the interior.
The shape of the bathtub will largely depend on the room itself and can be either corner or standard. You can store various washing and cleaning supplies in an equipped niche under the bathroom; the bedside table under the washstand will serve as a storage area for cosmetics, towels, etc. For hygiene products used daily, a small hanging glass shelf above the sink is well suited.

Nowadays, you can often see a small bathroom being renovated with the installation of a shower stall. It is better that its doors are glass and have a sliding design. This will make the bathroom look much freer.


In the previous material, we looked at the main points of optimal organization of a bathroom within a small space. But there are still many different nuances that also need to be taken into account and used during repairs.
You need to install the door to a small bathroom in such a way that it opens outward or use sliding structures. In combined bathrooms, it would be advantageous to have a doorway located near one of the side walls, and not in the center.
Renovating a small bathroom cannot include architectural zoning (steps, podiums, partitions, etc.) due to the small area. Selecting areas is possible using different shades color palette with a smooth transition or lighting design. You can equip the shelves with built-in niches so as not to break up the space with hanging elements that interfere with the spread of light.

Lighting can have two levels. The first is wall and ceiling lamps (preferably made of frosted glass), which emit diffused light that promotes relaxation and rest. The second one is located in work area near the mirror. You can use LED strip to illuminate niches.


When choosing plumbing fixtures, it is better to give preference to porcelain products - they are much easier to clean. When choosing a mixer, you should pay attention to new models of thermostatic mixers - they are somewhat more expensive than classic valve mixers, but more economical and reliable. The cost of purchasing such a model will very quickly justify itself.
The renovation of a small bathroom involves the following sequence of work: dismantling old equipment and finishing, installation of piping, electrical installation, leveling of the top and side surfaces, finishing of walls and ceiling surfaces with the installation of electrical points, floor treatment, including screed, waterproofing and finishing, installation of equipment and, Finally, installing the door.
Renovating a small bathroom is a troublesome task, but the result, in most cases, is worth the effort and time spent. It is worth noting that renovation in a small space has its positive side, which manifests itself in much lower costs for the purchase of finishing materials and the work of specialists. In addition, by choosing one of the directions for decorating your bathroom modern design, you can make it the real pride of your home.
Renovating a small bathroom - 35 photos good design interior updated: December 14, 2017 by: Kyiv Irina
As experts are sure, finishing an apartment should begin with renovating the bathroom and toilet. And this is not without meaning, since it is, in principle, possible to live without wallpaper, but without a working toilet or sink it is quite difficult. In addition, bathroom finishing work is considered the most difficult, and it is better to perform it with fresh energy that has not yet been spent on other rooms.
When starting a bathroom and toilet renovation, many people are perplexed by one important question: what is the best way to start a bathroom renovation? And it must be said that it is not in vain, since the quality and timing of finishing directly depends on compliance with the order of work.
Bathroom and toilet renovation - photo
Depending on the condition of the bathroom and toilet, there are two main types of repairs:
We will consider the most difficult option - major repairs. Most of the rooms in our apartments are small in size and therefore require redevelopment.

Before you start repair activities it is necessary to develop the design of the future bathroom and toilet. And this is impossible without first selecting plumbing fixtures, since these items occupy the main place in these rooms:

We propose to consider the implementation of these works in more detail, as well as find out what can happen in the end.

IN small apartments, where all the rooms are not just small, but are truly tiny in size, the partition between the bathroom and the toilet is usually demolished. Due to this, the area of the room increases slightly, but the bathtub and toilet remain in place. And the whole layout of a bathroom combined with a toilet is to decide on the choice and placement of the remaining plumbing fixtures and washing machine. But even here you can show your imagination.
 Bathroom and toilet renovation photo
 The main criteria when developing a sketch of such a room should be practicality, functionality and hygiene. It is equally important that the repairs performed last a long time, and this requires finishing and repair work to be carried out while maintaining technology and using only high-quality materials.
It is worth paying special attention to the renovation of the floor in the bathroom and toilet. Due to various types of accidents, both premises have a fairly high risk of flooding the lower neighbors. Therefore, when carrying out overhaul The floor covering must be pre-waterproofed, and then a screed is poured on top or a “warm” floor is installed.
 Floor in toilet and bathroom
 The classic option is floor covering tiles big size. Inexpensive quality alternative option You can use waterproof linoleum. However, be prepared for the fact that its service life is short compared to tiles. And this finishing material will most likely have to be changed much earlier than the rest of the finishing.
For lovers of luxury good decision will be the use of natural stone. However, such material must be used extremely carefully; it can visually reduce an already small room.

Regardless of what material the repair will be used, you will first need to level the walls. It’s just that the degree and quality of leveling will directly depend on the choice of subsequent finishing:

And for all types of finishing it is imperative to check the verticality of the walls and the horizontality of the ceiling. Otherwise, subsequent repair work will be quite difficult.
After preliminary preparation of all surfaces in the room has been completed, you can begin to carry out communications. Change metal pipes for products made of metal-plastic or polypropylene, and you will forget about accidents and leaks for a long time.

If it is necessary to move pipes, it is better to call a plumbing specialist from a housing office for this work. Firstly, it is assumed that he will do his job efficiently, and secondly, this will subsequently save you from possible problems with the management company.
By the way, in the process finishing walls, all communications can be hidden in plasterboard boxes. This will provide a neat and attractive appearance to the room.
The most interesting, but at the same time, time-consuming work is performing final finishing premises. And here there is room for imagination:
Most often, ceramic tiles are used as a finishing material due to its excellent performance properties, durability and easy care. And most importantly, it fully complies with the basic requirement for a bathroom and toilet – hygiene.

Another advantage of ceramic tiles is their versatility; the tile goes well with almost any building materials. By finishing the lower part of the walls with tiles and the upper part with paint or plaster, you will get a functional and attractive wall covering.
If the entire surface of the walls is tiled, you can revive and decorate the coating with the help of decorative borders and inserts. And using tiles of different colors, you can visually correct the unsuccessful geometry of the room.

Mosaic can be considered one of the varieties of ceramics. The advantages of this material include a wide range of applications (almost any surface can be laid with mosaics), ease of cladding and, of course, an attractive finish.

One of the most inexpensive options for finishing walls in the bathroom and toilet is painting the surfaces with waterproof paints. At the same time, designers recommend using for rooms with high humidity glossy compositions. Firstly, they visually expand the space of small rooms, and secondly, caring for such coatings is much easier.
If a room painted in one color seems boring, you can use vinyl decals to liven up the environment. Or use paint in different shades while maintaining the same color.

A good solution would be to make your own drawings on the walls. This will give the premises originality, and you will have a reason to be proud of yourself.
Thanks to modern technologies Today, for the bathroom and toilet, you can even use building materials that have never been used to renovate such premises before:
Decorative plaster is quite suitable for rooms with high humidity and constant temperature changes. The main thing is to use a composition that is not gypsum based.

Finishing the walls with plaster will give the room a noble look, and the huge variety of colors offered on construction market, will allow you to choose the shade to your liking.
No less interesting will be pasting walls with vinyl or self-adhesive wallpaper. This option, of course, is inferior in durability to other building materials, but if necessary, it is easy to replace it with a new one.
Besides, in Lately decorating bathrooms and toilets with wall panels is gaining popularity plastic panels. Today, manufacturers of this material offer a huge number of different colors and sizes, which allows you to create a truly interesting and original interior.

And finally, ways to finish the bathroom ceiling. Here the options are not as varied as for walls, but you still have your preferences:
 Ceiling for bathroom and toilet - photo
 For low ceilings Painting it in classic white or installing a tensioned glossy model would be suitable. At the same time, you should worry about high-quality lighting in the bathroom and toilet, otherwise all efforts will be in vain.
For high ceilings There are several more options. Here you can use both suspended and suspended ceilings various shades harmonizing with the color of the floor and walls.
In the photographs presented you can see the most interesting finishing options for both separate and combined bathrooms and toilets. We hope that such results of bathroom and toilet renovation (photo below) will encourage you to carry out finishing work in these rooms with your own hands. 


Professionals are sure that you should start with the bathroom, since you can live with the old ones, but with poorly functioning plumbing and leaking pipes it is problematic. In addition, this is also the most difficult and costly expense item, which often does not end. You need to carry out such work with fresh energy, not spent on remodeling other rooms. Today, in the review of the editorial website, we will tell you how the renovation of a bathroom and toilet differs from that of a premium class, and we will also look at the process step by step.
Bathroom and toilet repairs can be cosmetic - they are carried out only without interfering with the communication system. The second option is capital, it is being carried out complete replacement pipes, redevelopment, finishing and and. Financially, both types of repairs differ significantly; in each case, you should approach the issue of global changes individually.

Not everyone can afford expensive renovations in the bathroom and toilet, but this does not mean that you cannot make an economical option, and at minimal expense you can bring to life the most original ones. Our photo collection includes low cost solutions turnkey renovation of bathrooms and toilets.

Choosing a design budget finishing, you should abandon dark shades - they will visually reduce the space. Excellent solutions for inexpensive bathroom renovation options are presented in our photo gallery.


Related article:
In the publication we will look at sizes, applications, varieties, advantages and disadvantages, criteria for choosing the right panels, average prices, popular models, expert advice.
Modern bathrooms have a small area; the layout of the apartments does not allow for expansion of the space, so the choice of finishing materials should be more picky. The main mistake of many owners is choosing a dark or contrasting palette with an abundance of decor. We have selected some great ideas that will help you choose a more rational solution.


Related article:
If you are thinking about a stylish and elite interior decoration, then we recommend that you view various wallpapers for walls, a catalog of photo ideas in the publication of our portal, what will help you do right choice canvases, and give your apartment or house an unusual look.
The modern design of a bathroom and toilet, including combined ones, is characterized by simplicity, attractiveness and practicality. All content should be as functional and aesthetic as possible. Today designers offer enough interesting options, which can be selected for any area. Experienced craftsmen are capable even in conditions inexpensive repairs decorate the space beautifully.


VIP-class renovation is the creation of an exclusive space in one area. They first turn to professional designers, who, taking into account the wishes of the owners, create a unique project, often with the relocation of plumbing and remodeling. The decoration uses expensive materials, designer furniture and equipment from famous brands.
When developing a project for a bathroom, designers select a design that would be in harmony with the rest or. In the selection of finishing materials, emphasis is placed on the following:
VIP-class repairs will require complete dismantling of all finishing, relocation of communications and installation of electrical wiring. After which rough and finishing work and installation of equipment are carried out, etc. The bath bowl is often equipped with a Jacuzzi or hydromassage function.
The choice of slatted finish is a wonderful and inexpensive option for use in damp environments. To install it, you will need to install a frame; it will reduce the area of the room by at least 5 cm on each side.
Advice! Choose a light palette for the walls - it visually enlarges the space. However, you need to remember that a crystal white room will be uncomfortable to use - such a range is reminiscent of an operating room. wow.


Related article:
A flat ceiling can be updated with water-based emulsion or simply whitewashed. The work is simple and you can easily do it yourself. If the surface has large flaws or the laying of communications is required, you should pay attention to rack structures or calculate the feasibility. In many cases it justifies itself.
For the floor, the most practical solution is tiles; you should choose a rough surface. The coverage area is small, and purchasing ceramics will not greatly affect the budget. And also masters allow use without a base.


Related article:
: advantages and disadvantages, what it consists of, what is the difference closed type from open; what materials are they made from, what sizes and shapes are there, photos design projects, customer reviews - read in the publication.
Before repair work it is necessary to assess the condition of communications, electrical and plumbing equipment.
When choosing plumbing fixtures, give preference to Russian manufacturers - the quality is no worse than imported ones, and the cost is an order of magnitude lower. Today, stores offer a huge variety of bathtubs made of metal and cast iron, and you can also supply them, which will be a good option for active people.
Advice! If cast iron bath still in good condition, it can be restored or installed acrylic liner- it will be much cheaper than buying a new product.
Don't forget about the heated towel rail: modern models have a presentable appearance, which affects the aesthetic perception of the bathroom. If the product is in good condition, you can simply choose paint to match the color of the interior and paint it yourself.


Before starting work, you should first determine the need to replace the pipeline. If the system is hopelessly outdated, there is no point in repairing it. Today the following products are available to owners:


Before starting repairs, you need to draw up an estimate and calculate as accurately as possible the scope of work and the cost of materials. The final version will be more expensive, so you should have about 25% of the funds in reserve.
The cost of renovating a bathroom and toilet consists of the following costs:
In addition, it is necessary to take into account the following costs: drawing up a design project, including visualization, transportation costs, work of loaders and waste removal.
Important! The better you measure all the areas and draw up a detailed diagram, the more accurately you will be able to calculate the costs of renovating the bathroom and toilet.

When decorating a bathroom and toilet, it is important to observe technological process. Our step by step instructions repairs of separate and combined premises will help you do everything correctly, and you will also be able to clearly determine what you can do with your own hands, and for what work you will need to invite specialists.
Let's start renovating the bathroom.
| Illustration | Description of action |
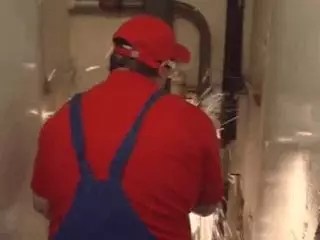
 | On preparatory stage All finishing is removed, pipes are dismantled, the heated towel rail is dismantled. In addition, on at this stage It is necessary to make markings in the wall and cut shallow holes for decorative niches. |
 | Decorative niches will be tiled. |
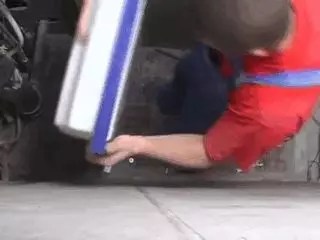
 | Before covering all the walls. |
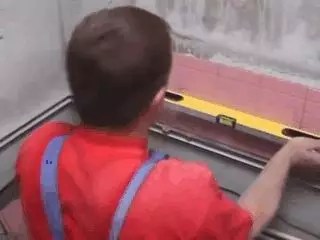
 | Align the walls with the beacons. |
 | According to the project, there will be niches on the ceiling with . To do this, you need to make a frame from profiles. |
 | Install and secure electrical wiring to the ceiling. |
 | Route the air ducts to common system and secure it to ceiling structure. |
 | Laying metal-plastic water pipes and sewer pipes. |
 | Installation of tiles begins at a distance of 30 cm from the floor level on a profile that is set according to the level. White was used for the seams. |
 | The floor and lower part of the walls are covered with two layers of coating waterproofing. |
 | Install a drain and overflow system on the bathtub, as well as legs, after which you can put it in place |
 | Laying tiles on the floor must be regularly checked with a level. |
 | Connect the cabinet to the wiring and install it. |
 | Install a chrome stand with a holder and a soap dish above the bathtub. |
 | Install the mixer, holder for the watering can, and connect it to the water supply. |
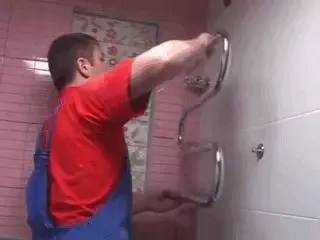 | Secure and connect the heated towel rail. |
 | Close the niche under the bathroom with a plexiglass door. |
Renovating a bathroom in an apartment begins with the complete dismantling of finishing materials; then we will consider all the work in more detail.
| Illustration | Description of action |
 | cut off the outlet from the common house, make threads on the remaining ends of the pipes. |
 | Mount the tee using plumbing paste and tow. |
 | Connect the tee to a bypass jumper equipped with a ball valve. Install ball valves on the tees, from which new outlets for the heated towel rail should be drawn and led into the bathroom. |
 | Install a shut-off valve, filter, reducer in the niche of the plumbing duct, check valve, collector. |
 | To save space, mount it to the toilet. Fix the frame at 2 points to the wall and at 2 points to the floor, then cover it with plasterboard and lay tiles on the walls and floor. |
 | Cover the ceiling with plasterboard, cut a hole for the lamps and strengthen the edges metal corner, planted on the solution, putty and paint it. |
 | Close the communications with a frosted plexiglass door. |
You can watch the master class on renovating a bathroom and toilet in more detail in the video:
Combining a bathroom with an area of 170 × 170 cm with a toilet 80 × 170 cm allows you to increase the room to 250 × 170 cm. Connection options depend on the project, most often it is the complete dismantling of the partition. Renovating a combined premises requires careful interior planning; you must first draw up a project and select the optimal equipment. To save space, you must follow the advice of professional craftsmen:
Today manufacturers offer different variants toilets for a small area: can be installed corner model, and replace the bath with a shower. And also an excellent solution - combining it with a washbasin fixed above the top panel.

Sequence of renovation of a combined bathroom and toilet
Repairing a combined bathroom is a little more complicated and consists of the following stages of work.
Let's bring approximate calculation prices for a major overhaul of a combined bathroom and toilet with an area of 2.2×1.7 m and a ceiling height of 2.5 m:
The total cost of finishing the combined bathroom was 45,900 rubles. at this stage you can save money by doing some of them yourself. To this figure you need to add the costs of purchasing materials, equipment, fasteners, and accessories. Practice shows that they will cost at least 30,000 rubles.
The main task of renovation in the bathroom and toilet is to create comfortable conditions for owners when using sanitary facilities. When choosing equipment and materials, preference should be given to durability and simple care. In addition, when deciding to combine a bathroom, owners should plan ahead. If the family grows in the future, it is unlikely that this will provide comfort to all users.
Now you know how much it costs to renovate a bathroom and toilet, and you can properly plan the costs for it. If you have any questions, ask them in the comments - our experts will be happy to answer them.
And finally, we suggest watching a video of an economy class bathroom renovation:


