In the bathroom and kitchen, it is recommended to use ceramic tiles as flooring, which are not afraid of moisture, are easy to clean and look aesthetically pleasing. But the owner of a private house often faces the question of whether it is possible to combine a wooden base with a tiled floor, and how to lay tiles on a wooden floor?
Failure to follow the rules for preparing a wooden base and installing tiles leads to dire consequences:
Wood – natural material, which is subject to deformation under the influence of humidity and temperature environment. Tile requires a base that is resistant to deformation. To remove this contradiction, certain technologies for preparing wooden structures are used, Special attention paid to the choice of materials for installing tile flooring, which must be airtight.
Laying tiles on a wooden floor is allowed in houses where the shrinkage period has completed or is nearing its end. Between the tiled cladding and the wooden base, a layer with damping properties is needed, which will absorb the movement of the base. At the same time, this layer will protect the wood from moisture penetration and prevent biological damage to the floor structures.
Before laying tiles on a wooden floor, you need to tidy it up. Skirting boards and paneling door frame removed, the old floor is completely dismantled, the flooring boards are sorted out - damaged elements must be replaced with new ones, varnish, paint or the top layer of wood that has absorbed dirt is removed from the old floorboards.

To remove paint or varnish from old floorboards, the following methods are used:
The top, contaminated layer of wood is removed with a manual or electric plane. Prepared flooring boards are treated with an antiseptic and a product with water-repellent properties (or a universal composition) - this will extend the life of the wooden base of the tiled floor.
Carefully inspect the joists - the reliability of the floor depends on their condition. You should first calculate the load on the base, based on the mass of the wooden flooring, tile cladding and materials that will also be used to create a multi-layer structure. It may be necessary to increase the cross-section of the joists or reduce the step between them. The logs are also treated with an antiseptic and water repellent.
The next stage is the installation of logs and plank flooring. It is important to avoid height differences and creaking; for this purpose, the logs are secured, checking the horizontal level. To insulate the structure, the gap between the subfloor and the top flooring is filled with small or medium-sized expanded clay. This heat insulator is not afraid of moisture and helps remove it from wooden structures.

A ventilation gap of 5-6 cm should be left between the surface of the backfill and the flooring. It is also necessary to provide a gap of 3-5 cm between the wooden floor and the walls so that the flooring does not swell when the wood expands under the influence of heat and moisture.
A vapor barrier is laid on top of the logs - a layer of kraft paper with a polymer coating. Next, the flooring is installed, for which you can use:
Option 1.
The use of DSP has a number of advantages: they are characterized by durability, resistance to biological damage, and increased moisture resistance. Cement particle boards do not contain components harmful to human health. This material is suitable as a base for tiles.

DSP boards are attached to the joists with self-tapping screws. The elements are laid with a shift of half the width for structural rigidity. The joints between the slabs are filled polyurethane foam for creating waterproof base. The base should be treated with a primer (mastic) that increases the water-repellent properties of the material.
Option 2.
It is better to lay tiles on a wooden plank floor if the flooring is assembled from boards attached to the joists with self-tapping screws. A gap of 3-5 mm is left between the boards to compensate for expansion. This design is not prone to loosening and there is virtually no risk that the floor will swell over time.
If you plan to lay the tiles on a plank base, roll waterproofing material in two layers is laid on top of it. The overlaps of the strips when installing each layer must be at least 15 cm, the joints are glued with reinforced mounting tape. The second layer of waterproofing is laid offset so that the seams are not located directly on top of each other. The waterproofing material must extend onto the walls by at least 10 cm.
A reinforced screed 10 cm thick is installed on top of the waterproofing. It is recommended to use a modified composition with increased elasticity and resistance to cracking. An elastic screed compensates for movements of the wooden base. The screed is laid along the beacons in the direction from the far corner to the doorway. After the material has hardened (after 3 days), the surface is made strictly horizontal using a thin layer of self-leveling mixture.

Option 3.
If it is in good condition, a sheathing made of moisture-resistant plywood is mounted on top of the boardwalk, and all joints are filled with polyurethane foam. After removing excess hardened foam, the surface of the base is impregnated with an antiseptic and water repellent.
Then a painting mesh is attached to it using self-tapping screws and a layer is applied special solution, which consists of water, coarse sand and liquid glass (in a ratio of 1:2:2). Tiles can be laid on a dry surface. It is also possible to use special polyurethane glue as an elastic screed over a wooden base.
Note! Materials such as chipboard, gypsum fiber board and ordinary plywood are not recommended to be used to prepare the bathroom floor for cladding - they are less resistant to moisture and require high-quality waterproofing. Laying tiles on a wooden floor, the flooring of which is made of boards or fiberboard, is a more reliable option.
The kitchen floor allows the use of moisture-resistant plywood, and other materials are suitable for preparing the base for flooring in dry rooms.
Regardless of the chosen option for preparing the base, before laying the tiles, the technological gap around the perimeter of the flooring is filled with polyurethane foam.
Laying ceramic tiles on a wooden floor begins with checking the quality of the base - it must be smooth and horizontal. It is recommended to use an adhesive composition with a high elastic modulus.

Layed tiles, clinker or porcelain tiles look aesthetically pleasing if you adhere to the work technology, which is carried out in several stages:
In answer to the question, is it possible to wet areas In a house with a wooden floor, laying a floor covering made of tiles, clinker or porcelain stoneware, it can be argued that this is quite possible and such a covering will last a long time.
Ceramic tiles are an excellent material for flooring, especially in rooms with high humidity or with high probability spilling liquids or other substances onto the floor. Typical examples are bathroom, toilet, hallway, kitchen. They do not refuse to use tiles in residential premises if the floor is equipped with a heating system.
But what about the owners of private housing, in which all the floors originally wooden? A similar question may arise for owners of apartments in old buildings, where the plank covering is mounted on joists. Is it possible to lay tiles on a wooden floor?
You can immediately reassure those who are worried - this is a completely doable operation that does not require complete dismantling of the coating to the ground or concrete base and subsequent pouring of a thick concrete screed. True, you will have to work hard, since the success of such a modification of the coating will mainly depend on the quality and strength of the wooden base.
Taking on the task of laying tiles if there is even the slightest suspicion that the wooden base is unstable is the height of recklessness. This is explained simply:
We should not forget that the load on the coating will increase significantly - in addition to everything else, the ceramic tiles themselves have considerable weight, mortars, other possible design elements of the created multi-layer “pie” of the floor. Thus, the wooden base must have guaranteed static stability. This is exactly what needs to be achieved at the first stage of work.
It is clear that the first step is always a thorough visual inspection, applying efforts to the most problematic areas of the wooden floor in order to identify its possible vibrations and sources of squeaks. If there are any, then no questions should arise at all - the coating must be thoroughly rebuilt and repaired, and not only in places of instability, since strengthening the floor in one place does not guarantee that it will not appear in another. It is necessary to understand the cause and eliminate it at the root.
Sometimes after dismantling the floor a “scary” picture appears
Moreover, experienced craftsmen always advise, in all cases of laying tiles on a wooden base, to carry out a complete search of it. If you are planning a ceramic coating, then you need to think that it is for the long term, and not for a year or two. Where is the guarantee that the hidden floor wooden flooring a defect or the beginning of the process of decomposition of wood, which does not manifest itself in any way today, will not be discovered literally in a month or even a year, when the tile covering has already been completely laid? To carry out repairs, you will have to remove all the tiles, dismantle the wooden base - and all due to the fact that the proper principles were not shown during the preparation. Isn’t it better to be completely, 100% confident in the reliability and stability of the wooden floor before you start laying tiles?
Let such a prospect not be particularly frightening - compared to complete dismantling wooden floor and pouring a new concrete slab to replace it, this procedure is much simpler and requires significantly less labor and financial investment.
So, the usual layout of a wooden floor is a plank covering mounted on logs. The logs themselves can be installed on a concrete base. Another option is that they are a double wooden covering, with a rough and finished floor and the space between them, which can be filled with thermal insulation material. For any type of floor inspection, you will have to remove the boardwalk completely to expose the joists for inspection, repair and alignment.
This cleaning can be done in several ways:
Thus, paint or varnish can be removed in advance by scraping or using abrasive materials - grinding and polishing machines, sandpaper or special attachments for a grinder or electric drill.
Sometimes a chemical cleaning method is used - washing off the paint with solvents. However, this is not the best option, because organic solvents are actively absorbed into the wood, disrupting its natural qualities and leaving an unpleasant, pungent odor for a long time.
The thermal method is widely used - using construction hair dryer or even blowtorch. Under the influence of high temperatures, the paintwork either burns out or melts to such a state that it can be easily removed with a regular scraper (spatula).
So, we have a repaired, solid plank base. What should I do next to fully adapt it to laying ceramic tiles?
After complete drying, you will get a rough monolithic surface, completely ready for laying ceramic tiles.
If you do not want to stir up dirt by pouring the screed, the room does not belong to the category of high humidity, but is quite intense dynamic load, then the plank base can be covered with plywood sheets 10 mm thick. The thickness may be greater, but we should not forget that this is an extra load on the joists and floorboards. By the way, here you can save on the floorboard - it is enough to lay it at intervals of even up to 150 -200 mm.
The work is carried out in next sequence:
After this, you can proceed directly to laying the tiles.
This method is somewhat similar to that described above (with plywood), but it also has its own characteristic features:
Approximate diagram of the resulting “pie” with two layers of gypsum fiber board
The process of laying tiles on prepared wooden floor surface in principle, no different from conventional technology, which is discussed in detail. The only thing you should pay attention to is the brand of tile adhesive. It is best to choose a composition “for complex surfaces”, and some adhesive mixtures in the instructions for use directly indicate the possibility of using them for laying tiles on a wooden base. This installation of tiles will be more reliable.
If you are deciding whether it is possible to lay tiles on a wooden floor in a bathroom, kitchen or other home, you should take into account the properties of the materials and their compatibility. In order for the tiling to serve for a long time, it is necessary to prepare a solid base that will not deform. For this reason, a concrete floor screed is best suited for this purpose.
However, this is not a hard limitation. If desired, it is permissible to use other materials (plank structure as a base or particle boards). However, in this case, you need to follow the technology for laying tiles and porcelain stoneware.
When combining ceramics and wood, moisture-resistant plywood or other wood-containing materials, a number of problems arise, in particular:
![]()
If for some reason only wood is considered as a material for flooring and tiles for cladding, such a combination can be used. However, in this case it is necessary to ensure suitable conditions to avoid the appearance of defects and pay special attention to the strength of the base.
So, when choosing a material (wood or particle boards), its quality is checked. There should be no rot or knots on the boards. Only beams of equal size are selected. As a result, tile distortion can be avoided. At correct installation the foundation should be provided with a sufficient level of staticity.

In addition, it is possible to reduce the intensity of the negative manifestation of the difference in the linear expansion of materials. The desired result is achieved by using an adhesive composition that has suitable properties.
If you lay the tiles correctly, using adhesive containing polymer additives, you can do without a screed.
In a private home, ventilation is important, allowing air flow to circulate without delay. Violation of this process entails the appearance of dampness. If the waterproofing is not done well enough, the tree will soon be destroyed due to the developing process of rotting. High-quality moisture protection will help reduce the risk of this phenomenon. If all these recommendations are taken into account, the cladding will last a long time.

A wooden floor in a private house is characterized by complex design. Considering the difficulties described above that arise when installing the cladding, it is necessary to more carefully prepare the base. Before making a screed or taking on the final flooring, it is necessary to assess the condition of the boards and joists.
An external inspection will not provide the required result, since major defects (cracks, mold, rot, etc.) may be hidden inside the structure.
It is recommended to remove the boards covering the base. This measure will provide the desired result, provided that you plan to lay tiles on an old wooden floor. If the base is new, and the cladding is installed immediately after completing the work on the rough structure, there is no need to additionally check the condition of the boards.

It is a mistake to believe that the absence of extraneous sounds when walking (creaks, etc.), as well as the strong fastening of the boards, is a sign of the reliability of the base. Some problems can only be identified after opening the upper floorboards, for example: the presence of mold, non-compliance with the technology for laying joists (increasing the distance between the beams). When the logs are installed in violation of the standards (there should be 50 cm between them), the entire structure is shifted. This rule should be followed, since the surface of the finished floor should be smooth.
Preparing a wooden floor involves the need to process the material. For this purpose, special compounds are used to prevent rotting and destruction of wood, for example, antiseptics and fire retardants. It is advisable to assemble the base for the tiles from pre-treated lumber. At the same time, a special composition penetrates into any cracks, covers the boards on all sides, reducing the risk of damage to the wood due to developing mold.

To lay tiles, you need to make sure that the design meets the requirements. For example, when installing joists, as well as during the process of laying a finished floor (plank flooring), it is recommended to constantly check the position of the boards using a building level.
The slightest distortion will lead to a reduction in the service life of the cladding.
Moreover, during the installation of the logs, it is permissible to place wedges to level the structure, since in this case significant shortcomings of the subfloor, which is the soil cover or concrete screed, may arise. And the boardwalk is leveled after fixing it on the joists. In this case, improvement of the surface quality of the finished floor is carried out by grinding. Special tool cut off areas that protrude above the surface of the boards (knots, waves).

If the general condition of the tree is normal, but there are several defects (cracks, crevices), you can avoid additional costs and eliminate leaks. This solution is used only when the design flaws are minor. This is done to prevent the gap from growing. Significant defects are eliminated by replacing a separate (deformed) beam/board. Other shortcomings of the subfloor are hidden in different ways:

The old boardwalk is removed. On at this stage check the position of the joists; if there are irregularities, they are eliminated using wedges and additional boards with smaller dimensions. The new flooring is laid only after the gaps between the joists are filled with expanded clay. This measure helps strengthen the structure. In addition, expanded clay fractions intensively retain heat in the room.
Between bulk material and plank flooring leave a gap of at least 5 cm thick.

Paul in wooden house It is mounted with leaks, due to which air circulation inside the structure is normalized. However, in cases where it is planned to lay tiles, the gaps between the boards can be minimal.
If the methods discussed above (grinding, replacing boards or beams) are impractical to use for some reason (there is no special equipment for removing a layer of wood, there is no possibility of installing new boards), you can consider other options based on the use of sheets of moisture-resistant gypsum fiber board (plasterboard), particle boards (plywood, chipboard). You can also fill the screed with your own hands. This is the most suitable method, as it ensures static, reliable coverage.

This option allows you to level and strengthen the surface of the subfloor. However, porcelain tiles or porcelain tiles are not laid over untreated plywood sheets. It should be protected from moisture contained in the adhesive. It is also impossible to lay ceramic tiles on fiberboard/chipboard without a special coating.
Step-by-step instructions for finishing wood-based material before installing the cladding:

CSP board (cement-bonded particle board) withstands exposure to water better than others. This option is advisable to use when arranging a bathroom floor in a wooden house. It is suitable for the toilet, kitchen and other rooms where the air humidity level is often increased.
Before laying drywall over wooden joists, it must rest in the room for at least 24 hours before starting work.

A multilayer structure will allow you to strengthen the structure and provide a static base. When installing the second layer, you need to take into account the need to bandage the seams. This means that there should not be less than 20 cm between the edges of the sheets of the first and second layer. In order to lay the floor tiles, 3 layers of plasterboard are laid. They are attached with glue. Additionally, the sheets are fixed with self-tapping screws of sufficient length. After puttying, the tiles are laid on the DSP.

This method has the advantage of no contact of wood with moisture, which negatively affects the properties of such a material. In this case, ready-made plasterboard blocks (GVL) are used. They are made in the form of a multilayer structure. Moreover, such blocks take into account the dressing of seams.

The principle of laying products of this type is similar to how plywood is laid on a wooden floor, but there is no need to seal the joints.
Instructions for performing the screed:
If you plan to install the cladding in a bathhouse or other room with high humidity, it is prohibited to use coloring compounds. Under the influence of moisture and temperature changes, the paint will crack and lose its properties. Available and effective options:


To lay porcelain stoneware or tiles on the floor, consider mixtures suitable for installing these materials. When choosing, it is important to consider the ability of the mixture to withstand the expansion of the boards. If you miss this moment, cracks will soon appear in the cladding.
To compensate for the linear expansion of wood, special tile adhesive is used. It must contain polymer additives. A high elasticity index is the second most important criterion after compliance with the type of decorative coating. You can stick tiles onto a concrete floor (screed over a wooden structure) using a cement-based compound.


To carry out work on wood, with cement (if it is planned to fill the wooden structure with concrete), preparation is carried out with waterproofing. You will need:
Assess the premises for availability free zones, where the cladding is best visible. It is recommended to start work from one of these areas, since here you will not have to cut the tiles. After preliminary installation of the cladding, the room is divided into zones; for clarity, they are separated from each other by a coated cord. This will make your work easier. The adhesive composition is prepared immediately before laying the tiles.

The glue is applied either to the floor or to the back of the porcelain tiles/tiles. Then the tiles are laid in accordance with the previously drawn up sketch. Cross-shaped stops are installed between adjacent products. During the process, the position of the products is regularly checked using a level. When the glue dries, it is recommended to grout the seams.
Electric cables and water heating systems are installed in several various schemes. A warm electric floor is installed according to the following instructions:

Water systems are connected to centralized heating, which is associated with a number of difficulties, so this option is used less frequently. Installation features:
The quality and service life of the floor covering largely depend on proper preparation grounds. According to the standard, the basis for ceramic tiles can only be a perfectly flat surface that can support not only its stable position, but also the weight of the ceramics.
For quite a long time it was perceived as a meaningless procedure. The fact is that wood is not inherently constant - under the influence of changes in temperature and moisture, it can contract or expand, change its size. And floor ceramics, in turn, are extremely sensitive to linear changes, so they will quickly become unusable. Chips and cracks will appear on its surface, the seams will begin to crumble, and the tile itself will gradually lag behind the base. But there are special schemes in construction with the help of which these materials can be “reconciled”.

Laying ceramics on a wooden base is considered inappropriate for a number of reasons.

In addition, in terms of aesthetic indicators, wood may be inferior to tiles, although this point is not so important, since ceramics are used primarily not for the beauty of the patterns, but for sanitary and hygienic purposes. Laying tiles is advisable only in rooms with high levels of humidity to protect floors from the harmful effects of moisture (for example, in a shower, wooden bathhouse).
But whatever the reasons, there is a need for laying tiles on a wooden floor. In this case, it remains to find out how this can be done, as well as select the most suitable technology.
Important information! It is highly undesirable to lay ceramics on new wooden floor, because you need to wait until intensive shrinkage is completed. As a rule, this takes at least two to three years.
First you need to purchase tiles. This issue has already been discussed in detail in the article on that, so today only the basic requirements will be briefly discussed. You should focus on the geometry and markings of the material.


The selection of tile adhesive also plays an important role.

The range of adhesive compositions is huge, but they are all conventionally divided into two categories - dry and ready-made mixtures. Ready-made formulations are more expensive, but when diluting a dry mixture there is a risk of making a mistake with the proportions. When purchasing glue of a particular brand, you should pay attention to the presence of the following properties:
All of the above requirements are met by two-component adhesive compositions made on the basis epoxy resin or polyurethane.


Important information! Such compositions are elastic only for 1 hour after dilution, and therefore it is recommended to dilute them in small portions.
The waterproof composition “Diola D-307”, intended for laying massive ceramic tiles, is excellent for baths.

Glue “Diola D-307”
It is important that the chosen adhesive is highly elastic. The fact is that the operating conditions in the bathhouse are not easy: heating and, as a consequence, expansion of materials alternates with cooling. And the higher the elasticity of the glue, the greater the differences the floor covering can withstand.
If you plan to lay porcelain tiles, then the selected adhesive composition must have high adhesion - at least 28 kg/cm². This is explained by the significant weight of porcelain stoneware and almost zero hygroscopicity. If we talk about specific brands, then for laying tiles – both porcelain stoneware and ceramic – the composition “Ceresit SM 17” is often used.


Ceresit SM 11 is somewhat less popular, but if the SS-83 elasticizer is not added to this glue, then the adhesion will be significantly less than that of Ceresit SM 17.


Table. Tile adhesive consumption
Important information! Some builders refuse to use tile adhesive, preferring to use a homemade composition: sand + cement (proportions - 3:1) + PVA glue.
In addition, the work will require the following equipment:


Now you can proceed directly to the workflow.
A wooden floor is a multi-layer structure made entirely or partially from wood. These are not only boards, but also a system of beams and joists laid under the plank covering, so before starting work, all elements must be carefully inspected and checked. Often the preparation of the base for installation is carried out:

The condition of the floor can only affect the number of repair operations, but not the choice of one or another arrangement scheme.

Schemes of wooden bases with tiled coating
The fact is that ceramic tiles are attached to any surface according to a standard scheme, while the differences may lie solely in preparatory activities. However, the result should be a flat and smooth surface that can support the weight of the floor ceramics. There are several leveling methods suitable for plank floors in a bathhouse.
The most popular method of leveling plank floors is to create a static sub-layer consisting of plywood or any other moisture-resistant material produced in sheets. There are several methods of dry leveling, let's get acquainted with them.

The final stage of dry leveling should be the installation of sheets of plywood or particle boards.

Of course, pressed products wood waste or dowels are also subject to linear movement, but not as much as natural wood.

Ceramic tiles will be fixed on top of the leveling sheets not with ordinary tile adhesive, but with a special polyurethane-based compound.
Important information! Before laying ceramics, the plywood covering should be sanded along the seams. After this, the joints between the slabs must be filled with sealant (as an option, you can use the glue that was purchased to attach the tiles) and the surface must be treated with a primer compatible with the selected sealing material.


Among the advantages of this alignment method it is worth highlighting:

As for the disadvantages, there is only one: leveling will take a certain proportion of the height of the room. And there will be a difference between the finished area and the rest of the floor, from which you will subsequently have to make a step or threshold.

It is worth noting that, according to building codes, the flooring in hygienic rooms, which are the washing room and the steam room, must be lowered by at least 2-3 cm, otherwise in case of leaks, water will flood the adjacent rooms. With dry leveling technology (plus the thickness of the ceramic tiles), the surface will noticeably rise above the rest of the floor, so it is not advisable to use it (the technology) in a bathhouse.

plywood sheet

This is a kind of simplified way of traditional floor leveling. The screed is poured in a “light” form due to the fact that bearing capacity The plank floor is clearly not enough for a full leveling layer.
Important information! There is another feature of this method - when pouring the solution, it is cut off from the walls and underlying foundation. In other words, it should be a kind of variation of a floating floor with a mandatory deformation gap along the entire perimeter.

With this scheme, the wooden elements of the structure will move under the influence of temperature changes, while the screed itself with the ceramics laid on top of it will remain motionless.
The thickness of the leveling layer should be 30 mm. It is undesirable to increase this thickness, since the weight will also increase along with it. Only minor deviations in one direction or another (a few millimeters) are allowed.
edge tape
The algorithm for pouring cement screed is given below.
Step 1. The floor is dismantled down to the timber in order to inspect all elements. If there is any doubt about the reliability of any element, it must be dismantled and replaced with a new one. If the distance between the logs exceeds 50 cm, then the system is strengthened by installing another beam. There should still be a slight gap (about 10 mm) between the ends of the joists and the walls. Upon completion of the check and repair work All wooden elements are treated with an antiseptic, then the floor is put back together.


Step 2. A flooring is constructed under the future screed. For this, you can use old boards (provided that they are still suitable for use) with a thickness of 40 mm. When fastening, a ventilation gap of 10 mm remains between the boards. A similar gap also remains when using unedged boards to replace defective floorboards. After all, if the boards are laid end to end, you will have to drill holes in them for ventilation.

Step 3. On top of the boards - perpendicular to their direction - quartered moisture-resistant plywood from 1.2 cm in thickness is attached (other boards made from pressed waste from the woodworking industry are also suitable). The material is attached in a similar way to brickwork using glue and galvanized self-tapping screws (the latter are screwed in increments of 20 cm). There remains a slight gap between the plates (about 3 mm); there should be no cross-shaped joints. Do not forget about the drain hole (if it is planned), which is often installed in the center of the room.


Step 4. Plywood flooring covers waterproofing material. For this, it is advisable to use glassine, paraffin or bitumen paper, although thick plastic film will also work. Roll insulation is laid overlapping (5-10 cm) and secured with tape to create a monolithic “carpet”.

Along the entire perimeter, the material should extend onto the walls by at least 10 cm; for convenience, it is also secured there with tape.
SNiP 3.04.01-87. Insulating and finishing coatings. File for download
Step 5. A damper tape 100 mm wide and approximately 8-10 mm thick is laid along the walls.

Step 6. A screed made from a ready-made leveling compound or a home-made leveling mixture is poured over the reinforcing mesh. To prepare the latter, sifted coarse sand is mixed with liquid glass in a 1:1 ratio. Water (1:4) is added to the dry mixture without any impurities or additives.
Before pouring, the drain hole is fenced with a small formwork. If the work is carried out in a washing room or steam room, then special guide rails can be installed to obtain the required slope in the direction of the drain. When the solution has completely hardened, you can proceed directly to laying the tiles.

This method involves attaching sheets of moisture-resistant drywall (GKVL) to the boardwalk using a two-component polyurethane-based adhesive. Due to its elasticity, the structure of the composition will not be disturbed even if the wood is deformed. Traditionally, before starting work, the structure is inspected and repaired.

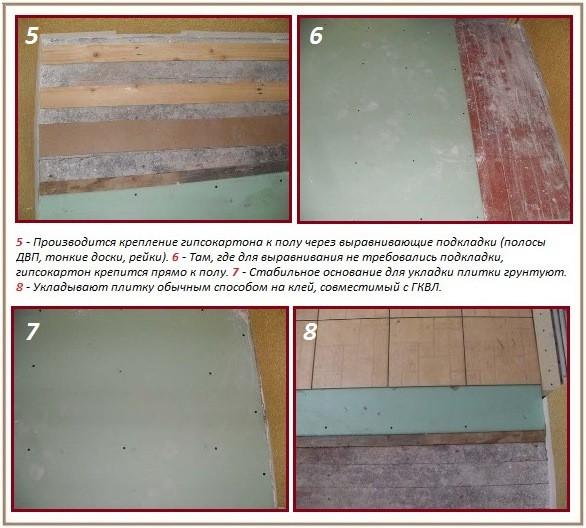
Important information! It is advisable to lay drywall in two layers, and the seams of the first layer should not coincide with the seams of the second. This simple procedure will increase the hardness of the floor covering.
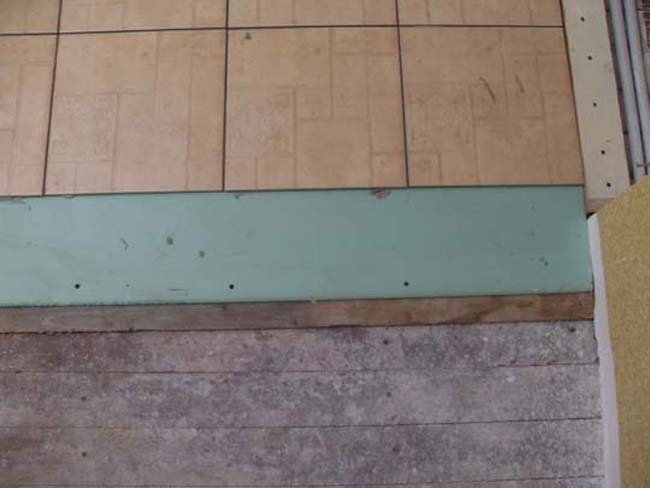
The plasterboard base is installed in the same way as in previous methods (using floating floor technology), so a technological gap should be left around the entire perimeter. The joints between the sheets are filled with sealant, after which the entire surface is primed with a universal primer. After laying the ceramic tiles, the gap is filled with the same sealant and covered with baseboards - this way moisture will not seep in and spoil the building material.
Each of the above methods of preparing the base may have to be adjusted taking into account the specifics of the room. In reality, there are many more methods, but they all have the same principle: the substrate should not interfere wooden base“breathe”, and this, in turn, should not destroy the rigid base with the tiles laid on top of it.
The procedure is not much different from creating a tiled floor in other rooms, the only difference is the grout used and glue mixture. In addition, a slope towards the drain hole is necessary, but this is rather a feature of the floor itself; however, this should also be kept in mind during finishing work. If the surface is not prepared, then to obtain a slope you will have to significantly increase the consumption of the adhesive composition. In the case of a dressing room, everything is much simpler: no slope is needed, the main thing is to maintain the horizontal and align the tiles relative to each other.

First you need to do a “try-on” to determine how best to lay the tiles. Trimming will have to be done in any case, although it is advisable to place the cut elements along the periphery of the room. The number of tiles that will be cut is determined in advance. If it is insignificant, then it is quite possible to use a tile cutter for cutting; It is more convenient to perform multiple cuttings with a grinder.

The algorithm for further actions is the same as in the case traditional technology styling

Step 1. In room correct form Laying should begin from the most visible corner. In case of incorrect geometry, you need to determine the middle by crossing the diagonals and start from there. To do this, the room is divided into 4 identical segments. And if we are talking about a steam room or a sink, then it is better to start installation from the drain hole - this will make it more convenient to maintain the slope.


Important information! Often, a building level is used to check the horizontality of the tiles, but for the steam room and sink, as noted above, the slope is important. There are two options here: either pull the rope, which will serve as a guide, or deliberately press down the required edge. Sometimes a special block is made for this purpose, having the desired slope. The block is placed on the tile, and on top of it is a building level.

Step 2. After this, glue is prepared in accordance with the manufacturer's instructions. The composition hardens quickly, so you need to dilute it in small portions - about 1 m² each.

Important information! For a bath, it is better to use special cement glue rather than mastic. It is advisable to replace the usual grout with an elastic silicone compound that has a suitable color.
Step 3. Using a spatula, the diluted solution is applied to the surface.

Step 4. Tiles are laid on the floor treated with glue, and special plastic crosses are inserted into the joints (the latter, in extreme cases, can be replaced with ordinary matches). Levelness is periodically checked.


Important information! If a plinth is made from tiles, then it goes beyond the line of the lining (the latter seems to be superimposed on it). This way, moisture from the walls will not flow behind the baseboard.


Step 5. Adjustments and alignment can be done before the glue hardens. Longitudinal/transverse directions are corrected by slight shifts. “Missing” elements are removed and added required quantity mixtures, after which they are placed back. Use a damp rag to remove adhesive from the tile surface. After hardening, you can begin grouting.
After one or two days you can start grouting. To do this, you will need a special anti-fungal grout and an appropriate tool, i.e. a rubber spatula.


The service life of the tile depends on how well the tile installation work is carried out. Tiles and tiles are usually laid on a concrete base. But sometimes it is not possible to install a concrete screed. Therefore, many are interested: is it possible to lay tiles on a plank floor?
Ceramic tiles in the kitchen in a wooden house are a housewife's dream
To lay tiles on a wooden floor, the first step is to prepare it. At this stage, defects in the plank base are corrected, given strength and protected from moisture.
 Laying tiles on wood is possible
 The key to a reliable ceramic tile floor is the base, so you should start by checking the condition of the old wooden floor:
Attention! Moisture-resistant plywood 12 mm thick is placed on the logs, which will provide a reliable and durable base.
Laying tiles directly on planks will not work. Floorboards may begin to play over time, so it is necessary to use a leveling layer. Various materials can serve as this layer.
For wooden floors in an effective way To level the surface, use moisture-resistant plywood or other similar material.
 Cover the old plank floor with sheets of moisture-resistant plywood
 Sheets wood materials allow you to distribute the load across several floorboards of the subfloor at once. This protects against failures of old plank structures.
To provide a reliable base under tiles or tiles, various dry-based leveling methods are used:
Using a plywood base for installing tiles is convenient and beneficial in financially. Wood derivatives based on shavings are not so susceptible to changes in size under the influence of moisture, so laying tiles on them is a possible option.
It is worth noting that tiles on top of plywood sheets must be laid with a special two-component polyurethane adhesive, and not with regular tile adhesive. Polyurethane adhesives have the proper elasticity to maintain a secure fit of the tiles on an unstable base.
After the plank floor is covered with plywood sheets, their joints must be sanded and filled with a special sealant or glue. After which the seams are primed.
The advantages of using the “dry” surface leveling method are that:
But this does not mean that this method does not have disadvantages. Leveling the plank surface will require the use of additional room heights, which will require decoration and joining various coatings using thresholds.
Given this fact, it is necessary to ensure that the floors in the bathroom should be a couple of centimeters lower than the level of other rooms. In the event of a water leak, it should not be distributed throughout the corridor and other rooms, but remain in the bathroom. That's why plywood base plus the thickness of the ceramic with glue can seriously elevate the overlap above others. In this case, using the “dry” method is not a desirable solution.
“Wet” leveling methods can also be used over plank floors. We are talking about sparing amounts of screed use, which will ensure flat surface with light loads on the wooden base.
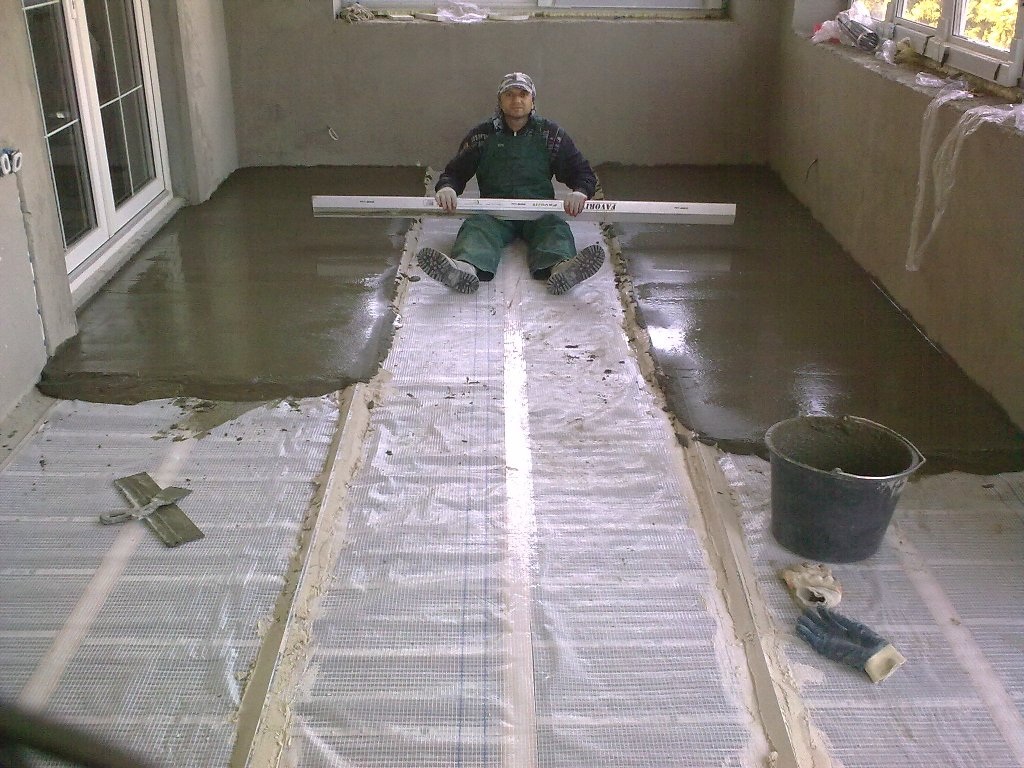 Laying tiles on a concrete screed is easier
 The floor screed for ceramic tiles in a wooden house must be cut off from the plank base, including from the walls. It turns out that it is necessary to do it in a “floating” way with damper gaps around the perimeter. A similar method is necessary so that wooden floors can change sizes without harm. tile covering, and the leveling layer retained a strong, unchangeable structure.
Attention! According to experts, it is not advisable to cover a wooden floor with a screed with a thickness of more than 3 cm, because this can cause deformation due to increased weight. But you can’t do less so that the screed does not lose reliability. It turns out, optimal thickness 3 cm with slight deviations.
The procedure for preparing the base for a screed on a wooden floor is as follows:
After the preparation work for pouring the solution is completed, they begin pouring the leveling mixture. There is no need to level the self-leveling floor, because it levels itself over the surface; it is necessary to direct the mixture in the desired direction and maintain the required thickness.
You can use another leveling mixture. To prepare this composition, you will need:
After the solution is ready, it is poured, leveled and left until completely dry. Only after complete hardening can tiles be laid on the floor.
There is another option for leveling the surface of a plank floor - using moisture-resistant plasterboard, which is fixed to the surface of wooden floorboards with a two-component polyurethane glue.
 Laying drywall will make it even easier to stick tiles than on a plywood base.
 Carrying out a coverage audit and updating the necessary lags was described in other alignment methods, so there is no need to dwell on it again.
To make the coating made of plasterboard sheets more reliable, they can be laid in two layers. Moreover, the seams of the top layer should not coincide with the seams of the bottom layer, so the layers are laid overlapping.
Attention! Flooring placed on a non-moisture resistant plasterboard base may become deformed. You can recognize moisture-resistant floor plasterboard in a store by the blue color of the slabs.
A damper gap is left around the perimeter of the room, so leveling with plasterboard has common features with a “floating” floor system. The joints between the sheets are filled with sealant. Whole area plasterboard surface must be primed to ensure a secure fit ceramic tiles.
 Tile on a wooden floor will look the same as on concrete base
 It is possible to lay tiles on a wooden floor, but take into account the wood's ability to change dimensions due to changes in humidity and insufficient strength.
For tile laying to be successful, it is worth looking at this short video How to properly glue ceramics to a plank base:


.jpg)


