PVC windows today can be found in almost every apartment, private house. By installing them, the owners are trying to protect themselves from noise, to give housing aesthetic appearance. However, many of them do not think about the fact that, along with the advantages, these windows have a disadvantage. They do not breathe, which leads to greenhouse effect in room. Wooden windows are deprived of this shortcoming.
Wooden windows allow the room to breathe and do not lead to the greenhouse effect.
Wood does not just breathe, it is able to create a special microclimate in the room and, thanks to its structure, maintain it. Modern production produce wooden windows from various types of wood, different shapes and colors. However, it is quite possible to make wooden double-glazed windows with your own hands. This requires skill and patience.

For faster and better execution of windows, you will need power tools for woodworking.
In order to make wooden double-glazed windows, oak, pine, ash, birch wood is used. An oak frame will be the strongest, however this wood is difficult to work with due to its hardness. In this case, subsequently it can be given any shade. Any wood chosen for making windows must be thoroughly dried to avoid distortion of the finished product. installed window. When drying, the frame may crack, bend. These deformations can lead to the need to replace the window, it is unlikely that it can be repaired. And these are additional costs.
Except solid wood for windows, as source material you can use glued timber. It is produced by gluing individual thin lamellas special glue. Such a beam is not subject to deformation and does not require additional time for drying.
Power tools will greatly speed up the work and facilitate it:
Of course, in their absence, you can get by with hand tools: a chisel, a hacksaw. It is preferable, when making wooden windows with your own hands, to use good electric tools, which allow you to perform a high-quality fit of the grooves.

Therefore, for the manufacture of windows, it is necessary to take high-quality material and an excellent tool.
Also don't forget about:
Before starting work, measurements must be taken window openings. This can be done with a tape measure. It should be noted that if wooden windows are made for a private building, then the sizes of the windows can be completely different. But even the windows standard apartment may vary slightly in size. Therefore, regardless of the structure, measurements must be taken at each window opening.

Triple glazed windows keep more heat in the house.
The bars of the window frame are connected to each other by a tenon-groove method. This is the tightest connection that will last a long time. To perform it, a groove is drilled on the vertical side of the frame, and a spike is cut on the horizontal side. The depth of the groove corresponds to the width of the bar.
As a mark required size You can make a shallow incision with a hacksaw. A slot is made from the end with a jigsaw and the wood is removed. With the help of a caliper, the axial line of the groove is determined - the center of the bar. A hole is drilled on this line using a drill and a wood drill. After marking the shape of the groove, it is cut with a jigsaw. By the same principle, 4 grooves are made.
Next, on the bars, which will be the horizontal part of the frame, you need to make a spike. The thickness of the spike should be slightly greater than the width of the groove, for a tighter connection and precise fitting of parts during assembly. All markings must be done with a caliper. For a spike from the center line of the bar, measure the width of the spike and cut the spike with a jigsaw or use a saw and a chisel. The surface of the spike, which will border the bottom of the groove, must be rounded with a chisel.
In addition, it is necessary to saw through the grooves for the glass.
The most acceptable dimensions are grooves 10 mm high and 14 mm wide.
After completed preparatory work you can start assembling the frame of the future window. Additional strength to the connection will give the application of glue at the joints. Excess glue must be removed before it completely hardens.

Scheme of profiles with one and two glasses.
Glass, before cutting, should be carefully marked. The size must exactly match the size of the frame. The error is not admissible even in 1 mm.
To cut glass, you must follow a few rules:
The incision will be of sufficient depth if a characteristic creaking sound is heard when pressing the glass with a glass cutting tool. After the cut is made, the glass is shifted to the edge of the surface on which the cutting is performed, and after pressing, the cut glass part will break off.
The edges of the finished glass must be processed with sandpaper.

Glass cutting should be done on dry, clean glass, the cut is done in one motion.
First you need to try on and fit. To do this, insert the glass into the frame, view and make minor adjustments if necessary. Glass is removed from the frame and sealant is laid. Then the glass is again placed in the frame and fixed with a glazing bead. After that, the second and, if any, third glass is inserted according to the same principle.
At industrial production material used as a desiccant large quantity small pores. The task of the molecular sieve is to absorb moisture from the air or gas that is inside the window between the panes. For this, silica gel in granules is used. However, granulated silica gel can also be purchased in stores. This material is placed between the panes.
The window inside itself is filled with air, since in the manufacture of a wooden double-glazed window it is impossible to fill it with gas on its own, as in industrial production. However, with a compressor, the space between the panes can be filled with dry air.
After that, the window can be painted or given the desired tone with a stain. After drying, you can cover it with varnish, which will protect the wooden double-glazed window from moisture penetration. Most often, varnish is opened several times.
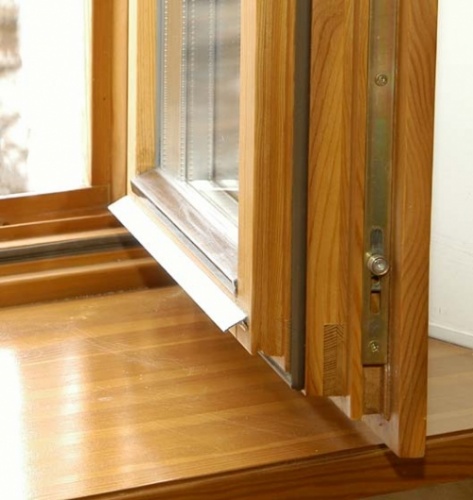
Screw handles that match the style of the room. Special recesses for fastening the closing mechanism in the sash are cut out in advance.
If this has not been done or its size does not correspond to the fastening, then a recess is carefully made with a chisel. In this case, the frame itself must in no case be damaged. Wooden double-glazed window, made by hand, can be placed in a window box.
When using a jigsaw, it is better to take a small file for it, then the edge will be smooth, without chips.
If necessary, a rubber seal can be attached to the outer part of the window, which will allow the window to close more tightly.
Excess sealant, putty, which are used during the installation of a double-glazed window, must be removed carefully immediately after they are discovered. Otherwise, after they harden, it will be very problematic to do this.
Making wooden windows with double-glazed windows with your own hands is a laborious process and requires a lot of time and effort. However, the result will please. Firstly, such windows perfectly retain heat in the room. Secondly, wooden base passes air, as they say "breathes". Thirdly, wood has high sound insulation performance, in combination with high-quality double-glazed windows, it will achieve almost complete noise isolation in any conditions. Fourth, environmental pure material completely safe. Video:
Double-glazed windows have gained unprecedented popularity in last years connections with their technical features. What is needed for self-production of double-glazed windows?
To bond the glass, a special styrene-based binder is used, which can be prepared at home. To do this, you need methyl ethyl ketone peroxide in a 36 percent dimethyl phthalate solution, this element plays the role of a hardener, as well as a cleaner and toner (synthetic paint).
The volume of the binder is calculated depending on such factors as the thickness of the mounting tape and the dimensions of the glass: for a tape with a thickness of 1 mm and 1 sq.m. glass will require a liter of composite.
Advice! It is recommended to prepare the solution in a container with a scale - this simplifies the measurement of the components.
In a clean plastic bowl, mix the components, then add the hardener. The dosage is calculated taking into account the temperature, the higher, the greater the percentage (from 1% at + 24 degrees to 2% at 12 degrees).
If you want to paint the glass in any color, for example, to create a tinting effect, then a toner paint is added to the solution, the dosage of which is not more than 5%.
The solution is thoroughly mixed and left for 15-20 minutes. This is done so that the air comes out, and no bubbles form on the surface.
The first step is the preparation of glasses. Cut out two glasses of the same size according to the size of the window. The surface is thoroughly washed with a glass cleaner and then wiped paper napkin or dry newspaper.

Important! The tape should be glued so that there is a small gap at the corners. To do this, it is necessary to retreat 2-3 mm from the edge of the glass.
Remove the protective layer from the tape and attach the second glass joint to joint. Press lightly on the surface for better adhesion. Next, the glass is poured with a solution-component. For this, the glasses are moved apart, a funnel is inserted inside the double-glazed window.
Important! When gluing the tape, leave space for the funnel. To do this, the ends of the adhesive tape are brought out, and the protective layer is not removed.
To make the filling of the reagent convenient, it is necessary to position the structure at an angle. They put it under wooden beam OK. Liquid is poured through a funnel. After the double-glazed window is completely filled with the component, the funnel opening is sealed. The funnel is removed, and the remnants of the protection of the mounting tape are removed.

If bubbles are found inside, they are removed with a medical syringe with a needle. The double-glazed window is sealed around the perimeter and left to dry completely - this will take 2-3 hours. This method will save money on the purchase of finished double-glazed windows.
After the double-glazed window is ready or, as an option, it is bought ready-made, it must be fixed in a wooden frame. This manipulation is performed using a sealant. In order for the appearance of the window to be aesthetic, it is recommended to use a colorless sealant. That's all the window is ready.
The installation of a wooden window with a double-glazed window has a number of features, which are determined depending on the type of opening and the material of the house where the window is placed.
Stage number 1. Analysis and preparation of the opening. The window opening must have a clear geometry. To do this, all faces are checked using a level. Surfaces are cleaned of debris, irregularities are removed.
Stage number 2. Installing and fixing the window block in the opening. The frame is fixed using dowels or self-tapping screws, but, in no case, nails or polyurethane foam. The distance between the fasteners is 70-80 cm.
Stage number 3. Sealing. A double-glazed window may lose its properties if there are gaps between the frame and the box, so sealant treatment is a mandatory moment of installation. Compression tape is used as a sealing agent.
Stage number 4. It is imperative to carry out measures aimed at vapor barrier of the structure.
Stage number 5. Elimination of cracks and holes. final stage- this is the foaming of holes. Mounting foam will help to avoid the ingress of cold air, dust. After hardening, the foam is cut off with a mounting knife. FROM outside in order to avoid the destruction of the foam during operation under the influence of natural factors, they are sealed with tape, mounted with cashing or plastered.
Stage number 6. Installing the window sill. The slab must be made of hardwood (oak, beech).
Dimensions and design of the window sill are chosen by the user. However, it is worth remembering that the window sill should not protrude by more than 5-6 cm. If you want to expand the structure, then it must be strengthened.
Wooden windows quite common in most residential buildings. This is primarily due to the availability of materials used in the process of their manufacture. If the window opening has custom shape, then the easiest way is to build a window on your own, while the master himself will choose its shape, the number of sashes and fittings. We will talk about the features of manufacturing wooden windows further.
In order to understand the features of wooden windows, we suggest considering their main advantages:
1. Aesthetic appeal appearance.

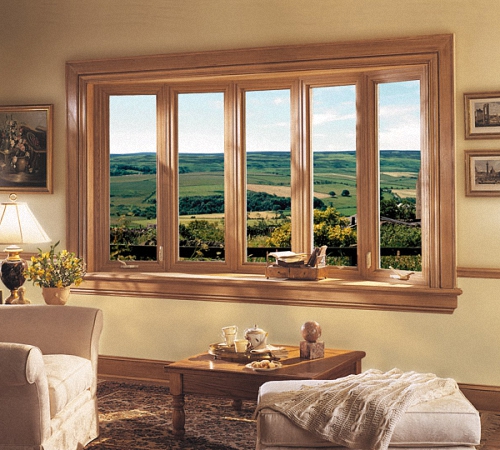
On a wooden window, the structure of the wood from which it is made is clearly visible. In addition, wooden windows fit perfectly into any kind of both exterior and interior. Most often, wooden furniture is installed in the room and wooden doors, which are in good harmony with the windows made of wood. At the same time, wooden windows have high functionality and sophistication.
Windows made of plastic have an unpresentable appearance, compared with wooden structures. The tree brings warmth and comfort to the room.
2. Ability to breathe.
This function has only wood. It is the tree that is responsible for the regulation of a healthy microclimate in the room. Because wooden surfaces able to absorb moisture, with excess, and give it away with a lack. The house, with installed wooden windows, has a comfortable and healthy atmosphere.
Windows made of plastic or other materials are prone to condensation on the windowsill or other nearby surfaces.
Due to the fact that the tree breathes, there is a gradual circulation of air in the room. Even if you do not open the windows for ventilation for a long time, the air will be updated through the micropores in the tree. After a long absence from home, the air in the room will be fresh and renewed.
3. High durability.
Despite the fact that wood is a rather vulnerable material, especially before moisture or fire, thanks to the presence of modern compounds and impregnations, quality characteristics wood used in the window manufacturing process. Modern dyes and impregnations on a moisture-resistant basis ensure long-term operation of wooden window structures. In addition, in the process of using wooden windows, their original appearance is preserved. For example, plastic windows will require replacement after ten years of operation, wooden windows do not lose their presentable appearance even after twenty years of use.
4. High level of durability.
Wood and its quality are assessed immediately, in the process of purchasing materials. The strength of plastic windows cannot be assessed, since metallic profile installed inside the structure. In addition, the option self-manufacturing wooden windows allows you to choose a quality wood that suits the owner of the window both in material and operational terms. It is better to give preference to a three-layer glued beam with a minimum thickness of 70 mm. It is the use of an adhesive beam that will ensure the stability of the window against external irritants and prevent its deformation.
5. Low thermal conductivity.
This property is explained by the use of glue beams in the manufacture of windows. In addition, thermal conductivity depends on following the technological moments of window installation.
6. Environmental friendliness and safety for human health.
This condition is the most important when choosing wooden windows. After all, the tree is natural material, which does not emit any substances harmful to humans.
7. Ease of repair of wooden windows.
This advantage allows you to reduce the cost of repairing or restoring a wooden window. These types of windows are easy to maintain and repair.
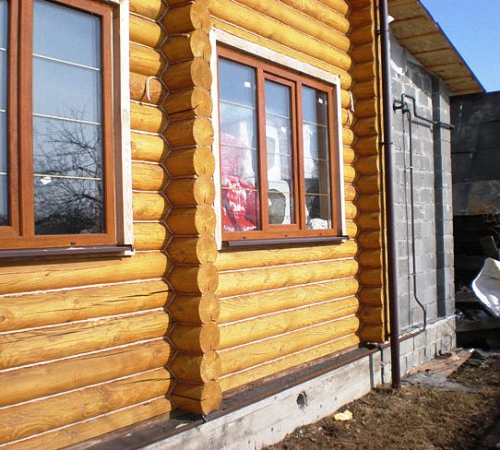
Wooden windows photo:
Installing a high-quality wooden window opens up opportunities for its owner such as:
In relation to design features wooden windows are

The first option is characterized by the presence of one separate wooden part. It consists of one box and two doors, each of them glazed. For the manufacture of the wooden part, a pine massif is used, and not a wooden beam. Minimum Thickness the sash is 4 cm. The main disadvantage of such windows is their susceptibility to deformation. In addition, it is not possible to achieve complete adjacency of the sash to the window. Moisture that is outside the room gets on the surface of the window sill. Double wooden windows are equipped with non-adjustable hinges and handles, so there is no ventilation mode in them.
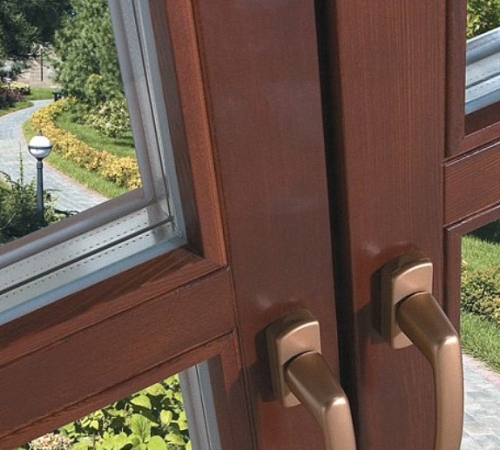
German windows are also called European windows. Since the fittings that are installed on them are of European origin. Such a window allows you to adjust the height and angle of the sash, it is possible to ventilate the window, there are locking mechanisms.
Eurowindow includes a window frame and a sash. The leaf has a two-chamber type double-glazed window, which perfectly prevents heat loss. To open the window, it is enough to make a little effort. In addition, care for such windows is quite easy, and glued timber is used for their production, the thickness of which makes it possible to make a multi-circuit sealant that completely protects the room from drafts.

Such windows are characterized by warmth, reliability and durability of operation. The service life of the eurowindow exceeds sixty years. This is due to the presence of a glued three-layer beam, which is not prone to drying out or deformation.
There is an option for upholstery of a wooden window with aluminum. This window has a longer service life and does not require constant painting.
Aluminum-wooden windows involve the manufacture of the supporting part of the windows from aluminum. The tree closes the aluminum from the outside. Thus, the strength of the structure is improved due to the presence of aluminum, and the wooden surface creates an attractive appearance and warmth of the window. This type of window is practically not common due to high cost aluminum and the complexity of the work.
Finnish windows are distinguished by the presence of a wide frame and two sashes that have a sequential opening type. One simple glass is installed on the outer sash, and a single-chamber double-glazed window is installed on the inner sash. For the manufacture of the outer sash, both wood and aluminum are used. The two sashes are connected using a sequential opening mechanism. For the manufacture of window frames and sashes is used solid wood, not glued timber. The window has an attractive appearance, although compared to German windows, it loses to it in terms of quality.
In addition, wooden windows are:

In addition, Swedish wooden windows stand out. They represent a combination of German eurowindows with a Russian window variant. Such a window has an external frame with single glass and an internal frame with single glass. Thus, a high level of sound and heat insulation is provided.
Carved wooden windows are characterized by the presence miscellaneous rose patterns that make them more attractive.
Before you make a wooden window yourself, you should take care of preparing all the tools necessary for this in the form of:
We propose to study step by step instructions self-manufacturing of wooden windows:
1. The construction of the box.
Depending on the size of wooden windows, they are:
Before starting work, you should select the material for the window. The most optimal and inexpensive option- pine. Since this type of wood contains a large number of resin, it is the most resistant to moisture and other external influences.
More expensive but quality option- oak. Although for beginners it is better to choose pine, so as not to accidentally ruin expensive material. The boards must have proper drying, they must not have knots, cracks, deformations. Please note that the box is the main supporting structure, which bears the entire load.
It is possible to use a glue bar, which is distinguished by higher strength characteristics and a long service life.
To build a frame, there are enough boards, 15x5 cm in size. A groove hole should be made in the workpiece, which will have the letter G, and a depth of 1.5 cm. All parts are connected using wood glue, and then a wooden rod, with a minimum length of 30 mm . It is the rod that is the element that acts as a retainer for all the components of the box.
Next, the box is installed in a previously prepared window opening. This procedure includes drilling holes in the wall, installing dowels in them, fixing the box with self-tapping screws. Mounting foam is used to seal the joint and seal cracks.
2. Construction of a window frame.
How to make a wooden window with your own hands drawings:

To create a frame, you must have a bar, 70x50 mm in size. Although it is possible to correct the thickness of the timber, depending on the size and strength of the window. The profile shape is determined by the thickness and amount of glass that will be installed in the window.
If you plan to install a single-glass profile, then it is enough to build two rectangular groove holes, otherwise, more holes will be required.
To make a profile of a certain shape, you will need an electric planer or a milling cutter. If the glass thickness is 5 mm, then a glazing bead, 1 cm thick, is required.
When all the details are prepared, the frame is assembled. To do this, you need to cut the board at an angle of 45 degrees. With the help of the prepared profile, a tenon-and-groove connection is provided, for more high level fixing additionally use self-tapping screws. Please note that all hats must be sunk into the wood to improve the attractiveness of the appearance of the window and to avoid corrosion.
3. Installation of glasses.
In order to prevent condensation from collecting in the window and there are no cold bridges, you should correctly measure the length and height of the glass that needs to be installed in it. The minimum error when taking measurements is 1 mm.
To cut glass, it is better to use a diamond self-tapping screw, and to polish the edges - fine-grained sandpaper.
In addition, all safety measures should be observed, namely, wear gloves from thick fabric so as not to injure your hands with fragments and wear a mask that will protect your eyes from dust or small fragments.
A ruler is placed on the glass with a small margin. A line is drawn along it with a glass cutter. Next, the glass is placed on the edge of the table and broken off. The prepared workpiece is installed in the window, if it does not need correction, then the edges of the glass are lubricated with sealants and laid again. Next, the glass is fixed with the help of glazing beads, on the surface of which small nails are hammered. If the width of the glazing beads is large, then it is better to use self-tapping screws to fasten them.

4. When studying the question of how to make a wooden window with your own hands, mention should be made of final assembly the whole structure. If the window has big size and is divided into two parts, then the vertical beam is first assembled and installed, then the sash is fixed with hinged hinges. Handles and other accessories are installed.
Completes installation work installing the finished window into the window frame, fixing it with self-tapping screws, which first pass through the surface of the box, and then through the wall. To seal all the cracks, mounting foam is used, and after it dries, the walls are plastered. Completes the installation of low tide and window sill.
How to make a wooden video window:
Of course, plastic windows have long won our hearts. However, for a budget way to replace windows, it is a wooden frame that is suitable. And if you decide to carry out such repair work in your country house or on the veranda, then you can make wooden windows with your own hands. When I attached a veranda to my house, I immediately decided to glaze it and the option with plastic windows didn't suit me. Of course, production machines assemble window frames much better and faster, but you always want to do something with your own hands. But if you follow all the rules for processing wooden material and the technology for connecting parts, then it is quite possible to achieve good results. Today we will look at step by step instructions for the production of wooden windows.

wooden box
When I decided to make a wooden window with my own hands, I thought about what kind of wood to use. From myself I want to advise you to use pine - it is quite affordable due to its cost. If you, like me, decide to try to make wooden frame for windows on your own, then give preference to this particular material. Oak can be considered a good alternative, but it is more expensive than pine and I was afraid to use it for the first time.
Important! If you decide to experiment, then you should not immediately purchase expensive materials. It is possible that you will not succeed and the wood elements will be damaged.
stock up necessary tools in advance, although many home craftsmen have all these items in constant use:
Before buying, always check the condition of the boards. They should not have cracks or chips, protruding knots or any deformations. They must also be completely dry. Step technology:
Important! All cracks must be filled with mounting foam. With this fixing, the mobility of the tree with a temperature difference is not taken into account.

DIY wooden windows
DIY wooden windows
Step-by-step instructions for making a frame for windows with your own hands depends on what kind of window you want to make. I made a single-glass profile with 2 grooves:
As a beginner in this business, it was not immediately clear to me how the whole process takes place. Instructions for the manufacture of wooden windows were written for me as if in an incomprehensible language, but having bought everything necessary materials and tools, I started work. Having considered all the drawings and photos that can be found on the Internet without any problems, it turned out that making a wooden window with your own hands is not such a difficult task.
Important! More recently, cashing was used to hide flaws in the installation of wooden windows or their thermal insulation. Now cashing plays not only a practical, but also a decorative role. Cash is suitable for wooden houses and is only used for them. It can be carved or resemble images of animals - it all depends on the imagination of the master.

We make wooden windows with our own hands
The most important thing in this process is the exact choice of glass dimensions. Thanks to this, cold bridges are not created, and the glasses adhere qualitatively to the wooden window frame. Deviations of 1 mm may already have Negative consequences- but we don't need it.
Important! Remember safety precautions when cutting glass. You should definitely have gloves to protect your hands and goggles - protection from glass chips is a must.
You need to cut glass with a diamond glass cutter, and fine-grained sandpaper is suitable for polishing the edge. The cutting technique is very simple. It is enough to stock up on a ruler that will be longer than glass and lead along it with a glass cutter. Before you smear the edges with sealant, you need to attach a glass for fitting. If everything is successful, then sealant is applied to the grooves, after which the glass is finally inserted into the frame. After that, we use a glazing bead - it should hook both the frame and the glass, and then fix it with thin nails. If the fillers are wider, then fix them with self-tapping screws - choose thin fasteners.
On this, the manufacture of wooden windows with their own hands is completely completed and only one thing remains: the placement of wooden windows in prepared boxes. I did not need this action, but if you still decide to install, then:

We restore old windows with our own hands
I would like to raise another important question: how to update old wooden windows with your own hands? Despite all the defects that appear on wooden structures after many years, they remain very strong and durable. Therefore, there is not always a desire to change old window structures and spend a lot of money on it.
Usually, do-it-yourself restoration of wooden windows involves installing sealants and painting frames, but in some cases more laborious process. When gaps appear between wooden frame and the box, seals should be used. You can use rubber, foam rubber or polyvinyl chloride. But if a skew has formed, then closing or opening the sash on the windows becomes a real problem. In order to correct the situation, you can try 2 methods: first, check the loops - maybe they have settled and it’s enough just to find a new place for them or cut off the excess with a planer. The fact is that wood tends to swell and therefore there may be places that need to be adjusted over time.
Very often, windows do not close due to a corny thick layer of applied paint. To do this, you need to use sandpaper remove excess layers of coatings from wooden structures. However, the most terrible problem may seem to be rot in certain areas. Oddly enough, there is a common solution to this: using a chisel, you need to cut out the damaged area, it would be better if you grab some more usable material. Lubricate the resulting recess with epoxy or wood glue, then insert new material and secure it. When the adhesive solution dries, the entire surface is processed with a grinder. The final decision will be to open the frame with varnish or paint with paintwork materials.

As you can see, there is nothing wrong with making new wooden structures or updating old wooden windows. In order to do all the work yourself, it is enough to study the technology, as well as stock up on the necessary tools and wooden materials. By choosing suitable wood, you can build your own window construction and in the future to carry out glazing of your summer house or veranda, and possibly a summer kitchen.
In recent years, the demand for PVC windows has been growing rapidly, they are most often used for office space, shopping centers, also PVC windows are quite often installed in residential premises. But this does not mean that wooden windows have ceased to be popular, rather, on the contrary, they have moved into the elite category. In addition, wooden windows are environmentally friendly.
From the point of view of technical and operational characteristics, wooden windows are in no way inferior to metal-plastic ones. Another advantage is that you can make them yourself.
Work on the manufacture of wooden windows can be classified as medium complexity, to ensure the required accuracy it is desirable to have special equipment, with the help of a conventional ruler and a hacksaw it will be quite difficult to observe the geometry individual elements. You can go the second way - buy finished window, for example, to give and install it yourself.
The most difficult thing in the manufacture of a wooden window is the creation of a profile, this work requires special equipment and certain skills.

But in the manufacture of a wooden window for a summer residence, the design can be simplified as much as possible. In this case, to perform work on the manufacture and installation of the window, you will need:
The box will be subjected to loads, so you need to use oak or pine for its manufacture. Soft woods will not work.


In the manufacture of wooden windows for summer cottages, if the house will be used for occasional living in warm time year, you can stop at the option with a thin double-glazed window, glazing beads and putty.
For the manufacture of the frame, you will need a bar measuring at least 6x4 cm, it all depends on the thickness of the window. As for the profile, it also depends on the design of the window, for example, in a double-glazed profile, a second groove must be provided for installing a second glass. To make grooves, you can use a conventional milling cutter or an electric planer.

With a selection of grooves, it is better to experiment on unnecessary trimming of the board.
The creation of a wooden window is performed in the following sequence:

A deviation of even a couple of degrees will nullify all the work done. For sawing, it is best to use a pendulum saw.

For the same purpose, a double dovetail key can be used, but this is associated with certain difficulties when selecting a groove.
To install the key, the groove at the ends should look like this.


If the window is with a sash, then the installation of fittings must be added to the above actions.
When the box and window frame assembled, all wooden surfaces must be carefully treated with an antiseptic, after which you can proceed with the glazing and installation of a wooden window. Glass installation can only be carried out after final assembly frames.

Double-glazed windows can be purchased directly from the factory, but for country house most commonly used ordinary glass, which is cut on site. The size of the glass should be somewhat smaller than the opening under it, after trying on the glass, a sealant is applied to the groove, the glass is applied to it, the bead prevents the glass from falling out of the frame. The glazing bead itself is attached to the frame with thin nails.
When installing wooden windows, you must follow 2 rules:

In order for the window not to warp over time, and the glass does not burst due to excessive load, even at the measurement stage, it must be taken into account that the dimensions of the window block should be 10-20 mm smaller than the window opening.
To ensure horizontality when installing a wooden window, mounting pads are most often used. After carefully adjusting the position of the window, it is fixed in the desired position with wedges.

For the final fastening of the window, mounting plates (purchased or homemade) are often used. They are attached to window block at a distance of 25 cm from each corner. After fastening mounting plates the wedges are removed to the wall and to the window block.

The free space around the perimeter of the window is filled with mounting foam.

If the window size exceeds 1.5 m, then one of the mounting plates must also be attached in the middle.
The window unit can also be fixed with dowels. To do this, a series of holes are first drilled in the wall (the distance between them should not exceed 80 cm), then the window is finally fixed in the design position using self-tapping screws. The heads must be recessed into the surface of the wood.
If desired, the heads of the self-tapping screws can be masked by preparing a mixture of glue and sawdust.
On this we can consider the installation of a wooden window completed. It remains only to install the glass and perform final finishing, which includes the installation of platbands and a window sill. These works can be started after the completion of the hardening of the mounting foam (that is, not earlier than after 12 hours).

Installing a wooden window is a fairly simple process. In terms of time, even for an inexperienced person, installing 1 window is unlikely to take more than 1-2 hours. About the same amount will be needed for glazing and installation of the window sill and trim.


