Practical storage systems for the garage or workshop.
For many people, the garage is not only a place to store a car, but also a real automotive, metalworking and carpentry workshop. Therefore, it is important that everything is always at hand and at hand. right place. But sometimes it’s so difficult to understand the variety of screwdrivers, pliers, scissors, drills and other utensils that are stored in “men’s Eden.” This review contains simple yet effective ideas that will help you create almost ideal storage systems in your garage.

Magnetic tape for storing small metal parts.
Magnetic tape glued to the wall in the garage can be used to store drills, scissors, bolts, nuts and other small metal parts. This magnetic holder is very convenient to use and will help prevent the loss of small but important spare parts.

Rack of plastic containers.
From large plastic containers and pieces of wood, you can build a large rack for storing tools, wires, spare parts and any other things. Organizing such a rack will allow you to restore order and significantly save space in your workshop or garage.

Rails for garbage bags and paper towels.
On one of the free walls of the garage you can place several small rails on which you can conveniently place rolls of garbage bags, paper towels, sandpaper, tape, coils of rope and much more.

Brackets for storing furniture.
Many summer residents use the garage to store folding outdoor furniture. So that it does not stand in the corners and does not take up much space, make a vertical rack for it with wooden or metal brackets and screw it to one of the free walls.

Storage of nails, bolts, screws and other small items.
Bolts, nuts, nails, self-tapping screws, screws and other small things do not take up much space, but storing them mixed is extremely inconvenient. Jars with lids screwed to the bottom of a wall cabinet or under the desktop will help you put these things in order.

Grid for storing pipes and baseboards.
A plastic grid screwed into the corner of the garage under the ceiling is ideal for storing leftovers. water pipes, skirting boards, profiles and other long things. Such a storage system will help significantly save space in the garage and prevent possible breakdowns fragile building materials.

Wooden organizer for screwdrivers.
A small practical organizer for screwdrivers that any man can make by simply drilling required quantity small holes in a piece of wood. This product can be hung on one of the walls of the garage or workshop to store all the screwdrivers in one place.

Vertical panels for storing things.
Several perforated panels made of metal or plywood under a table or in a cabinet will allow you to acquire an ergonomic and convenient place for vertical storage of small hand tools.

Storage systems made of PVC pipes.
Remains of PVC pipes of different diameters can be used to create the most different systems storage For example, pieces wide pipes, screwed to the bottom of the cabinet, are suitable for storing a screwdriver, drill and other tools of this type. From pieces of medium-diameter PVC pipes you can make cells for storing various sprays, polyurethane foam, tubes of paint and other containers.

Hanging storage for brushes.
It is very convenient to store paint brushes and spatulas suspended on a thin wire or on a thin steel rod.

Wooden rack for garden tools.
To garden tools did not take up a good third of the garage space, store it on a special rack screwed to one of the walls. You can make such a rack with your own hands from blocks of wood, wooden pallet or pieces of plastic pipes.

Pallet rack with shelves.
Wooden pallet complemented by shelves made of pieces wooden slats, will become a functional component of the garage and will help to place a huge amount of hand tools and small ones in one place.

Fishing rod storage.
A simple wire lattice can be used to create a convenient fishing rod holder. Such a storage system can be fixed under the ceiling so that it does not take up space below and does not get underfoot during the autumn-winter season.

Reading time ≈ 5 minutes
A real owner always takes care of the safety of his instruments. Even a small set should be stored orderly and neatly. A skilled craftsman can assemble a container for tools and accessories himself. Below we will talk about how to make a tool box with your own hands. The presented photos and videos will help in your work.
Externally, the box looks solid and stylish; it immediately declares a serious approach to the life of its owner. Its dimensions are (70x40x45 cm), that is, 70 cm wide, 40 cm deep, 45 cm high. This is quite enough to accommodate hand tools. The drawer has 3 pull-out trays, as well as a hinged top lid that opens up a spacious compartment. This box allows you to protect your tools from dust and organize safe storage.
For the manufacture of wooden box You will need the following tools:
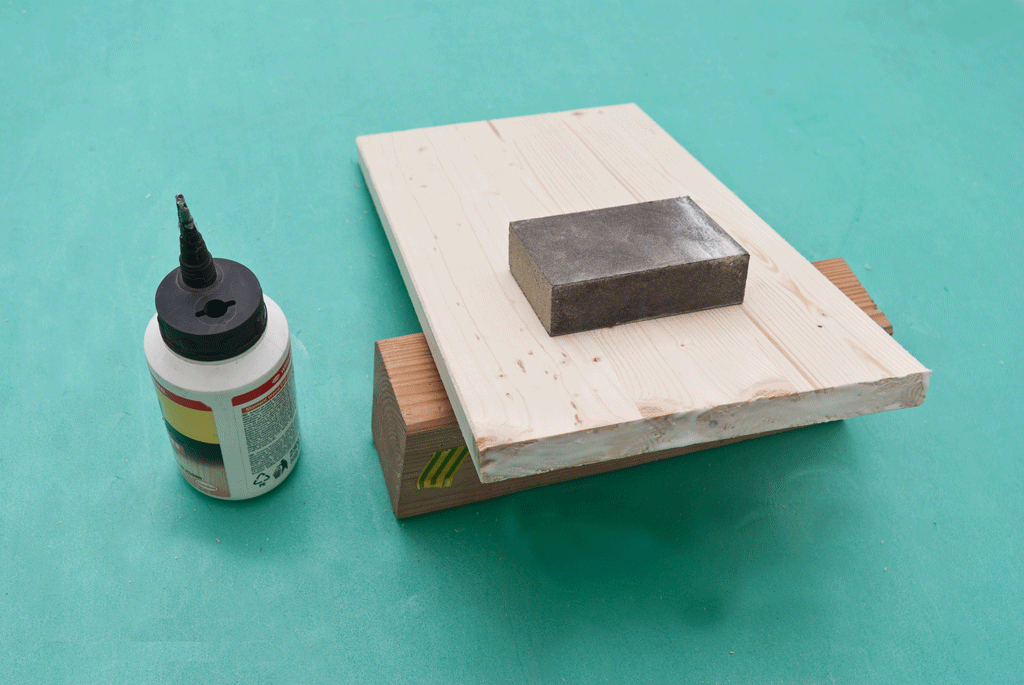
The optimal material for making the frame is oak wood. This is an excellent durable material that is durable and resistant to mechanical stress. It is better to take 19 mm thick glued slabs as a basis. This material does not have knots or rotten inclusions. Using a circular saw, cut a strip 38 mm wide.

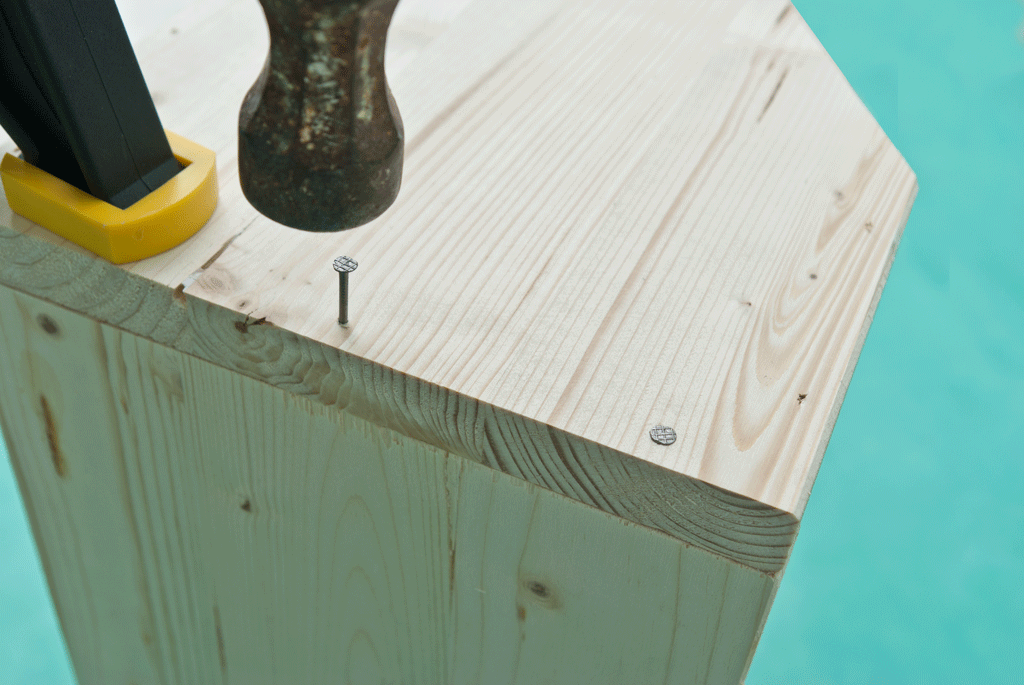
So that when gluing individual elements did not move relative to each other, a nail is driven a little into the first part, its head is removed with pliers, and then a second board is hammered onto the protruding sharp tip.

The boards are additionally coated with glue and fixed.

The glue that appears at the joints of the parts is removed with a chisel; you just need to wait for the glue to dry a little.

The result should be a part 38x38 mm. Its end is polished.

The edge must be cut strictly at an angle of 90°, so when cutting a part to the required length, we must not forget about the cut angle.

This technique will help ensure the accuracy of the cutting angle.
The location of each part is marked so as not to get confused during assembly.

A groove is cut in each part along the entire length; it must go strictly in the center.

The grooves can be made either using a stationary circular saw or using a router.

On the parts that are intended for the manufacture of vertical corner supports of the frame, transverse markings are made.

Another longitudinal groove is made in the rear corner parts. It is not needed on the front corner support parts.

For subsequent fastening in the end part of the workpieces, you need to find the center, marking the point of intersection of the diagonals.


It is necessary to carefully check the compatibility of the workpieces.

The workpieces are processed with a file.

Marks are made in the loosely assembled frame in order to subsequently lengthen the grooves.

The grooves are cut out with a hacksaw.

Use a chisel to remove all excess.


These blanks are needed for drawers. A corner is cut out from the end part.

Each workpiece is drilled for bolting.

Observing accuracy, you need to drill the prepared parts.

On the part intended for fastening and separating 2 drawers, cutouts are made at an angle of 90 °.

Having installed the parts for moving the boxes in place and fixed them, they gradually begin to screw them.

The corners of the plywood blanks are cut off, as in the photo.

The walls of the lower drawers are attached to sheets of plywood using self-tapping screws.

Prepared horizontal plywood parts are attached to one side. First, this is done without using glue.

When fixing with clamps, you need to check the diagonality so that the dimensions match.

Drawers are made of plywood.

The grooves can be cut either stationary saw, or using a cutter.


The drawer parts are held together with glue.

The sides of the drawers must have grooves for movement along the slats fixed inside.

For strength, the side parts are fastened with dowels, which are cut flush.

To ensure reliability when gluing, small nails are partially driven into the surface of the front wall of the drawers, and their heads are removed.

After attaching the front panels to drawers, look to see whether the individual elements are located evenly.

When gluing, extreme precision must be observed; there should be no gaps.

Finally, the top frame of the box is made from plywood.

To make an accurate cut at an angle of 45°, it is advisable to use a special tool.

The frame blanks are connected and fixed when gluing using a tension belt.
Discussed in the article various designs tool boxes are united by the ease of making them yourself. Choose a suitable project and, guided by our drawings and photographs, make yourself a convenient portable storage for the tools and equipment used in your work.
This box is good because the tools in it are located in their places and are in sight. You can’t put a lot of accessories in it, but there is room for the main ones. An open box will come in handy at home, when you need to repair something outside the workshop: you put in the box what is missing and go to work.

A wooden tool carrier is heavier than its factory counterparts, so you shouldn’t plan it to be too bulky. The box will not hit your knees if you make it narrow. The high handle also adds convenience - you don’t have to bend low to pick it up.
Select suitable pieces of plywood and scrap pine boards. Mark and cut out the parts of the box. Select grooves in the workpieces with a hand router or make two cuts with a circular saw and clean out the recess with a narrow chisel.
 Details of the box body: 1 - wall (2 pcs.); 2 — sidewall (2 pcs.); 3 - bottom; 4 - groove along the thickness of the partition and a depth of 1/2-1/3 of the thickness of the material
Sand the surfaces and assemble a rectangular box from the blanks. Coat the ends with wood glue and fasten the parts with small nails.
Cut out a central partition from 5 mm plywood, the width of which should be 1 mm less than the distance between the grooves in the walls of the box. Mark the location of the cutout for the arm, drill an entry hole for the saw, and cut the plywood with a jigsaw.
 Partition drawing
Apply glue to the grooves and install the partition in place.

Make two linings for the handle from a block with a cross-section of 20x45 mm, rounding the corners of the blanks with a plane. Prepare holders for hand tools from slats: in one, cut out recesses for pliers and pliers with a jigsaw, and in the other, drill holes for screwdrivers with a drill. Using glue and screws, secure the parts to the partition, placing them at different heights.

To prevent surfaces from getting dirty for a long time, coat the box with varnish.

In this upside-down stool, you can carry the tool to any place in the house or yard, and by placing it on its legs, you can reach a shelf or hammer a nail where your height is almost insufficient.

Using plywood or OSB with a thickness of 10-15 mm, cut out the cover (item 1), longitudinal drawers (item 2) and sidewalls (item 3) according to the dimensions indicated in the drawings.

Make a handle and four legs with bevels at the ends at an angle of 15° from bars with a cross-section of 40x50 mm.

Assemble the stool, fastening the parts with screws.
 Box assembly diagram: 1 - lid; 2 - drawer; 3 - handle; 4 - leg; 5 - sidewall
Round the edges of the lid and the oblong cutout in it, and apply a finishing coating.
If your child enjoys tinkering or tinkering, work with him to create a small toolbox for his favorite tools.

Take planed 16mm boards and cut out the parts according to the drawings. Prepare a round birch stick for the handle.
 Drawings of drawer parts: 1 - side panel; 2 - bottom; 3 - handle; 4 — handle stand; 5 - holder
Draw lines on the sides parallel to the edges, corresponding to the positions of the handle posts, and drill through holes for screws between them.

Remove any burrs with sandpaper and begin assembling the box. First connect the bottom and sides using glue and screws, then install the handle stand along the marking lines.

Now replace the second post while inserting the handle into the blind holes. Screw on the screwdriver holders.

Paint the box a color of your child's choice.
The required set of tools varies depending on the hobby or profession, respectively, and internal organization box may be different. The next option for carrying tools is suitable for any equipment and is distinguished by its solidity and reliability.


Use light wood for the box: pine, linden or poplar. Optimal thickness planed boards - 12 mm, thinner ones are more difficult to fasten, and thick ones will increase the weight of the structure.

Required accessories:

Mark the lumber according to the drawings and cut the blanks.
 Cutting blanks for the box
Table. Parts List
Make sure the cutting is correct by folding the blanks into a box. Sand all the parts one by one sandpaper No. 220 and label them. Assemble the bottom and lid of the box using clamps, corner clamps or mounting angles. Apply wood glue to both joining surfaces.

Drill guide holes for the screws and countersink them for the heads, and after fastening the parts, wipe off excess glue with a rag.

Fasten the body blanks of the portable part. Replace the partitions by screwing them on the sides and bottom.

Screw the carrying handle in the middle.

Install inside the drawer support rails at a distance of 30 mm from the top.

Use fine sandpaper to clean off pencil marks and burrs near the screws, and blow off dust from the surface.

Cover the box with a layer of polyurethane varnish, after drying, remove the raised pile with a “null” and repeat the finishing.

Align the hinges with the gap between the body and the drawer lid. Mark and make guide holes for screws 10 mm deep, secure the hinges.

Screw the corner covers using small screws.

Install the handle and latches on the lid.

Fill the finished box with tools.

If desired, place containers with dividers or cassettes for storing small items in the large compartment of the drawer.

If you decide to add partitions inside the box, make them removable so that you can change the free space for a new tool.
This article is about how to make a wooden tool box. If you have a lot of tools and want to keep them organized, the best thing you can do is create a simple toolbox out of wood. From our experience, we find them very useful as they are lightweight, durable and provide plenty of space for storing tools. Don't forget that you can adjust the size and design to suit your needs.
The main components of the tool box are made from 20mm boards as they have a beautiful appearance, and very durable. In addition, we recommend that you glue the joints and fasten everything with cuts. Try to screw in the screws as symmetrically as possible.
Once assembly is complete, you will need to sand the entire surface of the box. Make sure all edges are smooth. Otherwise, you may hurt your hands on the sharp edges. Also, be sure to check that all screw heads are level with wooden surface. Get rid of dust and shavings before painting.
To make a wooden tool box, you will need the following:
Materials
Tools
Adviсe
Time
Making a simple wooden tool box is one of those projects that can be done in less than an hour. But it can make your life easier, especially if you work with tools a lot.
Smart Tip: Before joining the parts, add a little glue to the joints. Immediately remove excess adhesive with a dry cloth, otherwise it will be difficult to remove once it dries.
The first step of the project is marking. As you'll see in the next step of the project, we'll be using 1x8 boards to make a toolbox. Therefore, you should use a carpenter's pencil and a straight edge to mark the lines on the wooden boards.

In order to get precise cuts, we recommend using a jigsaw or a good circular saw. Make sure the saw has smooth teeth, otherwise it may tear off the edges.
Smart Tip: Also, make sure the blade will fit exactly along the cut line before sawing.

The picture shows all the components needed for the box. A circular saw can make the job easier since many of the cuts need to be made at an angle.

You should use this drawing when making components for the box. Make sure you double check all measurements, otherwise the components may not fit correctly.

After creation wooden parts, you need to drill holes around the edges. As you can see in the picture, you need planks on wooden block to prevent surface damage. Drill three holes in the bottom and two holes in the sides.
Smart Tip: If you are not experienced in woodworking, you should draw guidelines for pilot lines. Allow some space from the edges to prevent the wood from splitting.

If the edges of the bottom are not smooth, you should sand them thoroughly with 120-grit sandpaper before assembly.
Coat the bottom ends with wood glue to strengthen the connection. Remove excess glue with a dry cloth, otherwise you will waste time cleaning it.
Press the ingredients firmly and leave for half an hour. If you are using good glue, it will hold the joints together well.
However, still screw the screws into the drilled holes.

In order to obtain a durable structure, we recommend using self-tapping screws. Work carefully to prevent damage to wood components.
Smart Tip: Align all parts before twisting. As you can see in the picture, the edges should be smooth.
Once all the components are installed together, the toolbox should look similar to the one shown in the photo below.

Make a handle from a cylindrical wooden rod. The diameter of the handle is approximately 20 -25 mm.
Smart Tip: Use a ruler to cut the rod to the desired length.

Add a little wood glue to both ends of the rod before installing it in place. Then drill a hole and tighten the screw. Hold the handle while screwing, otherwise it may move out of place.
Smart Tip: Leave about 15mm from the top edge to the wooden handle.

Remember to smooth the edges of the wooden components with sandpaper.
Smart Tip: Clean the box of dust and shavings before painting.

Then completely sand the entire surface of the box with sandpaper.
Smart Tip: Apply several coats of paint, varnish or stain to improve the appearance of the wood and protect the materials from rotting.

If you want your drawer to have the same dimensions as in our article, we clarify that 1 inch equals 2.54 cm.
The calling card of a true master is the box in which he stores his instrument.
It is impossible to do without this accessory if you need to get the job done quickly and efficiently, without wasting time looking for drills and screws, taps, screwdrivers and dozens of other necessary little things.
A wooden box with a handle, which has served as a storage unit for hand tools for centuries, can only be found today in the museum of wooden architecture.
It has been replaced by light and durable cases, suitcases and organizers, striking the imagination with a variety of shapes, volumes and sizes.
We will look at how not to drown in a sea of offers and choose a convenient, fairly compact and reliable tool box in our article.
It performs three main functions:
It should be noted that storing tools is not the only function of such boxes. Since small fasteners are often required during work, the most “honorable” place is allocated for them at the top level.

Depending on the method of accessing the contents, boxes of open and closed types are distinguished.
The first ones resemble ordinary travel bag. Their main advantage is fast access to stored items, and the disadvantages are inconvenience when carrying (the contents spill out when tipped over) and a low level of safety.

The most popular are boxes - durable boxes with a tightly closing lid equipped with latches and a lock.

Depending on the type of material used for manufacturing, tool boxes are divided into metal, plastic and metal-plastic.
Steel boxing is durable and reliable. However, you can't call it easy. Therefore, aluminum is more often used in production - a lightweight, durable and corrosion-resistant metal. If you need a big one portable box for storing tools that reveal their contents in several levels, then it is better to give preference to this material.

Plastic is another material widely used in tool box manufacturing. He's different affordable price, sufficiently high strength and durability.
There are two main disadvantages of this material– low strength of the “case-lock” connection and fragility in the cold. Therefore, in the cold season, you should protect such a tool case from strong impacts.

The search for a material that combines the lightness of plastic with the strength of metal led to the creation of galvanized metal-plastic. The boxes made from it are spacious, quite light and can withstand very heavy loads.

Another distinctive feature of tool boxes relates to the method of use: professional and household. The former are distinguished by large capacity, maximum reliability and high price. Household models have small dimensions, and for their manufacture they use inexpensive materials and accessories.
The “specialization” of tool boxes also varies, which should definitely be taken into account when purchasing. The box can be designed to store only carpentry tools or plumbing supplies. Universal option combines in its design compartments intended for different types installation equipment (screwdriver, drill, grinder, clamps, drills, couplers, self-tapping screws).
Often all free space is allocated for convenient layout of hardware. This box is called an organizer.

You can’t put a lot of tools in it, but all the small things necessary for work will fit completely.
First you need to answer the following questions:
Once you understand your needs, you can start choosing suitable model, product-oriented famous companies. There are not very many of them on the box market.
Foreign brands are the most popular Stanley, Kroft, Keter, Fit, Blocker. When choosing a domestically produced tool box, you should pay attention to the products of the Zubr company.
The American company Stanley produces professional and household tool cases. Its products are traditionally distinguished high quality, for which you will have to pay decent money. So for a standard 19-inch plastic box from this manufacturer (49x25x24cm), sellers ask from 2,000 rubles.

The average cost of a box made of metal-plastic (size 20 inches) is 2,900 rubles. Large boxes from this company, equipped with transport wheels, can be purchased for no less than 8,000 rubles.

For household use Inexpensive tool boxes produced by the already mentioned companies Fit, Keter, Kroft, Blocker are well suited. Depending on the size and quality of the material, price tags for these products range from 400 to 3,500 rubles. Models with wheels usually cost a little more.

The Zubr company produces cases for tools in different cost categories (from 500 to 4,500 rubles) and competes almost equally with the products of foreign brands. Therefore, among its products you will find for yourself suitable option And experienced master, and a simple lover of home crafts.

When choosing a tool case, pay attention to the quality of soldering of the plastic, its thickness and the reliability of the latches. The last point is especially important, since a tool case with spontaneously opening or broken latches is extremely inconvenient to carry.
Those who use not only small hand tools, but also larger electrified tools will certainly like the model with removable partitions. By removing them, you can significantly increase the internal volume of the box.
This design does not have any particularly complex elements, so it can be done on your own. The simplest homemade tool box is an open box with a handle.
To make it, you can use a thin board, plywood or OSB board. Having cut out two ends with holes for the handle according to the template, screw the side walls and bottom to them with self-tapping screws. After this, one or two partitions are placed inside. Their height must be chosen such that there is space on top for installing a shallow wooden or metal box in which small fasteners will be stored.

Putting a durable cover on such a box artificial leather with pocket compartments sewn onto it, you can significantly increase the amount of tools you can store.

The wooden handle can be replaced with a strap handle, which is more convenient to carry.
More difficult task— make a folding tool box with your own hands. It is very roomy and easy to use.

The most interesting feature This design is a system of levers (metal or wooden), with the help of which it opens its compartments on several levels.
Once you've assembled the large bottom compartment and the four top compartments, stack them on top of each other as shown in the picture, then mark where to attach the swing arms.

Before finally securing them, check the ease of movement and accuracy of opening of the entire structure. Two metal carrying handles need to be attached to the side walls of the upper compartments.
All necessary fittings (latches, locks and hinges) for a homemade box can be purchased in specialized stores.


