Country houses are in fashion today. Some are the happy owners of a dacha, and many even prefer to live away from the bustle of the city. Of course, everyone strives to make their homes more comfortable and beautiful, so they decorate them with verandas and terraces. These extensions need to be distinguished. Without going into the essence, a terrace is open area without walls, and the veranda is part of the house, but, as a rule, without heating.
In summer, such premises are good for various gatherings, but with the onset of the cold season they cease to be used. However, you don’t have to deny yourself and your loved ones the usual pastime. Insulating the veranda will help maintain its comfort at any time of the year. Of course, it is best to think about this at the construction stage, but even in a finished house purchased or in a veranda added later, you can correct the situation.
So, there is no point in insulating the terrace, but you can take care of comfort on the veranda. As a rule, insulation is a set of measures aimed at improving the heat-saving properties of walls, windows, ceilings, but you need to start from the floor, because the cold rises from below.
The procedure will depend on how the floor is made, which can be concrete, laid on a solid foundation, or wooden on supports.
Such a foundation will be a good barrier to the cold rising from the ground, and will also protect the veranda from dampness. In addition, a concrete floor allows you to take additional insulation measures.
With this type of foundation, the floor is usually made of wood. Air circulates underneath it, so it will be very cold on the veranda in winter.
External insulation of the foundation is another way to save the warmth of the veranda. In addition, the soil, expanding or decreasing in volume under the influence of air temperature, can deform the foundation. This problem can be solved quite simply by covering the entire perimeter of the base with insulation. Usually these are polystyrene foam boards, which will serve as a barrier to the cold and also prevent contact with the ground.
A less expensive, but more reliable option would be to use extruded polystyrene foam, which has the necessary strength, is not afraid of moisture and cold, and its service life is more than 50 years. Before gluing the insulation boards, the foundation is coated with bitumen or bitumen-polymer mastic, which is not afraid of low temperatures.
There is another option to insulate the base, the newest, expensive, but also reliable. This is sprayed polyurethane foam. The liquid base is sprayed onto the walls using special equipment, and after drying the foam becomes solid, monolithic, without a single seam.
Such methods are good when you can’t get to the foundation, but you still want to make the floor warm. However, even with an insulated foundation, thermal insulation measures will also not be superfluous. main feature all work with a finished floor - raising its level, which occurs due to the laying of various heat-insulating materials.
Since the veranda is not heated, this solution will be ideal for maintaining a comfortable room temperature. Moreover, it is recommended electrical system, and not water, since the cable is not afraid of frost, which cannot be said about pipes with water.
Quite labor intensive, but reliable option, which requires the use of durable insulating material in the form of slabs or mats. It can be polystyrene foam, extruded polystyrene foam, mineral wool.

Wood floors can be very beautiful, and country houses It is often customary to decorate with just such coatings. Wooden floors can be laid on any base, while taking care of insulation.

One of the insulation options is sprayed materials. This is quite expensive and requires that the work be carried out by specialists using special equipment. The use of such insulation will require cleaning the floor from debris, bitumen drips, greasy stains and solvents. Lay between joists cross beams not necessary - future spraying will form a fairly dense heat-insulating layer. The foam is applied with a special device that mixes a special liquid composition With carbon dioxide and sprays under pressure.
The sheathing filled with insulation must be covered with another layer of film or penofol, a relatively new material, which is foamed polyethylene on an aluminized backing. It is laid with the backing up and pressed down a little into the cells to leave space for floor ventilation.
Now you can lay boards treated with antiseptic on top, attaching them with self-tapping screws. The boards are positioned perpendicular to the joists, but instead of them, if desired, plywood or GVL sheets, and only then – the finishing coat.
There is an opinion that it is easier to insulate a wooden floor than a concrete one, but this is not entirely true. Of course, you won’t have to do the screed, but you still need to work hard.
This is an alternative electrical cable, which is laid in a screed layer and is therefore not suitable for wooden floors. The only requirement that must be met for installing such a system is that the floor materials are non-toxic when heated, but otherwise this is a good option for maintaining heat on the veranda.
This method is the main one for insulation wooden floors. In terms of the sequence of actions, it is similar to that previously described, only the base is prepared differently.

In addition to all the previously described methods, you can use flooring special types linoleum or laminate, which can retain heat, as well as carpet.
Insulating the floor on the veranda is a task that is best done during the construction of this extension, but if you really want to, you can start work at any time. It cannot be said that the set of actions is extremely simple and accessible to anyone. Just the ability to hold a hammer in your hands will not be enough to get the job done, but those who are confident in their abilities and have, albeit small, but still construction experience, can easily do everything on their own.
The main thing is to choose the most suitable materials in terms of price and quality, because the success of any repair consists of two components: the skill of the workers and the quality of the means and tools used.
When building verandas, they rarely think about heating them. The extension to the house is more used in warm time of the year. To change the situation, it is most effective to insulate the veranda. And this can be done with my own hands. If you don’t know how to insulate a veranda, this article will help you understand the important nuances.
There are a variety of insulation resources on sale. We present both products that have been proven for decades, as well as new ones that also provide reliable protection rooms from the cold. Which specific insulation to choose depends on the budget, features of the terrace, design, etc.
The insulation of the room must be based on a natural composition, resistant to fire, mechanical stress And environment. In most cases use:
Very often, mineral wool is used for insulation. It is resistant to fire, has low thermal conductivity, and is not afraid of deformation. The material provides good noise protection and is quite durable. At the same time, mineral wool is inexpensive, and the installation of the material can be carried out by a user even with minimal construction skills. One of the disadvantages of mineral wool is its short working life. The basalt analogue has approximately the same performance indicators, but it is more natural in composition.
There are many types of insulation
Expanded polystyrene is also used for insulation. Durable and easy to use material available at reasonable price. It perfectly protects the room from heat loss. The main disadvantage of polystyrene foam is its high flammability. Upon contact with fire, hazardous toxic substances are released.
Classics of the genre - polystyrene foam. The material is chosen for its durability, low vapor permeability and hygroscopicity. There is no need to additionally install hydrofilm on it. The material is universal and easy to install. But it quickly ignites and attracts the attention of rodents. Foam plastic is installed using different methods, the main thing is to do it correctly.
Penofol is used in combination with other insulation materials or independently. It has low vapor permeability and is environmentally friendly. Penofol is non-flammable. This is a modern and effective material that is perfect for insulating extensions in a private house or country house.
You can also consider expanded clay. Fired clay material is presented in the form of porous granules. It is used only for insulation ceilings, floor.
In this video, a specialist will tell you how to attach a veranda to your house with your own hands.
Without having outstanding construction skills, you can make a warm residential veranda. This will allow you to comfortably stay in the room during winter period. You just need to stick to proven technology.
Thermal insulation of terraces is carried out from the inside and outside. External insulation has the following advantages:
The situation is different when internal thermal insulation. You can do it in any weather conditions, since you are indoors. Bases are freely accessible at any height. But on the other hand, you need to prepare for construction, leave the room for a certain time. To better sheathe the structure, it is necessary to dismantle the old coverings.
Regardless of the insulation method, you will need a set of tools. Typically used:
In addition to the basic material, you need to purchase polyurethane foam, special film, fastening components. When the work process comes to an end, it’s time to start finishing the interior.
To insulate flooring, we will need expanded clay or crushed stone. We fill the floor with them, add a layer of sand on top, and tamp it down. Next you need to design the reinforcement mesh. Follow the dimensions specified in the insulation project. All that remains is to fill the top with concrete solution. Once the floor is dry, you need to install waterproofing; roofing felt is often used for this. You can put it on top wooden joists, which are better to be pre-processed protective equipment. Between the lags there will be thermal insulation layer. When the floor on the veranda is installed, the finishing coating has to be laid.
 Don't forget to get rid of old material
 Do not forget that before insulation old material needs to be removed.
If you divide the process into stages:
When the flooring is ready, a gap will appear - ventilation. Free access to cold air will prevent the accumulation of dampness under the floors. This will extend the life of the wooden components.
There are cases when the veranda is equipped with a basement. In this case, it is easier to insulate the floor, since there is no need to dismantle the old flooring.
Algorithm of actions:
It would be useful to perform decorative finishing.
Roof insulation depends on the characteristics of the roof. If it is pitched and there is no attic, you will not be able to move around it on your own. That is why it is better to insulate the coating at the construction stage or from the ceiling. Let's look into the nuances further.
Most of the heat escapes through the roof. It is not recommended to skimp on insulation in this area. All work will be carried out from the inside, since ceiling insulation from the outside is only possible during the direct construction of the building.
In order:
This makes the height of the room smaller. If this option does not suit you, insulate it from the inside using vacuum panels. Their installation does not require a frame, so the space of the room will remain the same.
In general, the method of insulating the ceiling is almost identical to the walls. The only inconvenience is working on weight. In this case, you won’t be able to cope without an extra pair of hands.
 Do not forget to follow the instructions for insulating the veranda
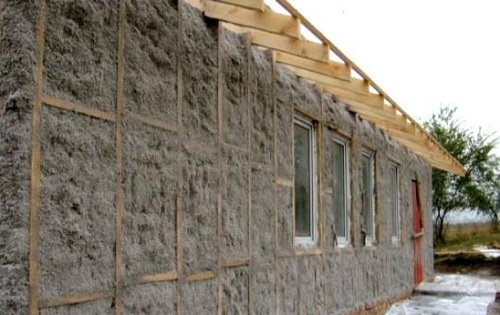
 We recommend treating the outside wall surface with polyurethane foam, polystyrene foam or mineral wool slabs. Subsequently, the coating can be decorated with almost any finishing material. The end result will be functional and beautiful.
Installation of insulation on concrete or brick walls is carried out according to the following algorithm:
If you do everything correctly, using high-quality material, in winter the terrace will be reliably protected from the cold. You can decorate the room as a hallway or arrange a compact winter garden.
When insulating you will need building level. Make sure that no cracks or gaps appear on the frame. Install the insulation in a single layer, eliminating excess parts.
Insulation process wooden walls is different. The slats are first installed on the original surface. The insulation is mounted to them using dowel umbrellas. The structure is covered waterproofing film. To fix it, staples are used. To protect the thermal insulation layer from moisture, use metallized tape.
If high-quality insulation is a priority, and you consider the terrace as living room, you will definitely need thermal insulation of windows and doors.
Can be used for insulation different materials. Modern and best option– PVC double-glazed windows. But there are common cases when it is necessary to insulate wooden frames.
First of all, preparation: seal the windows and doors. This stage optional if double-glazed windows are installed on the veranda. If we work with ordinary windows, we need to process the glass panels and the joints between the frames. Energy-saving film is applied. Adhesive tape is applied along the edge of the glass sheet, and protective film. We seal the joints of the frames with a solution of chalk and gypsum. Add a little water to the dry mixture and stir until it thickens. Apply the resulting composition with a spatula.
Now let's move on to the doors. The main thing is to seal the joints so that no cold air. We take the batting, remove the structure from the hinges and stuff the protruding rollers on top and bottom. Then we beat it tightly and secure it with a stapler or nails.
We still recommend using double or triple glazing. They retain heat well and provide good sound insulation. Make sure that the connection points between windows and walls are sealed with glue or foam.
Using modern techniques, it will be possible to reliably insulate the room. The technology is widely popular warm seam", but it is relevant only for wooden buildings.
We will need:
Insulation can be done both inside and outside. Before work, remove dirt from the seam, hammer a tourniquet or tow into it, and seal it with sealant. The “warm seam” technology is actively used, since with its help it is possible to retain a significant amount of heat.
 Don't forget to remove dirt from the seam
 The main way to maintain comfortable conditions in a room is to insulate it. Various equipment and technologies can be used as additional measures:
The best combination is an insulated room and an additional heating source. Create comfortable conditions You can live there yourself by installing thermal insulation on the veranda.
The issue of thermal insulation of the veranda becomes relevant when there is a desire to use this room all year round. Verandas are usually unheated, as a result of which the temperature in them can drop below zero in winter.
If you want to provide comfortable temperature air inside the veranda even in the coldest season, you need to take care high-quality insulation extensions.
With comprehensive thermal insulation using proven materials, and installation of basic heating device: a small solid fuel stove or a good electric radiator can provide constant temperature in the veranda at +18+19 degrees.
It’s worth mentioning right away that since the construction of a veranda is usually budget project, as a result of which it is built from inexpensive materials- wood, cinder blocks, or gas silicate blocks, the veranda will have to be insulated comprehensively.
You can, of course, only insulate the walls and even insulate the ceiling, but you will not get the desired effect from such thermal insulation.
To turn a veranda into a full-fledged year-round living space, it is necessary to insulate both the surface of the walls from the outside and the ceiling, walls and floor from the inside of the building.
If savings are at the forefront of the insulation project, then ordinary polystyrene foam can be used as a thermal insulation material. This material has good thermal conductivity and is inexpensive.
Also, polystyrene foam is easy to work with, even one person can handle it without any problems, so if you plan to do everything yourself, polystyrene foam - a good option from inexpensive insulation materials.
The thermal conductivity of polystyrene foam is approximately 0.04 W/mK per , which is, of course, less than that of mineral wool or extruded polystyrene foam, but also quite good, considering the cost of this material.
To insulate walls, ceilings and floors, you can take foam plastic 5 centimeters thick - in most cases it will be quite enough.
Expanded polystyrene benefits not only in its thermal insulation properties. An important fact is that this material has minimal vapor permeability and hydrophobicity, as a result of which condensation will not form on its surface, which is the main enemy of most insulation.
The advantages of polystyrene foam also include ease of installation - this insulation is manufactured in the form of slabs measuring 100*160 cm, for installation of which in most cases only an adhesive solution is sufficient.
August 28, 2016
If you have a house or dacha outside the city, then you probably had to think about how to insulate the veranda for winter accommodation. This is far from an idle question - and even if you don’t sleep there, warm room in front of the main building significantly saves energy costs for heating.
Today I want to tell you how to make insulation in a private house with minimal costs, taking two paths separately, or combining them with each other.
Let me make a reservation that a veranda is usually called an open or glazed room attached or built into the main building. It is noteworthy that we are not talking about heating here; therefore, it is necessary to insulate both the plank and stone extension only possible in other ways.

Since we are talking about insulating the veranda in wooden house(brick, stone), then, of course, this means not an open, but a glazed room:

No matter how you increase the thermal insulation capacity of the ceiling, walls and floor with your own hands, all your efforts will come to naught with single stained glass windows. It will be the same as if you put on a hat and boots, but at the same time you remained in one underwear in the cold.

One of the most powerful sources cold, the room may have a floor that lacks hydro- and thermal insulation, especially if the building is located in the northern regions of our country. Let's start with waterproofing.
Any moist substance is an excellent conductor of cold, not to mention problems such as dampness and rotting. Therefore, if the shut-off waterproofing was not laid during construction, then it must be installed now.
This can be roofing felt or thick polyethylene film (I am not mentioning vapor-permeable film - it is too expensive, and besides, you can completely do without it).
And now - about materials for insulation. For example, mineral wool, polystyrene foam, extruded polystyrene foam and, of course, expanded clay - the cheapest and most reliable component of country construction.
I would also like to say about the sand pillow, if you add it, of course. Waterproofing should be laid not on it, but under it - this way we will minimize the amount of moisture from below.

The ceiling can be insulated both from the inside and outside - it all depends on what kind of roof is on your veranda and, of course, on your desire. Regarding the material here, the same can be said as for the floor, but it all depends on its location - from below, of course, it is much more convenient to use foam plastic or mineral wool.
But, if you consider that verandas mainly have pitched roof, then there is no attic there, therefore, in 99% of cases the insulation has to be hemmed from below, that is, internal installation must be done.

In order to do internal insulation, you will have to mount any of suspended ceilings, for example, like the one in the photo above, for . But insulating the veranda from the inside with your own hands in this way may not always work out for the most trivial reason - low ceilings, which, well, it’s simply impossible to lower another 5-6 cm.
In this case, there is only one thing left - to install some kind of insulation under the roofing material, only with good waterproofing. And this will be more difficult, since you will have to dismantle and then reinstall the roof.

Well, finally, let's look at how to insulate cold veranda for living space inside or outside along the walls. Let me note that there is nothing new to say here. In such cases, as a rule, mineral (preferably basalt) wool or polystyrene foam is used.
The thickness of the material directly depends on the need, that is, on the thickness and climate of the region. There is one small nuance here - if the insulation is installed outside, it will bring more benefits than from the inside, and you can see its effectiveness in the diagram above.
Another point - by insulating the room from the outside with polystyrene foam, you get the possibility of “wet finishing”. That is, you can tile the veranda decorative plaster directly on the foam (of course, with a reinforcing plaster mesh).
Insulating the veranda either from boards from the inside or from any other materials from the outside is beneficial only if there are no drafts and there are windows with bags. Do you have any questions or suggestions? Write about it in the comments.


The composition of the family and the needs of its members change over time, and this cannot always be taken into account when building a house. At some point it may turn out to be too small: there is a need for an additional bedroom, office or bathroom. You can solve this problem with little expense if you know how to insulate the veranda, turning it into the same warm and cozy room as the rest of the rooms in the house. To do this you need to select the right materials and create a warm cocoon inside or outside the extension, depending on its design.

To decide how to insulate an extension to a house with your own hands, you need to evaluate its design, wall material, dimensions, ceiling height and other features:

Advice! If you do not live in the house permanently, you should not install water system heating - it can freeze and fail in your absence. It is better to prefer electric heated floors.

As for how to insulate a terrace in a wooden house with your own hands, here we're talking about rather about a complete rebuild or addition. Especially if it is an open extension without a canopy and a floor raised above ground level. Sometimes this problem is solved even easier, since dismantling of existing ceilings, old windows, etc. is not required.
In general, to transform the veranda into a living space, comprehensive insulation of all structures except the wall common with the house will be required.
Everything in structure thermal insulation materials can be divided into 3 types.
Such insulation is made from polymers, which are given a special structure in the form of many closed cells filled with air. They are produced in the form of rigid panels, rolled materials and foams, which harden after application to the insulated surface.
Note! Since the basis of such insulation is made up of synthetic chemical components that release toxic substances (phenol, styrene, etc.) when heated or burned, it is recommended to additionally protect them from fire.

This type of insulation includes:

With their structure, such insulation is reminiscent of unspun wool or cotton wool, hence the name - mineral wool. The raw materials for its production are various minerals and waste from ore smelting - slag. Therefore, they distinguish the following types these heat insulators:
Solid raw materials are transformed into fibers as a result of special processing. Due to their mineral origin, these materials do not burn, but due to their fibrous structure they easily absorb moisture, losing their thermal insulation properties. For this reason, they require mandatory hydro- and vapor barrier.

If you need to decide how to insulate a veranda for winter living in a wooden house, mineral wool will become best choice, since it is permeable to steam and does not create an insurmountable barrier to its escape through the walls to the outside.
Available in mats and rolls varying degrees density. To insulate horizontal surfaces, you can use any material, but it is better to install dense slabs on vertical surfaces, since they are less susceptible to shrinking and “sliding” down under their own weight.
The video will tell you about the pros and cons of cellular and fibrous insulation:
Expanded perlite and vermiculite, expanded clay granules - these and other thermal insulation fills can be used when the question arises of how to insulate the floor on the veranda or the ceiling from the attic. Similar bulk materials They are convenient because they create a continuous layer; their particles fall into all the cracks and cover them. They cost less than fiber mats, especially considering that you do not need to install a frame to install them.

The answer to this question depends primarily on the material of the veranda walls and the type of insulation. In any case, external insulation is more effective: in this case, the dew point, at which condensation forms when warm and cold air meets, does not reach the walls and does not cause them to get wet with all the ensuing negative consequences.
The following video clearly and clearly explains why it is better to insulate a heated room from the outside:
But if you want to know how to insulate a veranda for winter living from the inside with your own hands, then do it without the risk of high humidity it is possible in a room only if its walls are a frame lined with boards. Wood evaporates moisture easily. It is better not to do this with brick and block load-bearing structures.
Since it is easier to insulate an extension to a house from the inside - you can work in any weather - this method, despite all its shortcomings, is used quite often. Another reason for this choice is often related to the fact that the external walls are already finished with the same facade material, like the whole house, and you don’t want to spoil the exterior.
There is no big difference in how to attach the insulation - from the inside or outside. There are serious differences only in the thermal insulation technologies of different structural elements.
The method of installing insulation is selected taking into account its type and subsequent finishing:

You can see how thermal insulation is installed on the frame in this video:
If the height of the room allows or there is no other way, then the existing flooring is used as a subfloor. Most often these are boards laid on joists. A beam is attached to them in a similar way to a frame for walls. But it must have a sufficient cross-section to withstand the loads. Insulation is laid between the new joists, covered with waterproofing and a finishing floor is installed.

If the base is concrete, one of the insulation options could be a screed with expanded clay or poured into a regular concrete screed warm floor. This method is especially relevant when you need to decide how to insulate the veranda and make a bathroom or kitchen there by tiling the floors.
When the floor is accessible from below, the insulation can be secured under the existing flooring, creating the same thermal insulation pie, protected from moisture.
Advice! The floors will be much warmer if you also insulate the foundation of the extension.
If the distance from the floor to the ground is very small, you can remove the flooring, fill the cavity with expanded clay and put it back in place.

The easiest way is to insulate the ceiling, which is accessible from the attic. If it is not there, then to maintain the height of the room, remove the roof and install thermal insulation.
Note! The under-roof insulation must be reliably isolated from water in case of precipitation penetration.
When the ceiling height allows it to be reduced, the insulation is attached according to the already described scheme, as on the walls.

The ideal way to eliminate heat loss through openings is to install double or triple glazed windows and an insulated entrance door. If there is no money left for this, there is another way to insulate a veranda in a private house cheaply with your own hands. During the cold period, the outside of the windows is covered with transparent film, the gaps between the frame and the wall are caulked and sealed with strips of paper or self-adhesive foam.
Source avatars.mds.yandex.netThis is a completely acceptable temporary option for maintaining heat in a room. If you arrange a vestibule in front front door, placing an insulated frame partition, then the problem of cutting off the cold from it will be solved.
Knowing how to insulate a veranda in a wooden house with your own hands, you can turn it into an additional bedroom, kitchen or bathroom, expanding the living space of the house. To do this you need to block warm air the ability to exit the room from all sides: through the floor, ceiling, walls, windows and doors. You can insulate both from the inside and outside, choosing the method that requires less cost or will be the most effective in your case.


