A DIY flower stand will certainly decorate any home, giving indoor plants a stylish and original look. In addition, multi-tiered shelves help all green pets reach the light source, especially if there are a lot of them and it is impossible to fit them all on the windowsills.
Stands for indoor flowers are most often made of wood - boards and plywood. It's convenient natural material, which lends itself well to processing. Also, stands can be made of metal, plastic, wire.
You can place the stands in almost any part of the room - on the wall, in the corner, on the window. If light-loving plants do not fit on the window sill, it can be “expanded” due to numerous hanging or shelving shelves built into the walls of the window. If you need to save space and at the same time place numerous flowers with pots, you can fix the shelves on the walls. Also, beautiful stands on the floor will decorate the interior.
In the photo you can see what models of plant stands can be and choose the right model for yourself.


Simple but elegant wooden stands are quite easy to make yourself, especially for those craftsmen who love and know how to work with wood.
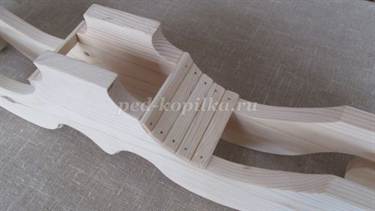
As an example, we will give a master class of a wooden stand that can be placed either by the window or on the floor. For this craft you will need the following materials and tools:

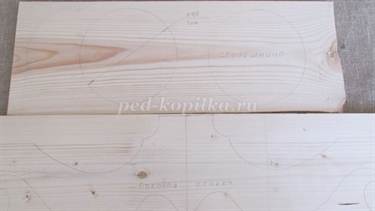
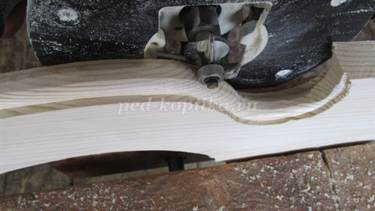
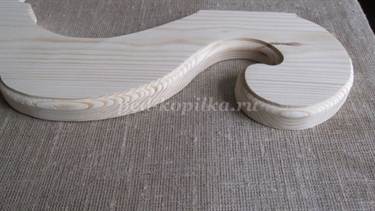
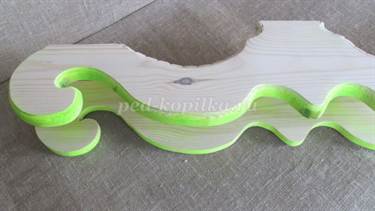
Boards must be selected taking into account the size of all parts. For the craft you need two side walls and three table tops. The walls can be about a meter long. The diameter of the tabletop is 16-20 cm.
You can draw the template by hand or use a ready-made one. It must be taken into account that the walls are the main support of the stand, so they must touch the surface in at least three places.
How to do:


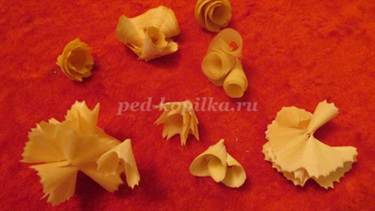
At this point you can complete the craft and start using the stand for its intended purpose. However, to give the stand an aesthetic and interesting view, you can decorate it with artificial roses. For this you will need:

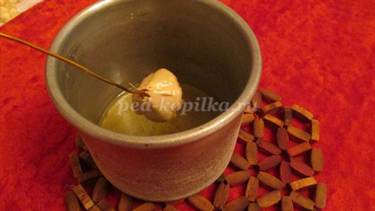
While the varnish is drying, you can do the following:


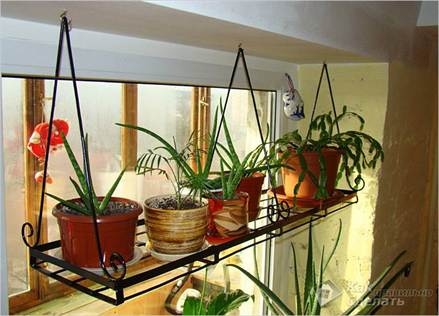
Stands made of metal, especially forged ones, also look beautiful. They can stand alone on the floor, decorating the interior, or be suspended, for example, by a window. They are easiest to buy or order from blacksmiths. However, you can try to repeat the forging patterns using thick wire and a soldering iron.
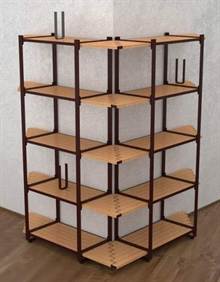
Perhaps the hardest thing to do floor stands for flowers with your own hands. For home with large rooms This great option, but quite labor-intensive. First you need to construct a frame on which the shelves will be supported. It can be shaped like the letter “A” or “L” or be rectangular like a rack.


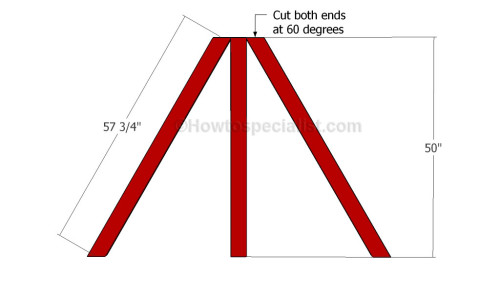
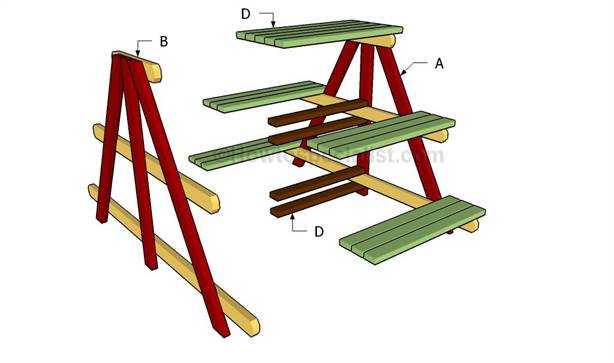


The frame must be strong and stable. Bars made of wood or metal or polypropylene pipes(depending on the expected weight of the shelves and pots).


Wall stands are racks or individual shelves attached to the wall. The shelves do not have to be located strictly below each other. They can be secured in a checkerboard or other pattern to make it easier to place pots and easily reach them while watering.

Very convenient corner stands - this way you can save room space. However, you should not make such a stand in a corner far from the light source.

An original shelf for flowers and small items can be made from boards and belts.
Growing flowers, for most housewives, is very exciting activity. A small hobby gradually develops into a big hobby, filling all the free space. It’s good if the living space allows you to allocate the necessary territory to create a green oasis. But what about this sprout, which has no place on the windowsill, can’t be placed on the closet, the table is occupied, and on the floor among the large flowerpots it will simply get lost.
The solution is this global problem, floor and wall shelf options are becoming available. Modern market offers a wide range of ready-made designs. Variety of shapes, structures and color designs is amazing and has no boundaries. However, made with your own hands, flower shelves become unique design solution and bring an extraordinary atmosphere to the interior.
Before you get to work, you need to create rough plan arrangement of colors, based on which the sizes and features of future shelves will be determined. Depending on the type of plant, two main options are used:
The number of flowerpots located on the selected structures also divides them into several types:
All proposed options can be designed in the form of corner shelves, so you will save space and additional features for design innovation. For lovers of liana plants, ceiling shelves are offered for consideration.
To create your own flower racks, you can choose and combine a wide variety of materials. Very often, many people choose a tree. Despite the environmental friendliness and versatility of use, do not forget that you can always find other interesting options at hand that have their own advantages. We will look at some of them in more detail.

Plywood - perhaps this is the simplest and cheap material, from which flower shelves of various shapes and sizes are obtained. If there is no plywood sheet in the house, it will take a small amount of money to purchase it. The process of creating a shelf from plywood is not complicated. In the presence of necessary tools assigned task in short time will turn into a work of art.
First, you need to make a sketch. Here you can show unlimited imagination. The main thing is that the resulting design corresponds to the initial purpose, is durable and can withstand the intended number of pots.
When the canvas is ready, the edges of the cut are cleaned sandpaper and holes are made for future fastening. The entire surface is covered with a special solution, which increases moisture resistance and prevents the appearance of mold. After drying, the shelf is opened with varnish.
Creative people can demonstrate their talents by decorating the product with drawings, covering it with pebbles or shells, and showing creativity.
To secure wall options plywood shelves use metal corners or brackets, due to which they are attached directly to the wall.


The most common place to place flowers indoors is the windowsill. Using this plastic sheet, flower racks are created. You can buy it at almost any hardware store or order from the manufacturer.
For the design you will need several nickel-plated pipes, fasteners, flanges for attaching to the floor and a pair of brackets, do not forget about the tools necessary for the work.
After the measurements have been taken, the window sill is cut to the required length. The next step is drilling holes for the pipes, two at the edges, it is important that they are parallel to each other, and one in the center. The length of the pipes must be the same, otherwise the structure will be unreliable and shaky. The assembled rack is secured using ceiling brackets and floor flanges.
The advantages of plastic shelving are durability, they are not afraid of moisture, and they are easy to care for.

To create a corner shelf, you can use all the materials listed here. For small products there will be enough leftover materials.
Creation technology corner shelves DIY is very simple. A surface of the required size is cut from a sheet of chipboard. A galvanized pipe is threaded into the prepared holes and the entire invention is connected to each other with flanges. Using brackets it is fixed to the selected surface.
The next stage is treatment with varnish or paint.
To create a green corner, interesting solution There will be a kind of corner shelving. As they grow, the shelves become smaller, representing a pyramid. You can arrange flowers on this design different sizes using climbing plants On the sides.

Wood is one of the most reliable materials used in construction. Properly assembled and secured wooden racks or shelves can accommodate any number of plants, regardless of size. When choosing wooden wall shelves, you can limit yourself to the most simple option. To do this, take a beam of the required length, coat it with varnish or paint and fasten it using metal corners to Wall. If you replace the fastenings with leather straps, you get a creative design approach that brings individuality.
Wooden floor racks are made for plants in large flowerpots. They can withstand a lot of weight, allowing you to combine different types colors.
From scraps, even if of unequal length, it is easy to assemble corner shelf. Flowering bushes diversify the boring life of corners with their bright colors.
For lovers unusual options are offered for consideration wooden shelves, combining several different materials.
Assembly method wooden shelves or shelving the same as in the version with plywood.

When combining materials for flower shelves, we recommend choosing a combination of metal and wood. Welded metal carcass With wooden flooring is used for wall types shelves and fits very harmoniously into a modern interior.
For manufacturing, you will need a drawing with measurements, several rods that will later create the base of the shelf, and a wooden board for the partition. After welding the main part, it must be treated with an anti-corrosion solution and painted in the chosen color. Next, the prepared wooden plank is installed, ready product, mounted on the wall using self-tapping screws.
Considering this combination of materials in floor options flower racks, the main work is carried out according to the same plan. Preference is given to options with several tiers, and lovers of sophistication will appreciate forged flower stands.

Main location glass shelves usually occurs in a window space. On such shelves, all plants will receive the necessary portion of light. When preparing for work, you need to choose the right glass thickness. The best option 0.5 cm. By strengthening the lower part with wood, this design can easily support up to ten small pots of flowers.
If handling a glass cutter causes some difficulties, it is better to seek help from knowledgeable craftsmen. By providing required sizes, they will easily complete your task.
In addition to the glass, you will need iron corners to attach the slats. Shelves are placed on top of the slats.
Equally important is the proper arrangement of flower racks and shelves. By following a number of simple tips, harmony is achieved between the green space and the atmosphere of the home:
The use of flower shelves is not limited only to the interior of the premises. Houses and apartments with balconies or loggias contain entire greenhouses. Owners personal plots create incredible compositions on the territory. Restored stairs, bicycles and wheelbarrows are used as shelving. Hanging shelf teapots, watering cans and other old utensils can serve. Such green corners become one with the owners, and self-designed racks and shelves for plants integral part little flower paradise.


Today, everything non-standard and made with your own hands is in fashion. Therefore, thousands of people around the world spend their free time decorating their home or yard with various crafts, including those made from scrap materials. Popular products of this kind include flower stands. Anyone can make them with their own hands.
To make such crafts, you don’t have to spend money on expensive materials. For example, ordinary paper towel rolls may be suitable, from which, using PVA glue, you can create a kind of “woodpile”. Then such flower stands (they are very easy to make with your own hands) must be painted with oil or acrylic paint. If desired, they can be decorated with bright yarn, which is used to intertwine the “logs”.
Fans of eco-style will certainly really like the options that look as natural as possible and will fit perfectly into such a landscape design. For example, anyone can easily make their own wooden flower stands (floor stands) from the trunk of a felled tree. To do this, you need to cut the branches with a grinder so that you get a cylinder 1-1.5 m long. Then you need to step back from both ends by 20-25 cm and make deep cuts almost to the middle of the diameter of the trunk, and then hollow out the area between them to form a place where you can install small pots of flowers.

Another option is again made from a tree trunk, but the area where the branching occurs is taken. The lower part is cut down to create a stable platform. In addition, from the thickest section of the log, discs 3-4 cm thick are cut according to the number of branches. Each of them is fixed on one of them. Then the product can be painted, and if the trunk was rough, then leave it that way. The result should be flower stands (floor-standing), resembling something like a large and massive candlestick.
Great idea - inhale new life V old chair. In order to make such wooden flower stands, you need:
At the same time, the older and more vintage the chair is, the more stylish the stand will be.

The second version of this craft is made even simpler: a round hole is cut out in the seat, with a diameter 3-4 cm smaller than the diameter of the flower pot, which is then inserted there and, if necessary, secured with small quantity polyurethane foam. By the way, if you are going to make such flower stands, it is better to create floor-standing, low options from children’s high chairs or stools.
Very stylish products can be made from what millions of people throw in the trash every day. So, you can make magnificent flower stands with your own hands from plastic bottles.
You will need:
DIY flower stands made from plastic bottles, which look like beautifully decorated bronze compositions, are made in the following order:
Using the same scheme, a large flower stand can be made. A high base for it will be possible if you take more bottles. For example, you can add another “floor” of four bottles, connected according to the principle of the lower part of the previous structure.
These crafts can be made from almost anything. For example, you can simply remove car tire from the metal rim and hang it on the wall. Then small pots with lush hanging plants are inserted into the lower part of the tire.

Wall flower stands can also be created from scraps of aluminum or plastic pipes with a diameter of at least 10-15 cm. They need to be cut so that you get 4-5 pieces of the same length. Then, stepping back from the edges by 3-4 cm, the upper part of the pipe is cut out to make something like a trough, into which soil is poured and flowers are planted. To be able to hang such a wall-mounted flower stand, take metal strip length, equal to length pipes-"troughs", and tie two strong ropes to it at a distance of 2 cm from the ends, so that 2 ends hang from both sides. Then they make a pair of holes on the pipes, retreating the same distance from the cuts. Thread ropes through them and fix them so that the stands do not move.
The principle of the previous craft can be used in another way. Yes, you can take wooden board and cut out 3 squares of the same size. In the center of each, you need to cut out a circle with a diameter 4 cm smaller than the diameter of the top of the pots that are going to be hung, and make one hole in the corners. Next, take 4 ropes of the same length. Each of them is intended for one of the corners of the stand. On the first rope, stepping back 10-15 cm from the end, tie a knot. Pass it from below into the hole of the lower “floor” of the product and tie the next knot at a distance approximately equal to the height of the pot, multiplied by 2. Thread the rope again from below, into the hole of the next “floor”, and repeat these steps until all “floors” are put on a rope. Do the same with the other three ropes. All four ends of the ropes are tied at the top of the stand into a knot, by which it can be hung on a hook embedded in the ceiling.

Such flower stands, made by yourself, can be three-, four- and even five-story. However, you shouldn’t get carried away either, since if the pots are large enough, the structure will turn out to be quite heavy.
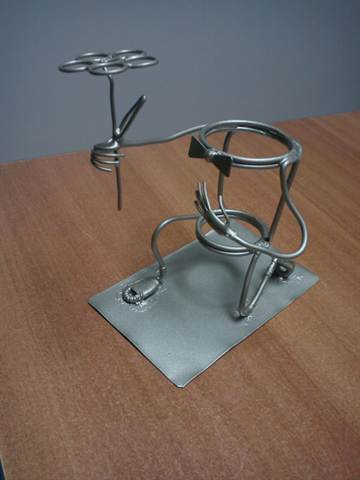
As already said, similar products can be made from a variety of materials. In particular, for the external decoration of buildings and for landscape design metal is an excellent choice. True, only a few can independently make forged flower stands, which are very beautiful and durable. In addition, they can easily fit into any interior. Among interesting options You can note the wall flower stands (metal) in the form of tree branches.
As for simpler products, everyone can make their own, for example, a frame with a canopy in the form of a lattice, to which it is attached wooden box, where flower pots are placed.

Flower stands (metal) can also be made from reinforcement with a diameter of 3-8 mm. It needs to be heated red-hot over an open flame and then cooled slowly. After this, the reinforcement is bent using a bench vice, scraps metal pipes various diameters and hammers. Then you need to arm yourself welding machine and fasten the parts together in the right places. After this, these areas must be treated with a grinder to remove scale and excess leaked metal.
In this way, floor, wall or hanging flower stands can be made. If you want to get a product in vintage style, you need finished design cover with two layers of paint: black, and when it dries - bronze. Immediately after this, you need to jerk the surface of the stand with a rag so that the not yet dry “bronze” comes off in places and the black bottom layer appears from under it. Thus, the product will look as if the bronze has turned black with time.
Glass aquariums always look very attractive. What if you use such vessels to make flower stands with your own hands? True, this option is only suitable for flowers that do not need large quantities moisture that naturally grows only in deserts. For example, in an old round aquarium, you can cut a couple of small holes, fill the bottom with sand and bury a small plastic bowl in which a dwarf variety of aloe is planted.

Now you know what flower stands you can make with your own hands for your home or cottage, and you can decorate your home with them.
Indoor flowers are an essential attribute home comfort. In order for them to grow well, you need to think about the location of the pots. Therefore, you should get plant stands in advance. You can make them with my own hands. Some designs are made from improvised materials in a matter of hours.
Flower stands are divided into 2 types. They are floor and wall mounted. The latter must be especially durable. Under heavy load, the entire structure can simply collapse to the floor. Therefore, if you have several large pots, then it is better to focus on the 1st type of stands.
More rational approach When creating such structures, one can consider the production of light decorative options.

The stands can be made from treated solid wood, plywood or MDF. In the latter cases, the base material must be moisture resistant, as it can deteriorate due to periodic spraying of the plants.
Enough convenient option- a stand for several pots.


Many housewives are faced with the fact that the only bright place in the apartment for growing flowers is the window sill. In this situation, he simply physically cannot accommodate everything houseplants. A hanging flower stand will help solve the problem. You can do it for walls too. In this case, they are equipped with additional lighting.


