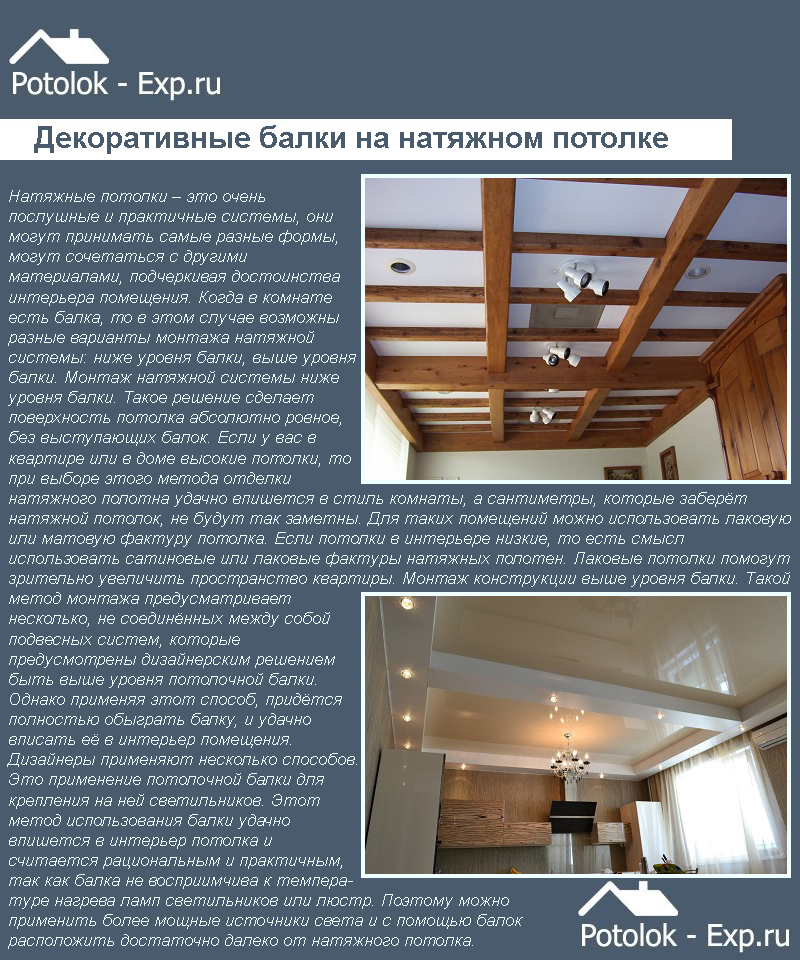
Wooden beams are used for the ceiling as a decorative detail of the interior, mainly in a rustic country style. The design of the ceiling affects the design of the entire room. Ceiling beams made of wood are either load-bearing or suspended. As the name suggests, on load-bearing elements bear the load if they are entrusted with the function of the ceiling in multi-storey building. At the same time, there is no distributed load on the roof beams, since they are located between the attic and the living space.
Wooden beams on the ceiling have been used in the interior of premises for a long time and currently continue to be used no less successfully. Modern methods Painting and staining of wood products allows you to create different colors and shades according to the homeowner's desires. Decorative wooden ceiling beams, shown in the photo, are installed in rooms with different purposes, since they are afraid of humidity.
Wooden ceiling beams are made from different wood species. But mainly coniferous materials from cedar, pine, larch, and spruce are used. Deciduous wood is used extremely rarely due to its high cost and lower strength, with the only exception being oak. Materials made from it are excellent for ceiling beams, but their high price for many it turns out to be unacceptable, and making these elements from oak is quite difficult.
Hemmed wooden beams on the ceiling, which are of considerable length and considerable thickness, usually begin to crack when drying and can warp, so they are made from thin boards and assembled like a box.

For a long time in wooden house decorative beams installed on the ceiling were decorated with carvings, painted, whitewashed, etc. After a certain time, coniferous wood acquired beautiful colour, and the resin present in it served as a preservative against rot and thereby ensured a long service life of the material.
Thick beams on the ceiling make the room higher and thereby form a kind of coffers on its surface. Often these ceiling elements are used in the kitchen as a holder for dishes.
To purchase beams beautiful view, they are often decorated with special overlays, since elements made of natural wood are difficult to process. They are often made from valuable and expensive wood. Using various wood processing techniques, beams are given vintage look. While creating original interior in country style, designers place them parallel to the walls, at different angles, and make them intersecting.

In addition to “country” and Victorian, the following styles are currently used when decorating ceilings:
Recently, designers often give preference to artificial beams, which are made from polyurethane. In many of their characteristics they are superior to natural wood.
To their positive qualities applies:

Decorative beams from artificial materials may have different profiles, which differ in design:
View 1 . U-shaped products made from MDF or chipboard. The parts are connected at right angles. Veneers made from valuable wood species are glued onto them;
View 2 . U-shaped beams are made from MDF or chipboard. Connect all parts at an angle of 45 degrees. For strength, the structure is reinforced with slats made of different wood species;
View 3 . U-shaped products made from MDF or chipboard have rounded corners. This option is great for interior spaces that mostly have smooth lines. The corner joints in them are reinforced using a profiled strip. Beams of all three types are painted with enamels if desired and patinated.
View 4 . Beams are made from lamellas of deciduous and coniferous trees, such as pine, ash, oak and others. These decorative products are installed when using country or Provence styles in the interior. The method of processing them is similar to that of natural wood.

View 5 . The products are made from lamellas, their design is the same as that of type number 4, but the lower edges are slightly rounded. Since these beams are made from natural material, a method of processing them like wood.
View 6 . These products are made from solid wood. Such wooden beams on the ceiling can be load-bearing or suspended. Processing is carried out as with ordinary wood.
Decorative polyurethane beams are made in industrial conditions and therefore appearance standard Everything at the same time wooden crafts have differences. But finishing the ceiling with wooden beams is complicated by the fact that these elements are heavy and it is inconvenient to attach them to the base floor.
You can install spotlights in artificial products, but in those made from natural breeds trees, lighting fixtures are installed, but this process is extremely labor-intensive (more details: ""). This requires special tools, and to prevent fire, the material is treated with fire retardants, and these are all additional costs and, at that, considerable ones. Beams made from artificial materials have the appearance of a hollow profile.
When building a house, it is necessary to install ceiling beams. In this case, the tree must be High Quality– dry and without rot. Under no circumstances should you use wet material, since after drying it will most likely crack and the ceiling will be made of wooden beams will lose load-bearing characteristics. During installation, the ceiling structure is installed with its ends in the wall masonry (read also: " "). In order to change a beam that has become unusable in the future, if necessary, you will need to spend a lot of time and money and put in a lot of effort.

Brushing wood is one of the ways to finish beams; you can do this work yourself without spending a lot of money.
To do this you need to have:
Coniferous wood lends itself best to brushing. For this work you will need three types of brushes:

If you want to amaze your guests with an imitation of bark beetle damage to a tree, you need to have the following tools and devices on hand:
An awl is used to depict the entry of a bark beetle into a tree, and using an engraver with an attachment, its movement is drawn.
Drywall in a wooden house.

There are a number of nuances when gypsum boards are laid on a rough ceiling along wooden beams. There is a high probability that in buildings built a long time ago, the sheathing boards are nailed down. When there is no confidence in their strength, it is best to screw each board with self-tapping screws to the beams. After such fastening they will hold securely.
Wooden ceiling made of plasterboard can be not only single-level, but also multi-level. With the help of this modern material, the configuration of the ceiling surface can take on absolutely any shape, even round. It is also possible to mount various lighting fixtures on the ceiling.
Previously, beams under the ceiling solved a completely functional problem - they supported the ceiling. Now this one is exclusively decorative element most often found in interiors made in rustic or Old English style, in Provence, country and chalet styles. It’s a good idea to integrate beams into modern styles interior: loft, modern, minimalism, hi-tech.
Decorative ones look most advantageous in rooms with high ceilings, which dictates their placement mainly in houses with a ceiling height of three meters or more. Wooden beams under the ceiling - stylish element home decoration, emphasizing the spaciousness of the room, and in some cases carrying a functional load (for example, it is used to hide communications). Most often, beams are placed in kitchens, hallways, halls and offices.
Certainly, modern houses rarely decorated with real wooden elements under the ceiling. Although there are natural connoisseurs who prefer real heavy beams for ceiling decoration, as a rule, country house.
Building materials stores offer a huge selection of false beams made of lightweight and easy-to-install polyurethane. Visually, such elements are indistinguishable from natural wood, and in practice they even surpass it in some ways.

The advantages of polyurethane false beams include the fact that they:
However, lovers of naturalness can opt for false beams made of MDF or chipboard, hollow inside. Veneers made of valuable wood species are glued onto such beams. You can find options made from lamellas. Beams come with sharp and rounded edges, U-shaped and L-shaped (to decorate joints).

Table. Comparison of polyurethane and wooden false beams.
To design a high-tech style, some designers use metal beams, however, such elements are more difficult to install and require professionals to install them.

Some craftsmen make beams with their own hands, which takes a minimum of time and is inexpensive. For example, in order to make false beams, you can use ordinary foam plastic, which is left over from insulating a garage or loggia.
Step 1. Cut sheets 4-5 cm thick into strips of the required width.
Step 2. Glue the strips liquid nails into a U-shaped beam.
Step 3. After setting, cut the beams into pieces of the required length.
Step 4. Cover the beams self-adhesive film under the tree (except for the side that will be glued to the wall).

Using the same technology, you can make beams from plywood or even regular boards. The boards can then be aged, covered with stain and varnish.
If you want to make beams from natural timber, you can buy edged polished timber, for example, 70x50. When choosing, be sure to check that it is smooth and dry. Then you need to treat it with stain and varnish and cut it to the required length. This is also an inexpensive and accessible option.
Each interior style will require its own style of beam design.

False beams can be used to decorate any type of ceiling: suspended, plasterboard, regular painted, etc. With their help, you can zone a room or create such a popular decorative element as a false window on the ceiling with imitation of stained glass. Decorative beams can imitate window coverings, between which, during the work process, a canvas with photo printing, mosaics, frescoes and even mirror panels are glued. The modern European trend is very interesting, when beams go onto walls.

Beams can be decorated with LED lighting on top, which will give a special decorative effect. The beams in which they are mounted look amazing ceiling lamps. All wiring in this case is hidden inside the hollow structure.
In general, beams on the ceiling will give a feeling of warmth and comfort to the living space, add zest to modern interior styles and allow you to create the necessary authenticity in public institutions such as clubs or pubs.

If the room needs visual expansion, then the following points should be taken into account when arranging the beams.
The frequency of location also plays a big role. For example, if the ceiling height is very high (which happens on the first floors of buildings), placing the beams close to each other helps to reduce it a little. If the ceilings are of medium height, the beams should be mounted on greater distance from each other. Beams can also be laid in a herringbone pattern. Attic rooms without a ceiling they look especially impressive if the ceiling beams pass through the columns and are attached at the ends to the walls, creating the effect of a hut.

The specifics of the procedure depend on the material from which the false beams are made. Let's take a closer look at each of the options.
This is the simplest option for placing false beams in modern apartment. If you want to decorate your kitchen or living room quickly, inexpensively and on our own, there is no better option.
Step 1. First, marks are made on the ceiling and walls to indicate the places where the false beams will be glued. The sticker areas need to be primed for better adhesion.
Step 2. Then the beam is coated with liquid nails and glued to the required place. Foam products are practically weightless, and liquid nails set literally instantly.

Some instructions advise to apply it to the wall at the same time, but if there is too much glue, the beam may begin to slide down the wall. Therefore, the golden mean must be determined experimentally.
Step 3. If the room is narrow, you can stick 2 beams along the long walls of the room, and simply place the cross beams perpendicular to them. Such simple ceiling will help hide the unevenness of a regular concrete ceiling and will look very advantageous.
This is also not very difficult or expensive to do.

Step 1. We draw lines on the ceiling for placement.
Step 2. We drill holes in the timber with a 12 mm drill no more than 0.5 centimeters deep every 30 cm.
Step 3. In the same holes we drill 8 mm holes into which we drive 120 mm self-tapping screws.
Step 4. We apply timber and mark the locations for the holes in the ceiling.
Step 5. Drill 8 mm holes on the ceiling in the marked places using a hammer drill.
Step 6. We drive chopsticks into them.
Step 7 We screw the beam.

Since the head of the screw is hidden, we cover these places with wood putty. After drying, tint with stain, then varnish. You can cover the screw heads with wooden plugs or special decorative overlays that imitate the heads of forged nails. You can attach nails to regular dowels - this is an even faster option.
If cross distribution of beams is planned, unevenness may occur at the joints. The design of these units depends on the style in which the room is decorated. If it is country, for example, then these places can be covered with leather decorative belts or large twine glued in several rows.
This professional way installation

Decorative beam B1 made of polyurethane (wenge, cherry, oak, olive, walnut, light oak)
Step 1. For polyurethane false beam Wedge beams are made of wood, which completely correspond to the internal cavity of the beam.
Step 2. The ceiling is marked: lines are drawn along which the beams will be attached.
Step 3. The wedge bars are installed along a line every 1 meter using screws or dowels.
Step 4. When installing a false beam, polyurethane adhesive is applied to the ceiling. This is not necessary for fixation, but for a tighter fit to the ceiling so that there are no gaps left.
Step 5. The beam is tightly placed on the beams and screwed through the sides with screws.

Step 6. The screws that attach the false beam to the beam and the joints of the beams are covered with decorative leather straps with imitation rivets.
To do suspended ceiling and decorate it with decorative tanks, you should install embedded parts, similar to those installed for hanging chandeliers. Embedding for a decorative false beam is easy wooden block required thickness. It is attached to the main ceiling, and the suspended ceiling is stretched in such a way that it passes touching the lower plane of the bar. Then false beams are attached through the ceiling to the beam.
You can use fastening of beams using hangers. Suspensions are attached to the base. and after tensioning the ceiling, slits are made in the canvas. Specific actions depend on the type of material.
If the suspended ceiling has been hanging for a long time, but you want to somehow diversify the interior without dismantling the canvas, you can use external consoles with fasteners to the wall or internal bars screwed to the walls. Beams will be attached to them with self-tapping screws.
Because plasterboard ceiling It is suspended, you can’t just attach beams to it. You will have to remember/tap the places where the frame profiles go and attach the beams to them. Can be attached to any in a convenient way: with a long anchor through the beam, gypsum board and profile or on a block attached with a self-tapping screw to the gypsum board and profile. A self-tapping screw screwed exclusively onto drywall will not hold the beam for long.

The joints of beams or the exit points of self-tapping screws are covered with various kinds of decorative overlays, among which the following can be distinguished:
To decorate the space, you can use decorative consoles, which are sold together with beams and create an imitation of supports on the walls. If cables will run inside the polyurethane beam for lighting fixtures, then they must be hidden in corrugated protection.
This way you can get a very beautiful unusual interior with an emphasis on wooden beams under the ceiling. This interior does not require a large investment of money, and you can fix the beams with your own hands literally within a few hours.
Wooden floors look organically in Scandinavian, classic, Victorian, rustic interior, as well as in a room decorated country style And Provence. High-tech design involves the use of beams, however, here they are more functional, emphasizing restraint and conciseness.
Often the project involves painting the floors. For example, in the Provence style, light shades are used to express tenderness, airiness and comfort. And here chalet or alpine style aged in natural tones, where rough beams made of coniferous wood fit perfectly, often right with the bark. This design can be seen in the photo of a snow-covered house in the mountains.
So, wooden and metal beams are the destiny country houses. But what to use in urban housing if there is a desire to recreate a certain style? This is where polyurethane beams come to the rescue. They are lightweight, making it possible to install them on the ceiling with your own hands, unlike metal ones, the installation of which is trusted only to professionals. In terms of financial and labor costs, polyurethane beams are the best option if you have a small budget for repairs, since they won’t hit your wallet hard. They can be solid or hollow; in the latter type you can install spotlights and hide the wiring inside. In addition, decorative beams for the ceiling come in a variety of colors and textures, most often imitating wood.
In any interior Special attention pays attention to details. You can decorate the ceiling completely or partially, make fancy or strict designs. There are a lot of examples of laying beams; just look at the photo and repeat it in your interior or decorate it according to your taste and discretion. European design is now at the peak of popularity, when the ceiling ceilings are gradually moving to the wall. There are a huge number of styling techniques; everything here is limited by imagination. You can also process the rough ceiling and create the desired design in the following ways:
How to arrange the floors?
You can make a room wider or longer using various techniques. Beams on the ceiling are placed according to the purpose suggested by the design:
Isn't it easier to skillfully beat such a construction? For this purpose they are used lighting solutions, such as design LED strip, mortise and pendant lamps that fit into the design of the room.
Interesting! LED lighting placed along the top of the beam creates the feeling of a floating structure.
Interior design, as a rule, involves a combination of the design of all surfaces in the house with textile furniture. This can be taken into account when painting the beams, applying a predominant pattern or relief to them, as well as focusing on the details and painting the beams on the ceiling so that they play in contrast. Nowadays there is a huge number of photos from which it will not be difficult to design a rough ceiling.
Due to the low ceiling heights, a design with beams is difficult to imagine in an ordinary city apartment. It is created in a spacious country house, where beams in the interior look more appropriate. However, it all depends on the imagination of the designer and the area of the living space. Because even a large apartment with a modern layout can be decorated with this decorative element. Decorative beams are easy to fit into any style. They are used to delimit space, place designer lamps, visual expansion area. Multifunctional products create a unique atmosphere in the room. Therefore, next we will consider in detail the characteristics of this trendy technique in home planning and the advantages of its use.
Their presence in private houses is implied a priori, since the structures are an integral element of the ceiling. In this case, the owner can leave the ceiling in natural form, or maybe hide plasterboard partition same. It all depends on the chosen style of the room. The use of ceiling structures can make it appropriate individual design project, where strict style will be combined with practical purposes of zoning the room.
Thus, beams can easily hide possible planning flaws. For example, uneven joints when finishing with drywall. Also, in ceiling structures it is possible to provide placement engineering communications(in order to build in decorative lighting, electrical wiring is installed in the beams).
Beams can be used as a base for attaching other design elements, be it decorative lamps or even modern plasma. Hanging dried herbs on ceiling items is considered a generally accepted decoration. Especially if they are located in the kitchen area. You can also provide hooks for placing kitchen tools or glassware.
Functional design solution implies proper zoning of space in the room. Let's try to name the goals that can be achieved in this way:


A variety of materials are used to produce ceiling products. Having a choice allows you to decorate a room or hall in a conceptual style, be it ethno or gothic. It all depends on the taste preferences of the owners and the amount of financial resources. There are also universal materials, to create any decor. The big plus is that you can install them yourself. Below we will present each of them in detail.
They will need to be additionally treated with an antiseptic.
The only disadvantage of wood can be considered the cost of the products, since quality comes first here. Wealthy owners like to order ceiling structures from exotic tree species (for example, merabou or meranti). Then there is processing (tinting, spraying) and installation using self-tapping screws. Options with hollow beams are also allowed, which can be secured with an adhesive binder.
The bedroom is the best option for arranging such decor.
All factors should be taken into account when choosing ceiling structures. Before purchasing, be sure to pay attention to the parameters of the room itself. The determining factor is the height of the ceiling. If it is low in the house, then it is better to completely forget about decorative ceiling products. The same applies to narrow, small rooms. Beams will only increase the effect of claustrophobia in a person.
It is also necessary to check the compatibility of the chosen style with ceiling structures. Pompous baroque is unlikely to go well with these massive products. Brutal ceilings are also not suitable for rococo, where the pretentious atmosphere requires completely different types of finishing. Beams gravitate more towards strict, stylish, even masculine interiors. Where the naturalness and natural shade of the material is valued above all else, and pomp is completely unnecessary.
Much will depend on the budget allocated to create the required design. Based on the amount of funds, it is selected optimal material. For example, if resources are limited, it is recommended to opt for artificial polyurethane beams. If the ceiling is high, no one will notice the replacement of the natural analogue with a false beam.


Decorative ceiling beams in the interior can be decorated tastefully, the main thing is to decide on suitable style. There are types of stylistics for the most harmonious use of hanging products:
One of the best options for these purposes. Designers love to emphasize the rich interior with decorative beams on the ceiling. This sets off the luxurious furniture and natural wood floors.
Best harmonizes dark color wooden beams with a light ceiling.
When the budget is limited, you should turn to polyurethane, which perfectly imitates a textured surface. Fine carvings can say a lot about the status of the owners.
More a budget option, since it allows the free use of artificial products. Ceiling beams in the interior are made in such a bright color that natural wood does not have. Then zone lighting is installed to delimit functional areas. Their number is farmed out to the owners.
The luxurious interior of this style is favorably emphasized by noble wood species (red), which are additionally treated to look antique.
French style goes perfectly with whitewashed decorative beams. According to the budget, natural wood or false beams are used. The latter are easy to install with your own hands, since installation does not require special skills.
High-tech and loft are at the peak of popularity now. For creating similar style polyurethane or aluminum beams are used. It will coexist harmoniously with metal suspended structures brickwork in the interior and a lightened ceiling.
Rough, brutal style implies exclusively natural wood, the installation of which is not easy to cope with. Need a friend's help.
Ceiling beams can and should be used when arranging a spacious home. This unique design element can become the main highlight in the interior and emphasize the respectability of the owners of the house. The above recommendations are enough to try to implement installation work on one's own.
The Middle Ages left us a legacy in the form of ceiling decorations made of beams. But if previously beams were used exclusively as a load-bearing structure for floors, now their functionality has expanded significantly. Modern materials, fashion trends, a lot of ideas - all this makes it possible to stylishly play around and decorate the ceiling with beams.
The ceiling, decorated with decorative beams, is already a full-fledged element of the room that works for the interior. In this case, beams can be made in different styles.

By style they distinguish:
Modern materials make it possible to use the principle of ceiling beams even in modern nano-interiors. We decorate rooms in a minimalist or high-tech style metal beams, which can be curved and multi-level.
You can add functionality to the beams with the help of additional decor.

Popular ways to decorate beams include:
The decorated ceiling, not only with beams, but also with additional decor, looks thoughtful and harmonious. It also expands the capabilities of the ceiling from a functional point of view.
The work of installing ceiling beams is carried out as standard. Thanks to plasterboard and polyurethane, you can install false beams yourself - no special skills are needed. Installation of natural whole beams is carried out by specialists.

When working with decorative beams, you cannot do without the following tools:
The following stages of work can be distinguished:
You can attach beams different ways. It all depends on the material of the beam, the size of the room and the beams.
To secure the beam, you can use a fastening system with wedge-shaped bars, which must be made according to the dimensions of the box of the beam itself. The bars are installed in the empty cavity of the beam at a distance of up to 50 cm from each other, and secured with liquid nails or self-tapping screws.
This method is acceptable if it is not possible to mount beams on a pre-installed profile.
The equipment with materials has adapted this type of ceiling decoration, such as beams, to our modern conditions, made it possible to easily and practically use this beautiful finish. Now you can safely create a ceiling from beams even on your own, or at least consider this option. The affordability of beams and ease of installation make ceiling beams an increasingly popular method decorative covering ceiling surface.