Until recently, the balconies of city apartments served as a kind of storage room - people stored preserved food and various things there. What’s more, all sorts of unnecessary rubbish was taken out onto the balconies, which was a pity to throw away. However, today these premises are increasingly used as additional living space. And to implement such an idea, you need to take care of insulating the balcony.
If you insulate your balcony, you will be able to not only expand the living space of your apartment relatively cheaply, but also significantly reduce heat loss from your home. The fact is that it is through the balconies that most of the heat escapes. But in order for everything to be done efficiently, you need to know where to start. With a well-designed scheme, turn cold balcony albeit in a small, but almost complete room, it will be much easier.

So first sketch rough plan works - it will include:

Important information! The balcony can be insulated both from the inside and outside. But since you will be doing the work on your own, that is, without the help of specialists, it is better to resort to internal insulation.
On modern construction market There are a lot of thermal insulation materials, but for a balcony they are more suitable:

As for foam plastic and EPS, the laying of these materials is carried out using almost the same technology (the only exception is the form of adhesion - with EPS it is better due to the use of grooves).
It is better not to use mineral wool for a balcony - the installation procedure will be more labor-intensive, and the condensation that inevitably forms on the balcony is undesirable for this material. Expanded clay, for obvious reasons, can only be used for floor insulation (the insulation technology will be described in detail below).
And if we add to all of the above the fact that the balcony should in no case be overloaded, then it becomes obvious: the most suitable option- this is foam plastic 4-5 cm thick, which costs less than polystyrene foam or mineral wool.


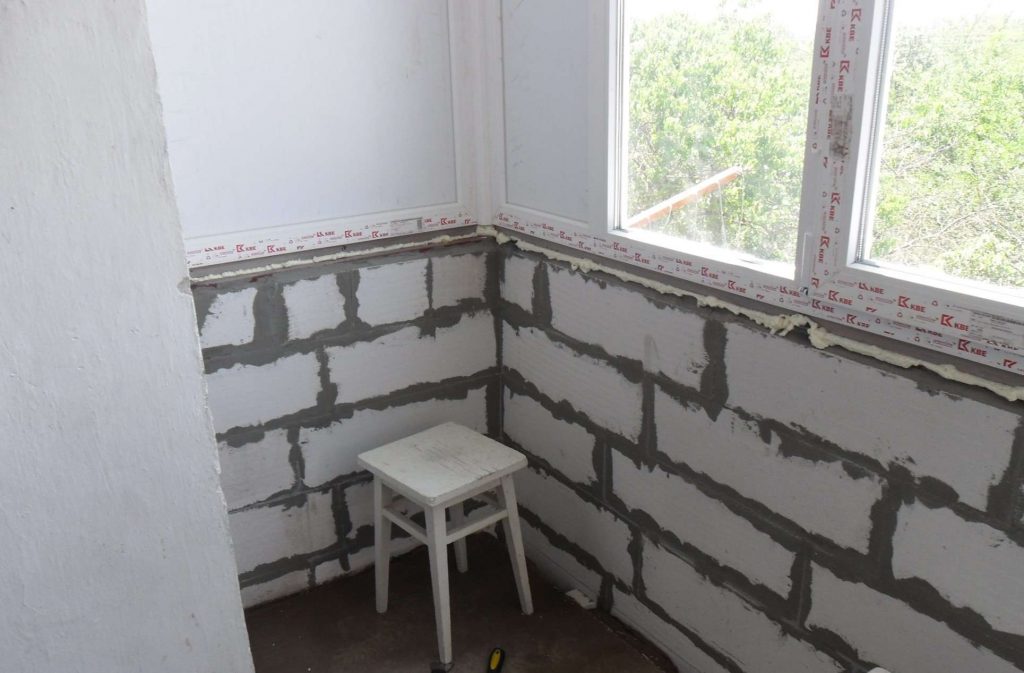
If your balcony is already glazed, you can skip this step. The glazing procedure itself largely depends on the parapet installed on the balcony. If we are talking about iron sheathing, then you must build it up using foam blocks or ceramic brick. It is important that the resulting wall thickness exceeds 10 cm. And if you have a reinforced concrete parapet, you can immediately begin installing windows.

Today, many (especially fans of environmentally friendly building materials) prefer double-glazed windows with wooden frames. It is worth remembering that such structures need to be processed antiseptic and paint regularly. You can learn about installing double-glazed windows with wooden frames from the video below.
However, the majority of consumers still buy PVC windows. When purchasing, choose a special one plastic profile, characterized by increased rigidity and strength properties. In addition, the profile must have good thermal insulation properties.

Plastic windows should also have:
After installing the PVC structure ordered according to the dimensions of the balcony (the work should be carried out by specialists), you can proceed directly to insulation.
Let's look at how to insulate a balcony from the inside with your own hands using polystyrene foam (although the technology described below is also suitable for polystyrene foam).
Table. Insulating the floor on the balcony
| Steps, no. | Short description | Illustration |
|---|---|---|
| Step #1 | First, prepare the working surfaces - seal with foam all the cracks found in the concrete, as well as at the joints between the slabs and the wall. |
|
| Step #2 | Mark the floor for the subsequent construction of the sheathing. In this case, it is important that the pitch of the sheathing exceeds the width of the insulation sheets by approximately 10 mm. |
|
| Step #3 | Lay the slats according to the previously made markings (the approximate size of the bars is 4x4 cm, but their width must correspond to the thickness of the insulating material). The first and last slats should be 50-100 mm away from the walls. Connect the slats using self-tapping screws. |
|
| Step #4 | Place sheets of foam plastic between the lathing slats, gluing them to the floor liquid nails or special glue. Blow out any resulting voids with polyurethane foam. |
|
| Step #5 | Lay a vapor barrier layer on top of the insulation. Lay a vapor barrier layer on top of the insulation (necessary to increase thermal insulation and prevent the formation of condensation). If you use regular PET film, then under no circumstances place it on the “cold” side of the insulator. If you are laying foil insulation, then do it with foil to the foam. |
|
| Step #6 | Fix sheets of plywood or chipboard on top, and the thickness of the floor covering should be at least 20 mm. Attach the sheets to the slats using self-tapping screws. |
|
| Step #7 | All that remains is to lay the finishing coating, which can be carpet or linoleum. |
|
Important information! There is another way to insulate the floor on a balcony with polystyrene foam: sheets of foam plastic are attached to a leveled and cleaned surface, and poured on top thin screed from a previously prepared dry mixture solution. Can be used here as a finishing coating ceramic tile.
As noted earlier, the floor on the balcony can also be insulated using expanded clay. This material is also inexpensive, and its installation is not difficult. Let's get acquainted with the algorithm of actions.
Step #1. First, lay a waterproofing film on the floor with an extension of 10 cm to the walls.

Step #2. Place the beacons around the perimeter in increments of approximately 25 cm, being careful not to lean them too far against the walls.
Step #3. Fill the floor with a 15 cm thick layer of expanded clay and distribute the material evenly over the surface.


Step #4. Moisten the expanded clay with cement laitance (this is an aqueous solution of cement).


Step #5. Fill the expanded clay with a layer of concrete or self-leveling mixture. This must be done carefully so as not to damage the structure of the insulator.

Step #6. Wait for the screed to dry completely. After this, you can begin laying the topcoat.

The technology here is almost the same as for floor insulation. Follow these steps:
Step #1. Mark the future location of the slats on the walls (as well as for the floor).
Step #2. Attach the slats in accordance with these markings.

Step #3. Apply polyurethane foam to the surface using wave-like movements. At the same stage, you should drill holes for the dowels.
Step #4. Attach the foam sheets using plastic mushroom dowels.

Step #5. Blow out all the resulting cracks with polyurethane foam, and then seal with mounting tape.
Step #6. Lay a waterproofing layer on top - for example, penofol, which will also serve as thermal insulation.


Step #7. Seal the seams at the joints with foil tape.
Step #8. Mount the counter-lattice on top of the foam foam and install the finishing material.

This procedure is also performed using a similar technology, but some differences still occur.


If the insulation weighs too much, you can use dowels for fastening. Blow out the cracks with foam. Otherwise there are no significant differences.

In most cases, balconies are lined from the inside with clapboard or profile, but plasterboard is also used, followed by wallpapering. PVC panels are also used for cladding. Concerning exterior finishing, then it is better to entrust it to professionals, especially if your apartment is located higher than on the ground floor.


Important information! It is forbidden to take there central heating, so if additional heating is required, you can lay a film “warm floor” under the linoleum.
You can also install an outlet on the balcony to which you can connect electric heater. The described room is small, so heating will take a minimum of time. We also note that the double-glazed window weighs quite a lot, so the remaining materials (including the insulator itself) must be of minimal weight. By the way, this is another reason why it is better to give preference to EPS or foam boards.

Now you know about the strengths and weaknesses of materials suitable for insulating a balcony, as well as the technologies for laying polystyrene foam and expanded clay. Therefore, it's time to get to work! Moreover, there is nothing complicated here if you are armed with step-by-step instructions and all necessary materials. If you do everything correctly, you will turn the balcony into a full-fledged living room with all the ensuing advantages.
Most apartment owners use the balcony as a place to store rarely used items. If you want to get additional living space and turn it into a place to relax, a flower garden or an office, you can do this without involving specialists. We will describe in detail how to reliably insulate a balcony from the inside with your own hands.
Read also: How to insulate a private house with your own hands: roof, walls and foundation, description of thermal insulation materials offered on the market (Photo & Video) + Reviews

To decorate the balcony, you can use both roll and tile materials that provide reliable thermal insulation:
It is undesirable to use thermal insulation materials that have a significant mass (for example, brick) for insulating balconies.
After all, the load-bearing capacity of a balcony slab is limited. If there is excessive load, such a structure simply may not withstand the additional weight.
Read also: Required materials
Secrets of soundproofing walls in an apartment: we use modern materials and technologies (25+ Photos & Videos) + Reviews
Using penoplex
Read also: Where to begin? Inspection and repair of balcony slabs

Self-leveling floor: device, recommendations and step-by-step instructions on how to do it yourself (50 Photos & Videos) + Reviews
The condition of balcony slabs is not always satisfactory - over time they may partially collapse. Therefore, before you start insulating the balcony, you should check how strong and reliable its base is.
Minor and medium repairs can be carried out independently. If significant cracks appear, or even more so, exposed reinforcement, the collapse of fragments of the slab, or its separation from the wall, you should call specialists. should only be done by qualified installers from the management company. If the reinforcement is severely corroded, it may be necessary to reinforce it with steel beams. In case of severe destruction balcony slab can be completely cut off.
To restore damaged areas of concrete:
Read also: [Instructions] Do-it-yourself laminate on a wooden floor: a complete description of the process. Laying schemes, what materials should be used (Photo & Video) + Reviews
Pouring floor screed on the balcony
After reconstruction of the slab, it is advisable to waterproof it. For these purposes, roll materials or bitumen are used. To modern waterproofing materials Penetrating impregnation is classified as “Penotron” type. It is better to apply it in 2 layers.
The balcony railing may also require repairs. New structural elements in the form of profile pipes are attached to anchors or by welding.
Read also: What to do if plastic windows in a house or apartment sweat? Causes of condensation. Ways to solve this problem (Photo & Video) + Reviews

If your balcony has conventional single-chamber double-glazed windows, they should be replaced. Otherwise, you will waste a significant part of the energy resources spent on heating the room. A warm balcony requires 2- or 3-chamber double-glazed windows. In the Far North they can have 5 chambers.
Glazing a balcony is more complicated than conventional installation of double-glazed windows. In this case, installation of additional components is required. Therefore, be sure to invite proven, highly qualified professionals.
It is not advisable to use wooden double-glazed windows for glazing. Due to the accumulated condensation, they will begin to rot over time. Plus, the weight of such structures saturated with water will be significant. If for some reason you decide to stop at wooden products, do not forget to regularly treat them with an antiseptic and paint them.
The use of latest technologies– glazing using I- or K-glass.
The first option - I-glass with a multilayer coating, which includes a small percentage of silver - is capable of reflecting up to 90% of the outgoing heat. Since such surfaces can be easily scratched, they are installed with a coating inside the room.
Read also: Oxide of non-ferrous metals is applied to K-glass, due to which heat is reflected from the batteries into the room. This type of coating is less susceptible to damage. Although the prices for both glass options are the same, the degree of heat reflection in K-glass is less and is 30%.

Plastic windows in a wooden house: description of the main characteristics, how to install it yourself, photo and video instructions A low-quality profile may turn yellow over time
, so pay special attention to its quality certificates. Choose profile systems from trusted manufacturers. If you want your double-glazed windows to last longer, don’t skimp on fittings either. To more economical way Windows are sealed with ordinary polyurethane foam.
But it will be better if all the cracks are sealed with a sealant that has water-repellent properties. There is no point in refusing to install flashings - they not only look decorative, but also protect the room from drafts. You can order at balcony windows blinds or covering with a special opaque film
Read also: Warming the balcony in stages

Foundation: description of the device, types, complete step-by-step instructions for making your own bookmarks (Photo & Video) + Reviews It is necessary to cover not only the walls with thermal insulation, but also the floor and ceiling, otherwise the insulation will simply lose its meaning. After all reinforced concrete slabs
Read also: Preparatory work
Making and laying paving slabs with your own hands: step-by-step instructions for dry and wet mixture. Making a mold, vibrating table (Photo & Video) + Reviews
Before starting work, carefully inspect the balcony for cracks. If you find them, carefully fill them with sealant or foam. Their excess must be cut off. After all, when installing the sheathing, they will interfere with its alignment.
Read also: Blind area around the house: types, structure, schematic drawings, instructions on how to do it yourself correctly (30 Photos & Videos) + Reviews

Both foam and aerated concrete can reliably store heat, which is why they are often used to insulate balconies or loggias.
However, since aerated concrete is capable of absorbing water, it is better to focus on foam blocks. Their air cells are completely closed from moisture penetration.
The wall must be positioned strictly vertically. Therefore, the location of each row must be verified with a building level When laying window frames
Read also: Insulation of walls and ceilings
[Instructions] How to make beautiful and unusual shelves on the wall with your own hands: for flowers, books, TV, for the kitchen or garage (100+ Photo Ideas & Video) + Reviews
How to properly insulate a regular or brick balcony?
Read also:

Since insulation under the screed significantly increases the weight of the structure, the most common method of floor insulation is insulation along joists.
So, detailed step-by-step instructions:

At the end of the article I would like to give a few the most important advice professionals.
And at the end we invite you to watch a video about comprehensive insulation of a balcony
8.3 Total Score
Insulating the balcony from the inside
Feedback from our readers is very important to us. If you do not agree with these ratings, leave your rating in the comments with the reasoning for your choice. Thank you for your participation. Your opinion will be useful to other users.
Ease of implementation
Appearance
Convenience


The loggia could well be called extra room in the apartment, but, unfortunately, many people use it only in summer time, since it initially does not have insulation, and there are no heating radiators installed there.
 Modern way insulation - spraying polyurethane foam
 Polyurethane foam is sprayed onto the walls using special equipment, and specialized companies deal with this insulation.
However, before inviting them to spray such insulation, the walls need to be prepared by lathing them. It will be a kind of frame for the sprayed and expanding heat insulator, as well as for securing decorative finishing material.
The advantage of this method of insulation is that when sprayed, the material, expanding, closes all the cracks, making the surface absolutely not blown, without cold bridges. Polyurethane foam covers not only the walls, but also the ceiling and floor.
I would like to show several options. Perhaps by starting the process of turning a cold room into usable area, someone will be inspired by one of the ideas developed by the designers.

In this case, a standard loggia with a small footage is presented, transformed into cozy room recreation. Here you can retire with a book or laptop and delve into reading. If a large family lives in an apartment, usually each member is doing something they love, and sometimes it’s difficult to find cozy place to sit in silence. An insulated loggia will be an ideal option for this.
In such a room you can place a small TV and enjoy your favorite programs or sit with handicrafts, comfortably choosing comfortable armchair legs. The main thing is that there is extra space that can serve all family members in turn to do what they love.
 An original option - the loggia turns into a stylish bar
 This option is suitable for apartments in which the door to the loggia is located in the kitchen. In this case, it can become a dining room, especially since most kitchens in apartments are quite small.
If apartment owners like to frequently host parties, a loggia window sill can easily replace a bar counter.
You can also have a romantic dinner here. The evening city, which offers a wonderful view, and the pleasant summer air will create the necessary mood for this. In winter, it’s nice to sit at the counter, sipping coffee and looking at the opening wide panorama outside the window.
Glass sliding doors installed between the kitchen and the loggia will help to unite or separate the rooms, depending on the need.

In this version, it was combined with the living room, and the wall, which previously served as a dividing element between the two rooms, became a unifying one, as it was transformed into a comfortable table.
The area of the former loggia in this layout can be used as an office with a comfortable desk, as well as hobbies when you don’t want anyone to interfere.
And, of course, combining the loggia and the room will increase the total space by opening a large window. The room will be more illuminated, which will help save on electricity.
Additional living space can be adapted for various activities, for example, on a loggia winter Garden, workshop or computer room. Therefore, if the apartment is equipped with a loggia, but it is not yet insulated, you need to urgently get down to business and expand the area of your home by using a room that is not used functionally.
This material should be of interest to all apartment owners who have a separate balcony or loggia. In this article I want to talk about how simply insulating a balcony with your own hands will help make it a full-fledged part of your apartment. If you are tired of using your balcony exclusively for storing old unnecessary things, read the article and find out how to properly insulate it.
To avoid any confusion in the future, I first want to explain the difference between a loggia and a balcony:


In old multi-storey buildings, apartments with balconies and loggias were rented to residents without any glazing. This means that snow and rain can freely fall there, and the air temperature throughout the year remains the same as outside.
Apartments in modern new buildings, most often rented with glazed balconies. Glazing helps protect it from rain and snow, but does not protect it from cold, wind and dampness. Therefore, the temperature and humidity on a glazed but uninsulated balcony are not very different from the weather outside.
I can tell from personal experience that simultaneous glazing and insulation of balconies with your own hands allows you to solve several housing issues at once:


If the layout of your house allows, then due to the balcony or loggia, one-room apartment easy to convert into a two-room apartment:

Even if you do not plan to convert the balcony into a living room, its insulation will help to significantly reduce heat losses in your apartment. Firstly, this will make the house much warmer in winter, and secondly, it will reduce monthly heating and air conditioning costs.
To insulate balconies, it is best to use rigid thermal insulation materials based on polymers, or roll insulation based on mineral wool.
Both insulation materials have their advantages and disadvantages, so below I will talk about their main qualities in more detail:
It is characterized by the following characteristics:


Penofol in thermal insulation coating performs three important functions at once:

Basalt wool is considered a universal type of insulation, since it has practically no restrictions on its use in construction:

Besides stone wool, found on sale glass wool, which is made from thin strands of molten glass. Its fibers are very fragile and break easily, so after creasing, such cotton wool does not restore its shape. I do not recommend using it for insulating residential premises, because small glass fibers can penetrate human skin and cause severe irritation.
To insulate a balcony with your own hands, you can get by with the usual set of household tools:


At night and during the day, significant changes in air temperature can be observed on an insulated balcony, which in turn can lead to the formation of condensation on the walls and ceiling. Therefore, for interior finishing it is allowed to use only moisture-resistant and frost-resistant materials.
Insulating a balcony from the inside should begin with installing windows, but in some cases this may cause problems. During the construction of multi-storey buildings, balcony parapets are usually made in the form light metal fence welded from a corner and a steel square. It is unsafe to install heavy double-chamber balcony glazing on such a parapet, so before installing new windows, it needs to be strengthened.
I can suggest three ways to strengthen the parapet:


To do this you can use the following method:

Installation of metal-plastic double-glazed windows requires certain knowledge and practical skills, so I recommend entrusting such work to qualified specialists in this matter. Firstly, it is more reliable and safe, and secondly, they provide a guarantee for their work. In addition, when ordering windows with installation, you can get a discount on installation work.
Balcony floor slabs usually have a small thickness, so before installing the finished floor covering, it must be properly insulated.
Floor insulation can be done with foam panels, sheets of extruded polystyrene foam or mineral wool slabs.
The general principle of using these materials is approximately the same, so I will tell you how to do this using foam sheets as an example:


If you want to lay linoleum or laminate on the balcony, then first you need to arrange the subfloor. To do this, sheets of moisture-resistant plywood or OSB with a thickness of at least 20 mm must be secured to the longitudinal bars. After this, the subfloor must be sanded and a finishing floor covering laid.
For normal thermal insulation of a balcony and loggia, it is very important to properly insulate the parapet and side walls, because they are in direct contact with cold air from the street. The solid wall between the apartment and the loggia does not need to be insulated so that it can freely transmit heat from the heated room to the loggia.
Below is a step-by-step instruction in which I will talk about insulating walls and balcony parapets using polystyrene foam and mineral wool:


When making a supporting frame for finishing sheathing, some craftsmen use a metal profile for drywall. At first glance, this option may seem simpler, but I do not recommend doing so. The fact is that metal has a higher thermal conductivity than wood, so at the installation site metal profiles, cold bridges form in the wall. They worsen the thermal insulation of the balcony and can cause condensation to form in the insulation layer.
If you plan to install a separate heating system on the balcony, then we must not forget that warm air it always flows upward from the radiators. In order not to heat your neighbor’s balcony from the top floor, I advise you to pay special attention to the thermal insulation of the ceiling.
The gap between the canopy and the floor slab must be filled with foam.


Even with full compliance with the insulation technology, condensation can form inside the insulating sheathing. To protect wood from rotting and mold, it is important to follow two simple rules. Firstly, all wooden parts must be treated with antiseptic impregnation before installation. Secondly, always leave a ventilation gap of 15-20 mm wide between the finishing sheathing and the insulation.
After reading this article, you can easily insulate any balcony or loggia in a city apartment yourself. A visual guide to insulating balconies can be seen in the video in this article. I suggest discussing all your questions and wishes below in the comment form.
Many people want to expand the living space of their apartment, and the easiest way to do this is by adding a balcony. But in order to make it suitable for living, it is necessary to take care of noise and waterproofing, as well as reducing the thermal conductivity of its walls. Although the process of insulating a balcony is not the easiest, it is quite possible to do it yourself. This article provides detailed instructions how to insulate a balcony yourself.
The choice of material is one of the most important aspects, because each material has its own individual physical and chemical properties. Common materials include polystyrene foam, extruded polystyrene foam, mineral wool, isolon, expanded clay, and polyurethane. Next, let's look at the pros and cons of each material.

Polyfoam is a foamed material with a porous microstructure, produced on the basis of styrene. Available in the form of square or rectangular slabs.


Extruded polystyrene foam - made on the basis of polystyrene by extrusion. Available in the form of rectangular slabs.


Mineral wool is made from sedimentary, glass and volcanic natural materials. Available in slabs and rolls of varying densities.


Izolon is a two-layer insulation. The outside is covered with thick foil, and inside there is a material resembling multilayer foamed polyethylene. Most often used when insulating walls, behind radiators, because foil is an excellent reflector of heat waves.


Expanded clay is clay particles that have been fired and have the shape of an oval or circle.


Polyurethane foam is a representative of the class of gas-filled plastics. It has a liquid consistency; when the subspace is filled with it, it foams and hardens.


Cons: requires the use of special devices.

Attention! Please note the following: under no circumstances should the balcony be made heavier; this is a violation of the building design standards.


Correct installation of insulation material is a guarantee of longevity and quality. In order not to forget anything or make a mistake anywhere, you must initially prepare step-by-step instructions (plan) and strictly follow it point by point.

Insulation can be carried out both from the inside of the balcony and from the outside. But when self-insulation It is better to choose the option of insulating the balcony from the inside.


Preparatory work consists of:

Initially, it is more logical to start with insulating the floor on the balcony.

Action plan:
Various cracks in the floor are patched with polyurethane foam. You can also use sealant or polyurethane mastic.


A layer of waterproofing is laid on top concrete slab. You can use regular polyethylene in these wholes. It must be laid with an overlap, with a protrusion on the wall.

We install a frame of 50-70 mm beams. Initially, the beams are laid on the balcony slab with gaps between them of 40-60 cm. To fasten the beams, use anchors about 110 mm long. Next, we secure the beams in the longitudinal direction with self-tapping screws. They will be used to level the floor.

Next, insulation material is placed into the resulting cavities in the frame. And finally, the finishing surface is mounted on top using self-tapping screws. When fixing the finishing layer, it is necessary to leave small gaps at the junction with the walls to prevent squeaks during operation. The cracks in the walls are filled with polyurethane foam.

Attention! The thickness of the insulation must exceed 7 cm for high-quality floor insulation. But you shouldn’t use too thick insulation. After all, the height of the threshold must be made below 20 cm, and the height of the room should not exceed 2.45 m, and the height of the fence should be more than 95 cm. Based on these data, you need to choose the optimal insulation thickness for you.


Action plan:
Waterproofing is carried out. Beams in the form of a lattice are installed on top of the waterproofing. The cross-section of the beam must be selected in such a way that after laying the insulation, a small space remains between the finishing surface and the insulation. As a result, an air cushion is formed - the thermal insulation characteristics will improve.

We put insulation into the formed cells. Finishing the walls. Chipboard, lining, plasterboard, etc. can be used as finishing materials. It depends on individual preferences.

You can choose the material that suits your aesthetic parameters by looking at many photos of balcony insulation on the Internet.

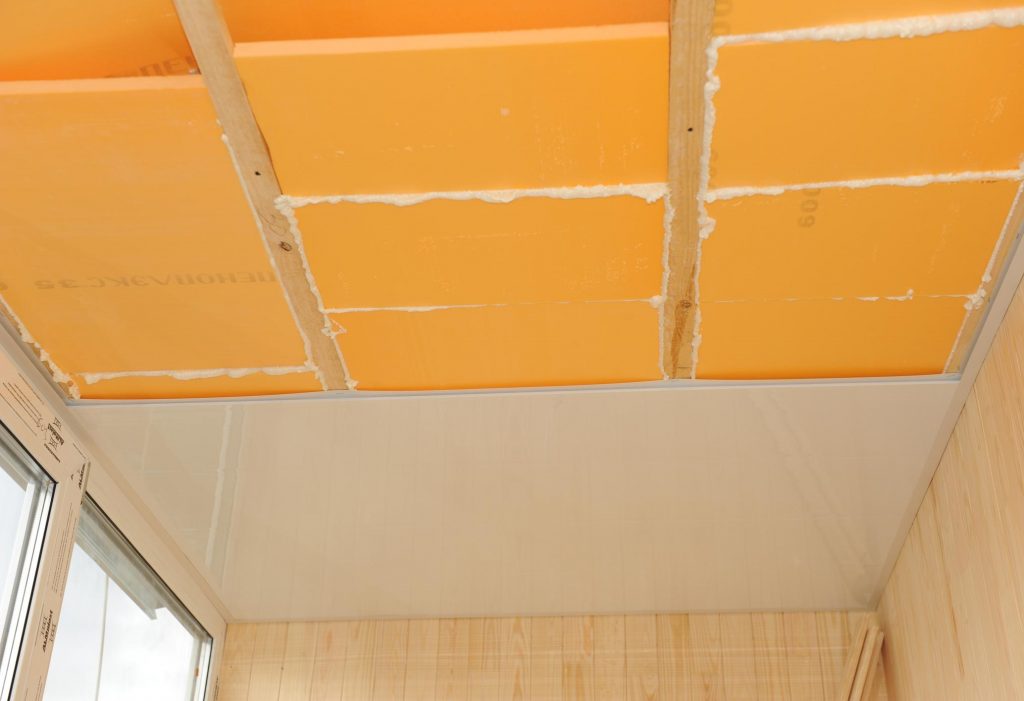
There are two options for ceiling insulation: with and without a frame. In the second option, it is necessary to use lightweight materials and this insulation Attaches directly to the ceiling slab.

Action plan:
The cleaned ceiling surface is covered with an antiseptic. The insulation is attached using polyurethane foam or glue.

Beams are attached on top of the material to install the finishing. If you use mineral wool: first a frame is made, then insulation is laid and drywall is installed. The finishing coating is installed.

Insulating the balcony from the outside is more correct. This method of insulation allows you to save the balcony space, as well as prevent the formation of condensation from the inside.

But the problem is that it is almost impossible to produce it without specialists. Therefore, it is better to order insulation of a balcony from the outside from specialized organizations specializing in turnkey insulation of balconies.


