Find out how to age wood with your own hands in the loft style at home with your own hands and you can use it anywhere in production: for a wooden kitchen, Provence furniture, tables, etc. This makes a wonderful color that will enhance the decor of any home! Application in decoration modern wood is, perhaps, a win-win option.
This is an incredibly attractive, breathable, pleasant to the touch natural material. It has a beneficial effect on the formation of the microclimate in the home, has bactericidal properties, and is useful for human energy. Wooden ceiling beams will look great in any room, individual elements decor.
This wonderful material lends itself perfectly to the most different types processing: it can be left in in kind, paint, age, and much more.
There is no specific, unambiguous answer to this question.
This procedure is carried out for different purposes, most often these are:

There are many in various ways for processing wood to achieve the desired result. Brushing, or texturing, is one of the most actively used.

The word brush is of English origin and means brush. From this comes the name of the technique, which consists in using the mentioned object to remove soft, pliable fibers of the material. Very similar processes occur as a result of natural aging, but they occupy in this case enough a large number of time.
This method is considered the closest to natural changes occurring in the material.
What kind of wood can be aged: species Give the surface wooden material
An aged look using brushing is quite possible on your own, at home. The problem is that not every type of wood is suitable for such processing. Maple, cherry, beech, pear, selected varieties exotic plants
 It is also not suitable for products and surfaces made of MDF. What to do if it's out of stock suitable material? You will have to use a different method, chemical. Wood coniferous trees It is best processed mechanically.
Brushing is a rather labor-intensive procedure. The main tool for its implementation is an elastic and durable metal brush. You won't be able to quickly change the appearance of a tree with its help, so you can speed up the process.
To do this you will need a grinder or a drill with special brush made of rigid wire.
It should be noted that the use of electromechanical tools for wood processing can be very unsafe. The fact is that during the event quite strong vibrations occur, which can cause not only wood chips, but also metal elements to tear off and suddenly fly off.
Therefore, it is important not only to know how to age wood, but also to be able to do it safely, without risking your own health.
 Chemical treatment during aging process Is it possible to age wood by hand without using special devices and tools? You will need coarse sandpaper to clean the surface. Apply to the prepared material ammonia
(ammonia solution), from which the wood becomes noticeably darker.
Thanks to this treatment, the wood texture becomes more distinct, while the noble darkening gives the material a touch of refined antiquity. Such processing can be superficial and fairly light in nature.
 . In this case, a polymer coarse brush is used. If the tree is subjected to deep processing, even the annual rings of the wood become noticeable.
Chemical method The main thing is not to overdo it when performing this operation
. Otherwise, the result of the effort expended will not be an elegant textured surface, but loose, indefinite wood.
Mechanical processing alone is not enough to achieve the desired effect of aged wood. What to do with the material next?
 You can coat the product with one of the types of varnish. The material looks very interesting after special processing - patination. It allows you to make the surface of the material even more embossed. Patina is a peculiar, unique gloss acquired by a material over time.
 Applying patina: the process Recreating it with your own hands requires considerable effort, and is carried out in several separate stages.
What is the patination process?
This is the application of special stains and compounds to the surface being treated. In each case, they are selected individually, in accordance with the desired shade and color of the product.
The compositions should be applied in such a way that they end up in the pores of the wood, which open during mechanical processing.
The essence of this method is to make the deep pores of the material appear contrasting and dark against the general background, which is lighter.
 To carry out this procedure yourself, you need to choose a paint that matches the color. They completely paint over the prepared surface and, without waiting for it to dry completely, remove part of the top layer with a cloth or sponge. This wood looks noble and looks like antique. But patination is not the only way to achieve a similar or similar result. It is absolutely wonderful to age products using special enamels. This method will allow you to get a real work of art that looks little different from a genuine antique.
A layer of enamel of a certain color is applied to the surface. When it dries, it’s time for the next coloring. For secondary application, you will need a composition of a different shade and a more liquid consistency. When the treated rock is completely dry, its surface can be easily processed
. In some places the initial layer appears, forming elegant abrasions. Toning and varnishing The patination process must be completed by tinting. To carry it out, you will need special compositions containing resins and natural ones. As
 finishing
And although the process is quite complex and time-consuming, anyone can master the art of working with wood.
The main thing here is to carefully study the technology, understand the sequence of steps, and strictly follow the instructions.
How to competently carry out the brushing process so that the resulting result is pleasing to the eye? You need to know some of the nuances of the process.

 Wood treated in a special way cannot be found in every home. The fact is that it is not enough to simply age the wood.
The ability to correctly use it for interior decoration is of great importance. But the use of the described brushing method allows us to produce completely unique products, actually exclusive.
These can be individual pieces of furniture, or entire sets and sets.
Chests of drawers, candlesticks, bookshelves, antique sideboards, frames for mirrors and paintings, made from such material, look especially interesting. country furniture and kitchen sets.
This method of wood processing is excellent for making individual doors and partitions. The wood brushing method is great for giving a special effect to flooring and parquet board
 . Often this material is used for designer decoration of the walls of saunas or home baths, billiard rooms, retro cafes, bars and non-standard premises.
 Set of chairs and tables Various methods of wood aging technology are no secret today. Throwing
Do-it-yourself wood brushing is an interesting technology that allows you to artificially age wood. Natural process aging lasts for decades. But now, with the help of special tools, we can achieve this effect can be done at home quickly and without significant material expenditure. Aged material is ideal for decor in classic, vintage and rustic styles.
Residents of modern cities increasingly prefer styles with a clearly emphasized individuality when decorating their premises: classic, vintage, rustic and country.

The main detail of such interiors is wood. Thanks to this material, the design of the room acquires uniqueness and unique charm. But for a classic and vintage style, pristine wood is not suitable natural form. In this case, aged wood, which has a more attractive and noble appearance, is best suited. This material is suitable for making any decorative element: a vintage lamp, a wooden chest of drawers, stylish doors And window frames, fireplace lining.
IN natural conditions The aging process of wood drags on for decades, since the original patterns on the surface of the wood are formed slowly and unevenly. Therefore, this material is rare and expensive. But among modern technologies there is a simple and quick way artificial aging of wood. This process is called brushing. Interest in this method is shown not only by lovers of elite vintage furniture, but also by those who want to diversify the interior interior of country houses.
Do-it-yourself aging of wood (brushing) – decorative technology processing of wooden products, during which for ordinary wooden surface an artificial antiquity effect is created. The method got its name from English word brush - brush. The aging process is also called wood structuring.

The artificial brushing method is based on the difference in hardness of the layers that make up the wood. During the work process, the soft light layer is removed. As a result, the areas become embossed, which gives the material a special appearance, characteristic only of fairly old trees.
The depth of brushing the board depends on its purpose. If it is necessary to create the effect of deep aging, then the depth of irregularities and roughness can be up to 2-3 mm. Deep wood relief is not recommended for flooring, otherwise the coating will get very dirty and difficult to clean. The optimal depth is 0.5-0.8 mm.
Special tools and techniques are used to structure wood. It is based mechanical restoration wood using special metal brushes that remove the upper soft fibers. Thereby hard surface is visible more clearly, forming a beautiful relief. But this is not the entire process of wood processing.

To emphasize the appearance and make the structure more distinct, the material is coated special paints with natural shades. Coloring is carried out unevenly: the depressions become more dark color, and the surface texture is light. This makes the relief more noticeable.
Helpful advice! So that the artificially aged material is as similar as possible to wood that has been aged naturally, you need to paint it in grey colour. In this case, the paint, even before it dries completely, must be smeared from the relief surface. This will create the effect of a tree standing under open air about 10 years.
It is better not to use wood with a fine-grained and unclearly defined structure, since the brushing method is ineffective for such species. The following trees are not suitable for aging:

Both soft and hard woods are suitable for aging wood. The main requirement is that the material has a clearly defined texture and that layers of different hardness are visible. Wood brushing is best done on the following species:

It is preferable to use coniferous wood for artificial structuring. The most affordable is pine. But this tree is not beautiful and unusual pattern. And, unfortunately, brushing the pine will not greatly improve this situation. If you use larch and spruce, the result of using the method will delight you with a unique pattern and rich texture.
Aging technology allows you to create unusual textures that are suitable for interiors of different styles. Structured wood is used to create elements decorative finishing, furniture, floors. Brushed furniture looks unique and very beautiful.
Unlike the natural aging process, wood structuring helps to increase the strength of the material and its longevity. Brushing also prevents the material from rotting and damage from fungi and insects. This happens thanks to the use of special antiseptics to protect wooden surfaces.

The result of brushing is an excellent appearance of the material, meeting the latest fashion trends. Using a variety of woodworking tools and equipment, you can get a lot of exclusive items and interior details. This will create an artificial imitation exotic varieties timber, the cost of which is significantly higher than the original price of the lumber used.
At first glance, the process of artificial structuring may seem very complicated. But the method of brushing wood with your own hands is the most affordable and easiest way to visually age a natural material. Even an inexperienced master can do this.
To complete this task you will need a minimum of equipment. In addition, brushing technology allows you to achieve excellent result both manually and mechanized. Depending on the chosen method, the master will need different tools.

During work, you will need certain tools for brushing wood.
Metal hand brushes are used to roughly remove soft fibers from the surface of the part, while leaving the hard ones intact. They are used for primary wood processing. The stiffness of the bristles depends on the length of the wire: the shorter it is, the stiffer the bristles. At the first stage of processing, it is better to give preference to a brush with the stiffest bristles. It is desirable that the brush has a wide end part and is close in shape to a roller. This shape guarantees a more uniform processing of the wood.
A hand chisel is a tool that can be used to make deep longitudinal grooves of various curvatures in wood fiber. With skillful use of this tool, you can obtain maximum realistic material by applying deep cracks.
Coarse sandpaper for polishing is used to highlight the texture of the material, making the natural pattern more clear. To achieve an optimal result during work, it is necessary to move the sandpaper along the fibers with pressure. By using paper with different grains, you can create grooves different depths and degree of expression.

A grinder equipped with special attachments for brushing wood is used at the initial stage for roughing and final processing of wood. At the beginning of the work, a metal brush attachment is used on the grinder to brush the wood, at the final stage - with copper or sisal bristles. Nowadays abrasive-polymer brushes are very popular. This tool makes it possible to selectively remove soft fibers without affecting the hard ones.
Helpful advice! If you don’t have a high-hardness brush, you can use a grinder to trim the pile. This will make the bristles harder. When selecting brush bristles, it is necessary to take into account that the bristles are 7-10 times thinner than the soft fibers of the wood. It is better to use a brush with straight bristles. When working with an abrasive-polymer brush, it is necessary to ensure that the surface of the wood does not burn when the robot operates at high speeds.
After the first stage of processing, experts advise burning the wood using a kerosene burner. A gas burner is not suitable for this type of work.

Firing with a kerosene burner will help complete the following stages of work:
Mass production of artificially aged wood requires speed. Some stages of wood processing can be mechanized, which will simplify the work of obtaining aged wood. To do this, you will need drills with variable speed control and special brushing machines.
Let's look at the most popular models of specialized equipment for structuring wood.

Festool rustofix ras 180 stripping router or brush machine for brushing wood. Along with this tool, you can buy brushes for brushing wood. They come in three types:
The Makita 974 sander is used for brushing wood. But during work, difficulties may arise with processing areas at the corners of the part. Therefore, at the joints, it is recommended to use a special angle grinder with different attachments or use a nylon brush attached to an angle grinder for brushing. This brush is highly wear-resistant and allows you to process the ends, edges and contours of parts with complex shapes.
The Felisatti AGF 110/1010E grinding machine is suitable for processing both smooth and uneven surfaces. Nylon and metal brushes are included with the tool.

Helpful advice! It only makes sense to buy a wood brushing machine if large volumes of work are planned. Brushes for brushing wood can be purchased either with the machine or purchased separately.
The aging process opens up the widest possibilities for the master to change the structure and color different breeds wood. Before proceeding directly to structuring, the wood must be prepared. The material for brushing must be free of defects, nicks and irregularities, and the humidity must be 10-12%, but not more than 15%. If the wood does not meet these characteristics, then the wood fibers will tear during processing, and a beautiful result from structuring will not be achieved.
Let's take a closer look at the process of aging wood at home. Working with the material can be divided into several stages.
Before starting work, it is necessary to perform initial processing of the part, namely: moisten the wood. This will prevent dust from spreading throughout the room during operation.

Next, you will need a hand brush for processing. Depending on the hardness of the wood, we select the hardness of the metal brush for roughing. The bristles of the tool should easily remove soft surface fibers, but should not damage hard ones. It is necessary to move the brush in the direction of the fibers.
If you decide to automate the processing process using a brush for brushing wood on an angle grinder or sanding machine, then it should be remembered that the movements are carried out along the fibers. It is necessary to move the tool with such intensity that the fibers are effectively scraped out.
You need to be careful when choosing the speed: too fast a brush speed can lead to baking of the wood. When using hand tools, this problem does not arise, but more effort is required. Also, manual processing will take time.
Helpful advice! It is better to select the speed on a separate small sample of wood. The optimal number of revolutions is 1500-2200, but it may differ for different breeds.

Then we carry out the initial grinding of the part. To do this, we use a polymer brush with an abrasive applied to it. This stage will remove roughness and fiber fragments from the surface of the part. Having removed everything unnecessary, you can evaluate how deep and high-quality the structuring of the wood is. If necessary, the grooves can be further deepened, making the structuring more distinct.
At the next stage, you can think about decorative design details. To do this, use a chisel in different places The parts are made with recesses and grooves of arbitrary shape. In appearance, they will resemble cracks that appeared naturally.
Next comes the final polishing. To do this you will need a sisal or hair brush. This wood tool will give the detail a finished look, fully revealing all the decorative texture. At manual processing Instead of a brush, fine-grain sandpaper with an abrasive surface is used. It will allow you to create a perfectly polished surface of the workpiece.
Then the wood needs to be well dried. It must be completely cleaned of dust and thus prepared for further painting and varnishing.

The use of stain will age the product by creating contrasting textured patterns. Applying liberally and quickly removing excess will allow you to paint over parts with soft fibers and leave light areas with hard fibers. Soft fibers quickly absorb paint, which means they become dyed, while hard fibers do not have time to absorb the pigment during this time, so they remain light. Wood painted with gold or silver paint looks especially beautiful.
Against the background of the natural color of the wood, this pigment creates reflections on the surface of the part in the sun. This gives the product original decorativeness and luxury. The product will look especially presentable if the wood is patinated - painting over the deepest cracks with a darker paint.
At the final stage, the product is polished again to remove roughness and irregularities that appeared after painting.
Helpful advice! Varnishing is carried out on completely dry and cleaned wood. To paint brushed parquet, you must use a special parquet varnish. This will allow the finished coating to maintain its presentable appearance and performance characteristics for a long time.

Brushing with chemicals is rare, even though the use of chemically active compounds greatly facilitates the process of artificial aging of wood. To carry out chemical treatment of wood, you must have special knowledge and ability to work with chemicals. In addition, the method has a drawback - it is not always possible to easily purchase the necessary reagents.
For the chemical structuring of wood, acids are needed: hydrochloric and sulfuric, alkali and ammonia. Reagents applied to the surface of the material corrode soft fibers. The master can only scrape off the unnecessary wood.
Stages of chemical brushing of wood:

The availability and demand for brushing allows you to perform this method at home. When structuring wood, it is imperative to adhere to safety regulations. You should work with tools and a wood brushing machine carefully and carefully. All artificial structuring processes must be performed in special protective clothing, glasses and gloves. If antiseptic solutions are used during work or too much dust accumulates in the air from the wood, then you should work in a respirator.
Brushing a wooden surface is an unusual way to make a wooden product more beautiful, unusual and attractive. This method is very popular among interior designers and ordinary people, since anyone can perform artificial aging of wood. It takes a little time and effort to get luxury furniture or a chic original ceiling, stylized in antique style. For a better effect, you can patina the furniture.
The main task of brushing wood is to create and emphasize the unique texture of the surface of the board. The result is a material with a clearly visible pattern. natural material. The procedure is suitable for many types of material. The cost of standard brushing is 350 rubles. per sq. m. When ordering additional painting, the cost increases. The price of the work depends on the type of wood chosen, as well as on the size of the board.

The cost of each stage of artificial aging is usually calculated separately. You can order sanding separately or just impregnation. The most profitable option is a full brushing service from the beginning of work to the final coating with the purchase of material. It is possible to perform artificial structuring from your material.
Workshops that brush wood carry out an individual calculation of the cost of processing depending on the type of wood, the size of the product and the list of services.
Brushing is performed on any type of wooden materials:

The structuring method is very popular in the manufacture of interior items and room elements. Such wooden products will become an original addition to classic and vintage interiors. In addition, the advantage of brushing technology is the ability self-creation exclusive items. In addition, this method belongs to the category simple processes accessible to everyone.
Brushed boards are used to decorate fireplaces, shelves, columns, Wall panels, and also aged wood is used as ceiling beams. This material creates a unique ambiance for living rooms and halls, cafes and restaurants. The interior design is filled with aristocracy and luxury, and aged wood creates warmth and comfort in the room.

Looks stylish and sophisticated wooden furniture using brushed elements. Artificial aging and patination of wood with your own hands allows you to make absolutely any furniture: cabinets, chests of drawers, pegs, beds. The use of brushed elements in furniture and interior design has no restrictions or prohibitions - it all depends on your imagination and creativity.
Artificially aged wood is a unique finishing material. Practical, inexpensive, fully retaining its strength characteristics, but at the same time possessing original beauty and antique charm. The scope of application of such wood is wide: interior design, furniture manufacturing, finishing of facades, gazebos, stairs, even fences are made from it. The most important thing is that wood processing does not require special knowledge or experience, and anyone can handle it. Let's take a closer look at how to age wood on your own, and what you need for this.
There are three effective ways age wood - mechanical, chemical and thermal. Depending on the chosen method, the end result has certain differences.
The mechanical method includes two types of processing - brushing and patination. Both types can be used together or separately, depending on the material and the desired result:


The chemical method involves treating the top layer of wood with various compounds that change the color of the fibers. Ammonia and products containing alkali, such as stove or drain cleaner, are suitable for this. This method can only be used for species containing tannins, that is, deciduous. Chemical treatment of coniferous wood will not give the desired effect.
The thermal method involves burning wood with a gas burner or blowtorch. The type of tree does not matter. They do not burn it too much, just so that the texture of the fibers appears more clearly, and then remove the carbon deposits with a metal brush. Next, cover the surface with stain or varnish to give the wood more decorative look. In general, the process is not complicated, but it requires caution and compliance with safety precautions.


During the work you will need:


Rough cleaning should be done with a steel bristled nozzle, but for finishing would be better suited nylon and copper. There is a special attachment called “Piranha”. It is a polymer-abrasive brush that can effectively remove soft fibers from the surface and leave hard ones. The grinder can be replaced with a drill; such attachments are also available for it. As a last resort, you can get by hand tools, but it's long and tedious.

Piranha brush
The wood should be dense, strong, not damp. Resinous boards should also not be taken, as the resin makes processing difficult. The presence of knots is welcome, as they make the design more pronounced and decorative. If you have no experience in such work, take a small piece of unplaned board or timber, up to half a meter long.
In the process of such work, a lot of fine dust is always formed, so it is best to do it on fresh air. If the weather does not allow it, take care of the possibility of ventilating the room and be sure to prepare a protective mask or at least goggles.
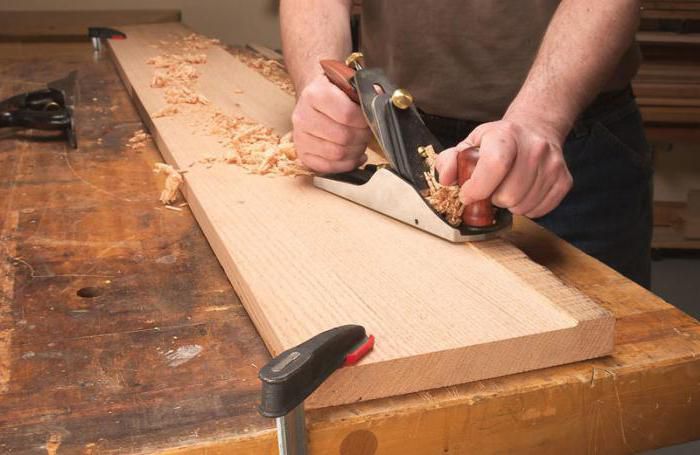
Step 1. The workpiece is placed on flat surface and processed with a hand plane. Electric tool It is better not to use it, as it leaves small transverse stripes, which reduces the naturalness of the design.
Step 2. Using a chisel or the corner of an ax, you need to make chaotic chips, shallow and shapeless, across the entire surface to give the material a rougher appearance.
Step 3. Now you need to remove the soft fibers with a wire brush. The brush should only be moved along the grain, pressing the tool firmly against the board.


Advice. To reduce dust formation, it is recommended to slightly moisten the surface of the workpiece with water. But before sanding and impregnation, the wood must be dried.


Step 4. When the relief begins to appear, the manual brush is replaced with an angle grinder with a metal brush, and work continues. The nozzle should be positioned perpendicular to the surface being treated, movements should be made strictly along the fibers. If you don’t need too rough a texture, immediately take a Piranha brush or a nylon-bristle attachment and do not press too hard on the tool while working. Go around the perimeter of wormholes and knots in the tree to emphasize the contours.


Step 5. Use a soft brush to sweep away the resulting dust, and then begin sanding. You can sand the wood manually or using a grinder, the main thing is to remove protruding fibers and sharp protrusions. Finally, clean the workpiece from dust again.
Step 6. Now the material needs to be given color. To do this, the surface is first coated with Pinotex primer, which is applied with a brush along the grain. You can use both stain and dark azure - any coating with color that will not hide the texture.

Step 7 After applying the composition to the workpiece, give it a few minutes to absorb, and then carefully wipe off the top layer with a sponge. There is no need to rub hard, just smoothly move it 2-3 times along the fibers. After this, all the recesses will remain darker than the protruding edges, and the relief will appear more clearly.


A distinctive feature of good quality stains is that they reveal the texture of wood


Then there are two options: leave this color and cover the wood with a transparent varnish, or add another layer and give the material the appearance of old bleached wood. The second option is suitable for processing elements in the Provence style. To do this, you need to wait until the impregnation is completely dry and apply a very thin layer of white glaze with a brush. After it has dried, the wood is lightly sanded with the finest sandpaper, cleaned of dust and coated with colorless varnish.

This method is also used: after brushing, the workpiece is covered with a dense layer of white glaze, dried and brushed again with a metal brush, but now not so intensively. Finally, a layer of clear varnish is applied.

Applying white paint


To do dark wood, and not bleached, instead of white glaze, the surface is thickly covered with stain or Pinotex, and the layer is made uneven. Next, use a brush or sandpaper, depending on the finish you want. Sanding produces light, blurry abrasions, but after brushing, rough grooves remain and the wood looks more brutal.

Primary processing is carried out using the technology described above: soft fibers are removed, relief is given and the surface is polished. Only after this the workpiece can be patinated.
Step 1. Take any wood primer and carefully apply it to the wood with a brush. The primer should penetrate well into all grooves and recesses. Allow the workpiece to dry.

Step 2. Apply the first coat of paint. Acrylic paint is best suited because it is not prone to peeling, adheres well to the surface, and does not leave streaks.


The choice of color depends only on your preferences; you can take any shades, the main thing is that they are rich and contrast with the patina shade. The paint is applied with a brush, evenly distributing the composition in a thin layer. The base coat must dry completely, so take a break from working for a day.

Step 3. Sand the workpiece with fine sandpaper. Wipe off the dust and apply a layer of patina with a brush. It is best to choose a patina for wood in the color of bronze or gold, with a metallic tint. Here it is not necessary to distribute the paint evenly; on the contrary, the difference in coating density will only emphasize the aging effect.


Step 4. When the patina begins to set, you need to take a dry cloth and wipe down individual areas. After the paint has dried, the wood is coated with clear varnish.


| Type of composition | Characteristics |
|---|---|
| Water-soluble composition, characterized by slow drying, odorless and great variety shades. Easy to apply and shade, ideally highlights the surface texture |
| A very thick composition with a pearlescent sheen. Apply to protruding areas with a dry brush, and into recesses with a sponge. Easy to rub and gives maximum antique effect |
| Compound dark brown, most often used to shade relief. Easy to apply with a brush, does not smear, wipes well with a soft cloth |
| Has a paste-like consistency, applied with a dry brush or thick fabric. It is considered the most the best option for patination of wood |
First of all, take care of safety precautions. When burning wood, there should be no flammable objects or liquids nearby, and it is better to generally carry out such work in the fresh air. Be sure to check the serviceability of the burner or blowtorch.
Step 1. The workpiece is placed on a non-flammable surface or placed vertically, after which it is fired with a burner. The material is processed as evenly as possible, the top layer should be charred approximately 2-3 mm in thickness.


Step 2. After cooling, the charred carbon deposits are removed manually with a brush or using a grinder. The intensity and duration of this treatment depends on the desired texture.

Step 3. Having formed the desired relief, take the grinding attachment and process the workpiece again. Here it is important not to overdo it and not remove excess, otherwise the aging effect will be insignificant.
Step 4. Since the color of the wood changed during firing, dark and light areas appeared, there is no need for painting. Now all that remains is to coat the material with colorless varnish or protective impregnation.

The use of chemically aggressive substances requires special care and precision in work. Protective gloves must be used and the room must be well ventilated. The workpiece is pre-treated with coarse sandpaper and wiped from dust. Then apply alkaline agents or ammonia with a brush and leave for several hours. To slow down drying, you can cover everything on top with film. Under the influence of ammonia and alkalis, the surface acquires a gray tint, characteristic of old weathered wood.

When the color of the workpiece has completely changed, it is rinsed with water and then wiped with a vinegar solution (a tablespoon per glass of water) to remove the remaining alkali. If ammonia was used, vinegar solution not needed. After drying, the wood is brushed, sanded and applied protective covering. There is no need to paint such material, because then there is no point in chemical processing, and it is easier to do everything mechanically.

Such decorative material excellent for decorating facades in rustic style. First of all, this is the German half-timbered style: original finish walls implies the use wooden beams rough texture, giving the building a characteristic appearance.
Country-style finishing also allows for the use of aged wood: the cladding itself, shutters, and entrance doors, as well as decorative elements.


Railings, steps, support pillars at the porch - all this can also be made using the described wood processing methods. After practicing on small pieces, you will be able to handle any surface without much effort. Of course, large-volume elements, such as house trim, are not so easy to process manually, but there are special machines on sale for this purpose. The most important thing is to have the desire, and then everything will definitely work out.
Brushing – unique technology, which allows you to age and structure the wood. This solution provides an opportunity to give new wooden products an aged, noble look. All more people prefer to create a unique interior in a house or apartment using wooden finishing materials. As a rule, wood that has a more aged appearance looks very noble and luxurious. But not many people know that even new wood products can be given the luxury and nobility that wood acquires after many years of use. In this article we will look at a master class on brushing step by step.
Increasingly, when decorating the interior of a house, they use wooden products, beams, ceilings, doors with appearance aged wood.
Tools for brooching wooden products:
Let's take it wooden blank, in our case, a board made of soft wood. Next, using a grinder and a special wood disc, we make shallow notches, as shown in the photo below.
As a rule, this processing of wood with a grinder will already be sufficient for further use on ceilings or in places where a person cannot touch it with his hand, since in this case, during the initial processing, burrs remain on it.
In the case when you plan to use wood after the broaching process for window sills, doors, furniture and other interior items, additional processing of the wood surface will be required. First of all, you need to slightly smooth and level the surface of the wooden product. For this we will use a wire brush. It is worth noting that you need to work with such a brush on the surface without special effort so as not to spoil the finished wood structure.
First of all, you need to install an iron nozzle with a coarse fraction on an electric drill. As shown in the photo below, we carefully go through the entire processed rough surface of the wooden workpiece without excessive force.
It is worth noting that iron brushes are used to smooth the surface of a wooden product, and burrs are removed using abrasive attachments. Thanks to this, the aging of wood looks not only believable, but also safe for humans, since the surface of the wooden product will be perfectly smooth without burrs.
After the entire surface has been passed with an iron nozzle, we proceed to finishing with abrasive nozzles. When working with abrasive attachments, you should press with force to thoroughly remove all burrs on the wooden workpiece.
After preparing the wood for finishing, you can use glaze or treat the surface of a wooden product with drying oil, oil, stain, or varnish.
Pictured below wooden facade the house was glazed.
Oil coating allows you to get the effect of “aged” wood. To do this we need a regular brush and oil for wood in the interior. Best choice of oil dark shades, in this case, wooden products will look more noble. Carefully coat the entire surface of the product with oil.
In order for the dark recesses to remain dark and the light ones to remain light, we will need to treat the surface of the product immediately after impregnation with oil. To do this, we take an ordinary cotton rag. By carefully wiping the entire surface of the product with a rag, we create the visual effect of “aged” wood, as shown in the photo below.
When creating interiors, designers are happy to use wood. For some, it allows you to create a certain style concisely and clearly, while others can shape the appearance of the space, paying attention to small details and nuances.
Rural life, which received the French name Provence (literally provincial), has been adopted as a fashionable trend in the design of living space. It may use motifs from France. However, not many people know that there was not that elegance that is talked about so much (only in the southern regions can you find exquisite options; the northern regions have always existed much more modestly and poorer). Much more interesting is the German or Russian rural style. They contain much more colors, shades and wood products.
Mandatory attributes of the rural style are somewhat rough benches, massive tables, separate stools, cabinets and shelves above them. The clumsy products were made with quite careful finishing. Only time changed its appearance wooden structures. Due to intensive use, the structure becomes clearer and the fiber pattern is more visible.
Boards that have existed for decades are characterized by the presence of a silvery coating, as well as blackening of individual zones. Time has its own way of coloring wood that is not protected from precipitation. There are even those who want to purchase ornamental material, which for a long period served as an auxiliary structure on the site. Old boards are transported hundreds and sometimes thousands of kilometers so that in the hands of a modern master they can be used as construction material antique
In fact, you don’t have to look for an old barn to make antique furniture from its boards. There are ways in which you can make boards and bars look as if your great-grandfather used them in products:
Most often, more than one chosen aging method is used, but they are combined with each other, achieving an even more noticeable effect of presence in a room of the 12th...19th centuries. It turned out that antique furniture was in demand on the market. Some users say that back in the nth year an ancestor who took part in the Battle of Borodino or a participant in another sat on this chair. historical event, for example, a veteran of the Battle of Kulikovo. Listeners touch with delight the creation of the medieval master, admiring how they managed to preserve the product from the depths of centuries.
Artificial aging Easily performed on coniferous wood. It is distinguished by the presence of soft fibers in the surface layer. You can reveal the texture by removing some of the soft fibers using a brush with hard metal bristles (Fig. 1). By repeatedly moving along the fiber, it is easy to remove the soft component. Only structural rigid fragments will remain. 
Rice. 1 Wire brush for brushing wood
It’s easy to treat one or two boards with a brush like this. If you need to harvest a certain amount of timber, you will have to use means of labor mechanization. An electric drill or an angle grinder (grinder) will help here. A mechanical radial brush is installed on them (Fig. 2). 
Rice. 2 Mechanical brushes: a – for an electric drill; b – for an angle grinder (grinder)
Attention! Mechanical end brushes for electric drills and grinders can only be useful for processing the ends of bars and boards. When working, you need to use protective equipment: gloves, respirators and safety glasses, preferably a mask.
Before brushing, all lumber should be planed. Many people think this requirement for preparation is unnecessary; in fact, craftsmen have always respected their work, as well as the people for whom they made pieces of furniture. Planed boards and bars were always used. Some carpenters were able to use an ax to give workpieces a look that other contemporaries would not be able to do even with the help of modern planes or machines.
The process is performed in the following sequence:
After three or four passes, the result is examined. There is no need to overdo it here. Having obtained a depth of only 0.4...0.6 mm, you should stop. The process has begun. After a couple of days, the grooves will deepen on their own, as destruction has occurred in the wood structure. The visible effect can only be enhanced by subsequent treatment with varnishes or oils.
Probably everyone has seen that old boards have a grayish coating, giving them the appearance of a slight silvering. With the help of paints you can give a similar color to any wooden product. For this purpose they use acrylic paints(Fig. 3). But they white. Therefore, tinting paste is added to them (Fig. 4). By changing the concentration of the color, you can achieve different shades of gray.
Rice. 3 

Rice. 4 Tinting paste for imparting shades to wood
In practice, furniture makers also use more complex painting methods to give the wood vintage look. There is a method called patination. The effect of such treatment is not to apply a continuous coating, but only a coating of bronze film. This treatment produces shiny bronze fragments. In Fig. Figure 5 shows one of the ways to patina wood. In addition to applying a bronze (golden) tint, additives were used to create the effect of antiquity. Craquelures are macro-irregularities specially created on the surface. 
Rice. 5 Patinated facade fragment
To give products the look of old wood, it is not necessary to paint the products completely and cover them with opaque paint. In practice, varnishes are used, which, after being applied to the surface, are covered with a fine mesh.
By combining transparent and opaque finishes, you can achieve the effect of aging wood to such an extent that it will seem that this furniture came from the distant past (Fig. 6). There is patination of individual fragments, there is also treatment with varnishes, which gave the appearance of an antique. 
Rice. 6 Antique nightstand
Heat treatment opens up enormous possibilities. With its help, the following is applied to wood:
Firing is performed using the tools presented in the table.

Chemicals: alkalis and acids give new wood an aged appearance. Used for acid treatment sulfuric acid for batteries (Fig. 8). When exposed to a product, even on hard grades, deep streaks of texture appear. This method is used for oak, walnut, and ash. You have to use concentrated acid with a density of 1.42 g/cm 3 . Acid of lower density works through the texture more slowly.
Upon completion of the treatment, it is necessary to neutralize the effect of the acid, so use a solution of caustic soda or spill it with a solution of baking soda. Then a long period of soaking in water is required. 
Rice. 8 Sulfuric acid
Treatment in solution gives an excellent effect for wood. copper sulfate. For such an operation, plastic sewer pipes. The lower hole is closed with a stopper, and then boards or bars are placed inside. Then pour in a solution of ten percent strength copper sulfate. The duration of exposure depends on the type of wood. To obtain the appearance of driftwood, it has to be kept for up to a week. Even soft varieties: pine, spruce, acquire high hardness and resistance to rotting. The wood darkens and becomes brown. Looks impressive on finished products.
In Fig. 9 shows antique furniture elements made by modern craftsmen. All described methods were used during processing. The products look quite interesting. 
Rice. 9 Modern antique furniture


