Today the simplest and in a fast way To make the walls of your home beautiful and smooth, decorate them with MDF panels. This solution is, of course, not suitable for all rooms, but for corridors, stairwells, storage rooms and hallways, this material will be almost ideal. We will talk about it in this article, in which, together with the website, we will look at how to install MDF panels using frame and frameless methods with your own hands.
There are two ways to secure mdf panels on the walls - the so-called adhesive and frame. Both of these methods are good and are used depending on the circumstances. If finishing walls with MDF panels involves hiding any communications, then the frame method of attaching MDF is used. If we're talking about When finishing smooth walls, the adhesive method is used.
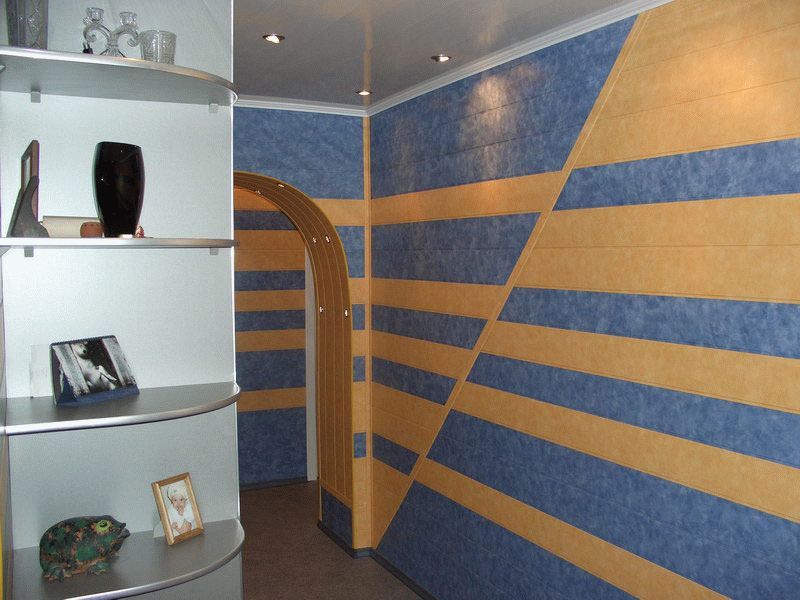
Wall decoration with MDF panels photo
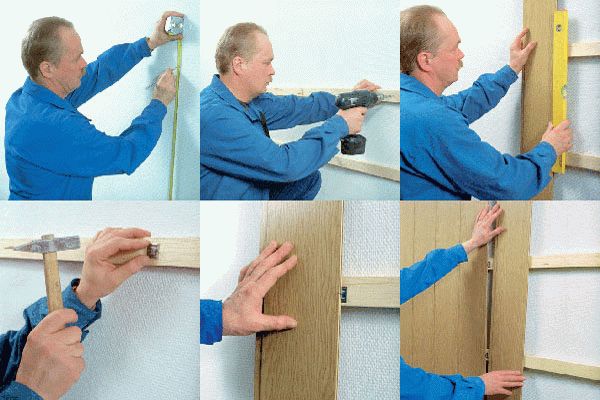
The very name of this method speaks for itself - to implement it you will need to build a frame, which in some way resembles the structure that is used for. The difference lies only in the position of the load-bearing ones - if they are installed vertically to fasten plasterboard sheets, then MDF provides for a horizontal arrangement of profiles. In this regard, the peculiarities of constructing such a frame arise.
In principle, at the first stage everything happens in a similar way - the plane of the future frame is hammered out, then guide profiles are attached along the perimeter of the wall, on the floor, ceiling and adjacent walls. This is where the differences begin. In a given plane, vertical load-bearing profiles cd are installed not after 600 mm, but after 3000 mm, which is the standard length of the load-bearing profile.

Installation of MDF panels: frame method
This is done in order to subsequently install horizontal load-bearing profiles cd between them, the pitch of which is 500 mm. They are connected to vertical profiles using crab CD connectors, and fixed to the wall with the same U-shaped brackets.
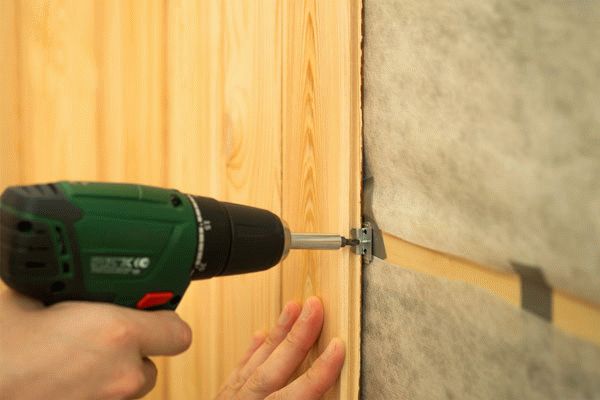
Installation of the frame is the main work in the process of installing MDF panels. The mount itself is more easy process, which almost everyone can handle. MDF panels are attached to the frame using clamps (special clamps). Before fastening it to the frame, the clamp itself is inserted into a groove located at the end of the panel, thus ensuring their reliable fixation to the frame. The clamps are designed so that they do not interfere with inserting the next panel into the groove.

DIY installation of MDF panels photo
Installing MDF panels on walls using glue is much easier - the entire installation process is greatly simplified by the absence of metal or wooden frame, the construction of which takes quite a lot of time.

Installation wall panels mdf photo
Before we begin directly attaching the panels, let’s first look at the glue that is used for these purposes. Or any glue will not work here - you need a composition that has certain qualities.

Liquid nails for mounting MDF panels photo
The installation of panels using glue itself looks quite simple - its technology is almost completely described on a tube of “Liquid Nails” glue. It is not recommended to violate it. To begin with, the walls covered with panels must be cleaned of dust and dirt - in principle, if you are going to seriously engage in self-repair, then the priming process, which is performed to clean the walls from dust and dirt, and at the same time to improve the adhesion of materials, should become a habit. They always prime everything, everywhere.

Priming walls before installing MDF panels photo
After the primer has dried, the actual gluing of the panels begins. While it dries, you can do other preparations - for example, cut several dozen panels to size.
The glue is applied directly to the panel itself in a dotted manner and in a checkerboard pattern - the glue drops should be large. Once the adhesive has been applied, the panel is pressed against the wall, tapped firmly and torn off. This is required by gluing technology - you need to tear off the panel so that the glue is weathered and the panel does not peel off from the wall under its own weight. To speed up the process and make MDF installation It’s faster to apply panels with your own hands; you can immediately, one after another, smear up to a dozen panels, attach them to the wall and tear them off. While the glue is weathering, you are allowed to take a smoke break - after five minutes, the panels can be hung on the wall again and thoroughly slammed down.

How to glue MDF panels to the wall photo
It is easy to glue the panels; it is much more difficult to trim them evenly and accurately. In this regard Special attention it is necessary to pay attention to slopes and similar obstacles that come across the installation path of MDF panels. It should be understood that the even cutting of the panels completely depends appearance premises.

Installation of MDF panels on walls
Well, in conclusion, we will dwell on the main installation nuances that are typical for both methods of fastening MDF panels.
That's basically it. This is how MDF panels are installed. This process is not complicated or simple, like, in general, any finishing work, in which your attitude to the little things plays an important role, which together affect big picture repair. Simply put, there are no trifles in this matter.
This information is intended for those who want to quickly and cheaply decorate MDF walls on their own, or for those who simply want to broaden their horizons. By studying this article, you will understand that finishing it yourself is not very difficult. After all, the installation is alternately painted and shown in the form of photographs.
MDF material is wood waste (shavings) mixed with a special adhesive solution and put under pressure.
This structure of the material makes it similar to boards, but at the same time is significantly different. For example, heat processing wood waste in the production of particle boards, it allows you to avoid adding various resins and other negative chemical compounds to the gluing mixture.
Despite this, they have excellent technical indicators, as a result of which they are widely in demand today.
Interestingly, this material is used for finishing works all surfaces, from ceiling to floor. On the other side, this type materials are much more common in various administrative premises And in public places. Perhaps people do not use it for their home due to the lack of home warmth and comfort of this material.
The advantages of this finishing material include several qualities.

Along with the advantages, they also have some disadvantages. For example, this finishing material,
The installation process will require equipment such as special wiring boxes, a screwdriver, edge profiles, gluers, screws, and so on. In general, the installation process does not require special skills, but knowing the little tricks will allow you to carry it out as efficiently as possible.


Let's look at the first example of finishing, in which they are installed in the bullfighting room of a standard three-room apartment in a multi-story building. Considering the fact that there are no external walls, additional insulation is not required. Installation work must begin from the ceiling.


Interestingly, such a base allows you to install any type of finishing materials such as plastic, plasterboard or chipboard. As for slabs made of compressed sawdust, it is better to use clamps and screws for their installation.
Remember, first lay out all communications (electrical wiring, etc.), and only then install the panels.


As for the location of the horizontal profile, you should focus on those places that are most often exposed to impact, for example, in the area of the knee, shoulder, and so on. The distance between this profile should be maintained at 60-70 cm.

MDF panels for wall decoration are not only easy to install, but also very practical to use. MDF panels for dry wall cladding are still as popular as they were two decades ago. We have prepared instructions for you on proper finishing DIY walls with MDF panels.
In general, it is recommended to attach wall sheathing to a system of galvanized or timber profiles. This allows you to avoid preliminary leveling of the wall surface and makes it possible to lay up to 50-70 mm of internal insulation or sound insulation. Choosing between wooden and metal frame determined by the specifics and conditions of the room, as for finishing gypsum boards. In a modern variation of this installation, profiles and slats can be replaced or supplemented with plastic mounting strips, which provide for quick and easy installation with snap-on brackets.

Special case frame system- arrangement of a solid base as a rough preparation for the walls. The method is relevant in the case of using thin (5-6 mm) panels in rooms with high operational load. If there is a sufficiently rigid substrate (OSB 6 mm, gypsum plasterboard), the panels will not be pressed through, and their warping due to changes in humidity is guaranteed to be excluded - a typical disease of cheap products. At the same time, the wall receives additional insulation and remains ventilated.

Sheathing without a frame is carried out by gluing panels to the walls after they have been pre-aligned. It could be plaster, cement plaster or a rough base from the method described above. The method is recommended for installing panels with a width of over 160 mm; fastening along the entire plane gives an advantage to the durability of the coating, but eliminates fragmentary repairs and disassembly of the sheathing.
The principle of constructing a frame for finishing with panels is the same as for gypsum plasterboard, but the profile installation scheme is completely different. Depending on the method of mounting the panels, the configuration may vary.
In the most typical version, the panels are attached directly to the profile; accordingly, the direction of the rack elements will be horizontal, this is the main difference from the gypsum board system. External cladding allows you to give the room the correct geometry, but for this you must follow the correct assembly sequence.

Start with long walls: attach vertical sections of UD 28 mm guide profile in the corners. The two planes of the frame must be strictly parallel, so that the wall sheathed first is taken as the base one. In the future, the distance for installing profiles on the opposite wall will be set aside from it.
Insert sections of 60 mm CD rack profile between the guides. When laying horizontally, you will most likely encounter a lack of length of the molding. In these cases, the crossbars can be spliced by inserting inside two sections of the guide profile and additionally strengthening them with LM screws. Since the linearity of the frame is not critical, it is also not forbidden to fold the profiles with an overlap of 30 cm and fasten their adjacent shelves with self-tapping screws.

The CD profile installation step is 35-40 cm, the outer ones are installed 10 cm from the floor and ceiling. To support the frame, straight hangers are installed in a checkerboard pattern in increments of 60-80 cm in one row, depending on the thickness of the panels, and therefore the total mass of the cladding.
Installation of the frame on short walls is carried out in exactly the same way, except that the guides are attached not to the pillar, but to the frame profiles of long walls. For this reason, the first “pawns” should be installed no further than 10 cm from the corners to thoroughly strengthen them.
If you intend to use PVC mounting strips or carry out rough preparation of the walls, the frame is made exactly as for gypsum board sheathing. The distance between CD racks can vary from 60 to 80 cm, direct hangers are installed every 80 cm. Such a frame can be reused during the next renovation by replacing the finishing material with pure gypsum board, while fastening heavy sheet materials horizontal crossbars are not allowed.

The installation of the panels to the frame itself is extremely simple; special plate brackets are used for this. They fit into the groove hidden fastening and are fixed to the frame with a self-tapping screw with a countersunk head. With the use of PVC mounting strips, the situation is even simpler: just snap the clips into the mounting groove and press the panel next. Rigid fastening of panels with self-tapping screws is performed only for the first and outer strips.

There are also alternative way installation, which involves the use of “liquid nails” glue. The panels can be glued either to the frame or directly to the walls, if the unevenness on them does not exceed 2 mm/m. Often this is the method chosen for cladding unfinished brick or block masonry; it is only important to choose the correct adhesive composition.

It is recommended to use quality products. The glue must remain flexible after drying; give preference to compounds based on rubber or polyurethane. For occasionally heated dachas, you should choose frost-resistant glue; other features are determined by the surface material for gluing.
Don't forget about proper preparation walls Masonry and plaster must be thoroughly impregnated with primer mixtures to increase adhesion.
The main advantage of working with MDF panels is that the fittings for cashing out the corner joints are mounted superficially, that is, after the installation of the sheathing is completed. Use plastic fittings with grooves for PVC panels is highly not recommended. Trimming the panels must be done fairly accurately, the gaps within internal corners should not exceed 1.5-2 mm/linear. m, which is quite enough to compensate for temperature expansion.
The main element of the fittings is universal corner profile. It consists of two thin MDF strips, bonded with laminated film, and can be used to decorate both internal and external corners. To ensure correct and beautiful alignment of the overlays at the corners, their edges are cut in a miter box at 45° with a general bevel outward. When finishing corners on slopes, the angle will not be correct, so local trimming is recommended. Installation is carried out using glue for wooden products based on polyvinyl concentrate.

Another element of the fittings is the joining strip. It is used for splicing sections of sheathing when the length of the molding is insufficient or for combining panels of different colors in one plane. A mounting strip should be provided at the installation site of the connecting element.
Skirting boards for MDF panels deserve special mention. For the most part, they are used to cover the corners between the wall and the ceiling, or to decorate the upper end of wall panels. The plinth is installed in the same way as other fillets; the installation is carried out using transparent silicate glue.

The issue of fixing the floor plinth remained unresolved. There will be no special problems if the lower guide of the frame is lowered to 10-15 mm from the floor. If there is a rough base or the walls are covered with panels, fastening can also be carried out using standard means. The practice of chemically attaching skirting boards using liquid nails is common: front surface panels have excellent adhesion.
Wall decoration consists of several stages. Installation of MDF on walls will require preliminary selection necessary materials. The technology for installing MDF panels on walls is quite simple., if you follow the tips and recommendations. Everyone can arrange a room.
Every person wants to have stylish and comfortable housing to emphasize their individuality and create a unique atmosphere.
Installation of MDF boards on walls can be done correctly, quickly and cheaply, without putty, primer, painting or wallpapering. Minimum construction waste, stylish and practical.
Wall panels have been known for more than 10 years Russian market. During this period, their popularity has not subsided.
The advantages of using MDF panels are:
This building material Suitable for both dry and wet areas. Even when exposed to moisture, MDF furniture will not become covered with mold or mildew. Mounting it in wood will also be an advantageous way to decorate the surface.
There is a wide variety of MDF panel designs:
Some tile panels are small in size. I alternate tiles, different in texture and color, so you can lay out different patterns of any level of complexity.
Visually this will achieve the effect ceramic tiles large format.
Thanks to the panels with dimensions of 120 by 80 cm, it is possible to cover the panels faster. By studying the recommendations, you can give the modules an excellent appearance.

The difference between wall panels is noted by such indicators as:
At correct execution works can be created perfect interior. Interior decoration walls with natural materials are now in trend. However natural materials quite expensive, and working with them is labor-intensive. Therefore, synthetic materials are widely used.
Thanks to high quality they are difficult to distinguish from natural analogues. MDF panels repeat the texture natural wood, create the appearance of a wooden covering.

At the same time, they are easy to wash and clean. And the installation process is characterized by simplicity and speed of work. It is necessary to cut the panels to the required length and secure them to the frame.
MDF is resistant to moisture. about moisture-resistant MDF for walls. There are special corners to match the color of the panels; they can change shape. With them you can build a platband, internal or outside corners. This kind of material used to give the interior a finished look. You can learn how to install MDF panels on walls from the recommendations.
If the installation is carried out in winter time, you first need to keep the wall panels indoors for several days so that they regain their size. When choosing panels, keep in mind that the narrower they are, the longer the work will take, but there will be less scrapping.
It is necessary to determine how much smooth walls. If the level shows good data, then there is no need to make a wooden sheathing.
You can simply glue them to the cement using special glue. If the walls are not level, you will need to do lathing.
This situation is more common. What materials will be needed for it? The sheathing is made from soft wood. Preliminarily think about what kind of sheathing will be. In dry rooms it is better to use wood, and in wet rooms - metallic profile. It is necessary to select fasteners based on the same parameters.

Self-tapping screws - if a metal profile is used, fasteners made from wood screws or staples, if you need to work on a wooden sheathing. In the space of walls and sheathings you can lay a layer of heat or sound insulation.

How to attach the MDF panel to the wall:
You need to start work from the corner. Laying must be done tightly. The thin part faces towards the corner. The fastening is carried out on the surface of the rail.
You can successfully install MDF panels on the wall with your own hands if you prepare slats with a cross-section of 20 by 40 mm. They will need to be secured using self-tapping screws and a screwdriver.
The location of the slats must be perpendicular to the direction of the panels that will be mounted. In order to mount the sheathing elements, we adhere to an interval of 40 - 50 cm.

Using the mounting level, we constantly check the evenness of the installed slats. If the wall surface turns out to be uneven, it is necessary to level the sheathing using such building materials, How:
To secure the surface, long self-tapping screws or dowels - nails are used. This will depend on what materials the walls are made of. Also constantly monitor this process by measuring the evenness of the surface using a level.
The bottom of the slatted sheathing should be located taking into account a distance of 3 - 5 cm from the floor. This will allow for successful consolidation in the future. floor plinth.
At the top, the sheathing is mounted at ceiling level.
If work is carried out where there is a high level of humidity, It is advisable to install plastic or metal sheathing elements. You can watch a video on how to install MDF panels on a wall surface. If you use the “groove-to-groove” fastening method, over time you can easily disassemble the structure.
For execution installation work By MDF installation panels on the walls must be started from the corner:
A thematic video from the Internet will tell you how to attach MDF to the wall.
In order to fasten MDF panels to the wall sheathing, clamps are used - special type staples.
The clamps are pushed into the cavity of the panel groove and secured using a construction stapler.
It is best to use nails. Constant care must be taken not to damage the edges of the panel.

To avoid this, use pliers. We install the remaining panels. The ridge of the panel that will be next in the row is inserted into the grooves of the panel that is already installed.
A video about installing MDF panels on a wall can be viewed before starting work. Next you need to attach it to the sheathing and carry out the same work in the required quantity.
The last panel next to the wall may not be the right size. If necessary, you can cut MDF panels with a jigsaw or wood saw.
Cutting it out will not be difficult, the main thing is to correctly measure the part that will be cut. This way they will be the right length. By following the instructions in the instructions on how to attach MDF to a wall, you can do such work yourself. We install the fittings.
In order for the MDF wall mount interior to look like a finished product, it is necessary to install MDF fittings. You can close the joints using a folding corner.
Apply glue to the surface inside and press firmly onto the corner panels. After completing the finishing work using MDF panels, the appearance of the walls will change significantly.
You can attach mdfc panels to the wall without lathing. In this case, the lower part of the panel must be clamped between the wall and the plywood. Top part must be inserted into starting profile. It is screwed to the top panel.
To be able to further secure the structure, you need to make another hole in the middle to secure the panel. MDF fastening panels to the wall without slats is done using wooden choppers and self-tapping screws with caps.
The panel will fit perfectly tightly to the wall, and you will be able to save at least 4 cm of space if you install the MDF panel on walls without lathing.
For additional fixation of the panel to the wall, a professional polyurethane foam. The foam will not be destroyed under the panel, since it does not get there. sun rays. Spray the top and bottom of the surfaces with foam. The fastening of MDF boards to the wall must be reliable.
The panel is glued, and one additional screw is added in the middle. about how to glue MDF to the wall. This will be quite enough. The strength and durability of the entire structure depends on how you can attach the MDF to the wall.
For more information about installing MDF panels on walls, watch the video:
MDF plinth can be attached to the wall in several ways:

It is necessary to select the baseboard to match the tone of the main coating. Step-by-step instruction will look like this:
Most often, the plinth in an apartment fits the platband, this gives the structure aesthetic appearance. To sharp corners do not spoil the appearance of the baseboard, you need to file the corners, turning them inward.
Can be installed attractively with wall mount. Panels with photo printing are perfect.
Compared to aprons made from other materials, it can be installed directly in the kitchen, adjusting all technological dimensions during the installation process.

The panel needs to be marked and, if necessary, holes cut for electrical outlets. On flat surface panel MDF is glued using liquid nails.

Gives the room beautiful view. Installation of the apron and additional elements is carried out quickly and with minimal construction waste.
Practical and environmentally friendly MDF panels are widely in demand in modern construction. They are made by pressing wood dust in a vacuum. In this case, the color of natural wood of various shades is achieved.
If you learn in detail how to mount MDF panels on a wall, You can radically change the appearance of any room in the house. Installation of MDF panels on walls, the price of which will depend on the quality of the selected materials and volumes necessary work, more profitable than working with natural materials.
You can learn how to install MDF panels on the wall from the video. This material is so easy to use that work can be done quickly and efficiently.
Decorating walls with MDF panels is a method that has many advantages over other types of construction work. The fact is that technology allows installation in fairly short time. A significant advantage is that there is no need to carry out additional processing of the coating. Cladding is carried out different ways: glue and frame. It is the latter method that is considered the most labor-intensive.
This material has numerous advantages that make it indispensable. These include the following indicators:
 MDF panels allow you to create unique design interior, in addition, they are easy to care for
 On a note! The wood-fiber material is covered with a decorative layer by lamination or veneering. And the problem often arises that after removing stains with alcohol mixtures, numerous stains remain on the surface. Get rid of them by reapplying the solution. The main thing is to continue mashing until the liquid has completely evaporated.
Naturally, such positive properties they say that MDF panels on the wall are great option. But we must not forget about some disadvantages:
Thus, we can conclude that MDF finishing It is advisable to install panels when it is planned to follow the installation technology.
 Despite the ease of installation, MDF panels have their drawbacks
 For quick and comfortable work it is necessary to prepare tools and purchase materials in advance. The event is carried out using the following devices:
 Installation of MDF panels requires special tools
 The frame method of attaching panels to walls requires more materials than adhesive, which requires only a special mixture and self-tapping screws (for mounting the first MDF element).
For cladding frame method required:
In principle, installing MDF panels will require a limited amount of money. Of course, if you don’t pay attention to products that are covered with valuable wood veneer.

Before covering the walls, you need to prepare the surface. It consists of several stages, each of which begins only after the previous one has been completed. The most important rule, the observance of which makes it possible to obtain desired result, this is a completely dry wall.
Work cannot be carried out in the following cases:
If there are no such troubles, then you can begin preliminary preparation. It is completely identical for all methods of installing MDF wall panels.
One is often done blunder– wallpaper pasted on the walls remains. This absolutely cannot be allowed. They serve as an excellent breeding ground for bacterial growth. And with the adhesive method, it will not be possible to securely fasten the elements.
 You should completely get rid of old wallpaper and whitewash
 The whitewash layer is also removed, although many craftsmen claim that such a procedure is not necessary. In fact, when the need arises to apply primer, it is the old layer that will interfere with its absorption. Therefore, it is better to clean the wall completely.
Unfortunately, this problem occurs everywhere, especially in new buildings and old ones. wooden houses. It's quite difficult to fight her. There are recommendations that indicate that it is enough to treat the damaged areas with special solutions. Many manufacturers even produce them in spray form.
 After removing the old coating, it is necessary to remove fungus and mold
 It’s worth mentioning right away that you can defeat the fungus only by destroying its entire mycelium. Therefore, there is only one way out - removing the plaster to the base, thoroughly impregnating it with special solutions. Of course, the amount of work increases, but there is a possibility of completely eliminating the threat to health.
On a note! Fighting mold (fungus) is a very long undertaking. It is necessary to eliminate sources of constant moisture penetration, and also to treat all contaminated apartments in apartment building. This will allow you to produce high-quality cladding MDF panels.
This procedure is necessary even if you plan to install a frame. The fact is that any cracks can reduce the thermal insulation effect. The work is carried out using the following technology:
 Installation of MDF panels requires complete sealing of the wall
 This event allows you to increase the adhesion of materials, as well as to carry out the installation yourself more efficiently. For work, compositions are selected that have deep penetration. To further protect the surface, the mixture must contain antiseptics. The primer is applied in two layers, each of which is well dried. The walls are especially carefully impregnated before installing MDF panels with glue.
On a note! Treatment wooden surfaces should be carried out using similar technology. But the mixture must contain fire retardants, which will give the lumber fire resistance.
 Surface priming is a mandatory stage of preparatory work.
 It is impossible to sheathe walls with MDF panels without a well-built frame. Need to create reliable design which will withstand the load. Installation is carried out in several stages.
Before you start marking, you need to decide on the layout of the elements. They can be mounted: horizontally, vertically and diagonally. All positions can be combined, but this requires installing dividing decorative elements. For horizontal arrangement of fragments, the lathing is laid vertically on the wall with your own hands. Accordingly, for vertical cladding it is the other way around.
Marking is carried out according to this principle:
 To apply vertical markings you will need a plumb line
 Covering walls with MDF panels on lathing is done using two methods. The choice of a specific method depends on the condition of the base.
Wall cladding with MDF panels begins after full preparation. The sheathing is once again checked for strength, and the joints are pulled. If necessary, communications are carried out, and the locations of sockets and switches are immediately marked. The cable is laid in cable channels, which are corrugated hollow tubes. They are fixed to the walls with their own hands.
Cladding work begins with cutting the products. But if there is significant curvature of the ceiling and floor covering, which has not been previously corrected, then each element is cut off after careful measurement.
On a note! Facing material has a decorative front side, which can be significantly damaged when cutting off excess. Therefore, it is necessary to take into account the location of the teeth on the jigsaw file.
Installation of MDF panels on walls has the following technology:

From the above we can conclude that laying MDF material is not a labor-intensive procedure, but requires compliance with certain rules.


.jpg)


