Upon completion of the main stages of building a house, they begin to finish the base of the pile-screw foundation. Decorative finishing in the case of piles is even more necessary than if a strip base is used, since it not only decorates the house, but also performs a protective function. The screw foundation is open to all atmospheric influences, the wind blows under the house and water flows. This will affect not only comfort, but also the durability of the screw structure if the base of the house is not covered with decoration.
Finishing can be done in two ways:
The first way is much easier - you just need to install decorative panels on a wooden or metal crate attached to piles or walls of the house. In the second case, you will have to make a small concrete base. In addition to complexity, options vary in cost. The choice is also based on the aesthetics of a particular material. What unites the methods of finishing the basement is that even an inexperienced person can cope with the work.
The hinged base has several advantages over brick:
Various panel decorative materials are used to finish the basement of a pile foundation using a hinged technology. The question arises - which one is better to use?
Basement siding is the most common pile foundation finishing material. Its popularity is due to the low cost of the material, its high mechanical strength, resistance to moisture and temperature changes. Biological destruction (mold, rotting due to bacterial damage, being eaten by rodents and insects) does not threaten such a plinth. In addition, there is a wide range of siding colors - from simple solid colors to panels that mimic natural stone.
Thematic material:
Plastic panels can be made from different polymers - expanded polystyrene, polyurethane foam and others. This allows you to give them almost any color, texture and shape. In addition, they can simultaneously act as a heater.
Plastic is strong enough, immune to atmospheric and biological influences. Its use is an economical finishing option. However, they also look somewhat cheap compared to siding and, moreover, a brick plinth.
Metal sheets of corrugated board are easy to process, very durable and reliably protected from moisture and temperature fluctuations. Installing them is no less simple than other options for finishing materials. The only drawback is the narrowness of the scope. Sheathing the foundation with them is possible only in conjunction with some types of wall decoration. For a wooden house, for example, such a plinth is not suitable.
You can also close the underground with cheaper materials - for example, slate or DSP sheets finished with painted plaster.
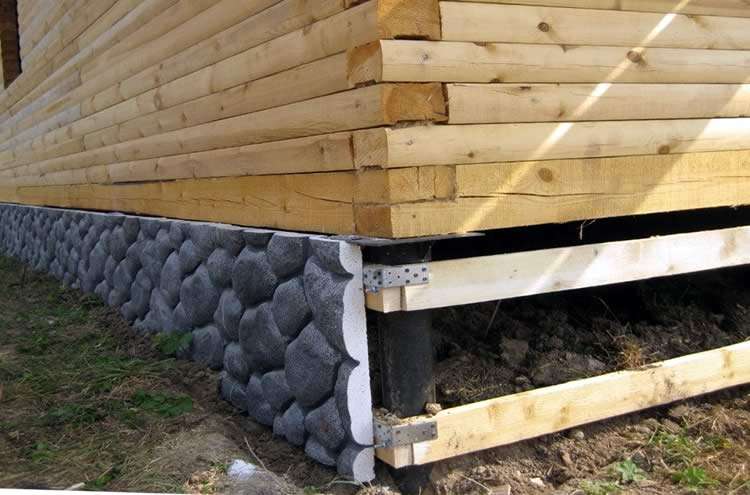
Installation of a hinged plinth begins with the assembly of the crate. You can make it either from wooden slats or from a metal profile. In the first case, the frame elements are screwed to steel brackets, which must be welded to the piles in advance. The profile is welded directly to the parts of the screw foundation.

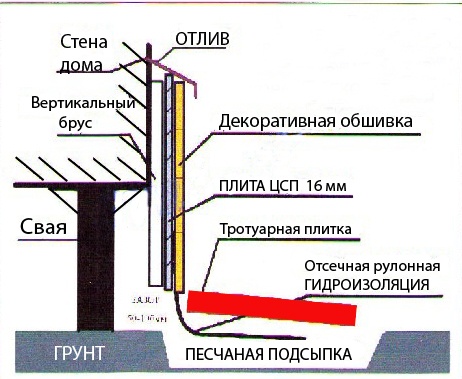
As a rule, the crate consists of two parallel boards, one of which is attached directly under the wall of the house, and the second - at a distance of 150–200 mm from the ground. This distance may vary depending on the climatic conditions in the region. It is necessary to make sure that 50–70 mm remain from the edge of the decorative plates to the surface of the earth - this is necessary to compensate for the thermal expansion of the soil.
After installing the parallel elements of the crate, you can install vertical slats or a metal profile. This is done in cases where the base is too high to ensure greater structural strength. In this case, the installation step should be 400–450 mm.
A shallow trench about 30 cm wide is dug around the perimeter of the house and covered with sand. Then the insulation material is mounted on the crate. A rolled waterproofing is fixed on top of it, the end of which should spread along the sand. The edge of the roll is compacted into the sand. Paving slabs are laid on top of the sand. This whole structure is called a blind area and acts as a drainage system that protects the basement from excess moisture.

If siding is chosen as a finishing material, a starting profile is installed on top of the insulation in the lower part of the basement. Decorative panels are inserted into it, which are then attached to the crate through the thermal insulation using self-tapping screws. The corners of the structure are reinforced with special profiles that come with the siding. To protect the plinth from precipitation flowing down the walls, metal tides are installed on top of the finish.
The basement should be closed in a hinged way, guided by several rules:
If instead of siding it is decided to close the foundation with plastic panels or sheets of corrugated board, the technology for installing the material is somewhat simpler - the starting profile is not needed, the finish is attached directly to the crate. It is important to observe the gap between the bottom edge of the finish and the ground surface.
The capital brick plinth provides not only high aesthetics of the building, but also strong and reliable protection of the underground space of the house. If necessary, such a basement can be turned into a basement. However, finishing will cost much more than when installing a hinged plinth, and the work will be more difficult.

There are two options for mounting a brickwork plinth.
Installation in the first way is carried out in the following order.
In the second case, the work will take a little less time and effort. A metal equal-shelf angle must be welded to the piles at a height of about 50-70 mm from the ground to ensure ventilation. The length of this profile can be 6 or 12 m - you can choose any depending on the length of the walls of the house. The thickness of the steel is selected according to the height and weight of the base.

Thus, there are several ways to close the base of a pile-screw foundation. The choice of the right one is based on the complexity and high cost of the work - however, you can cope in any case. Finishing the plinth will not only make the house more beautiful, but also extend the life of the screw piles, so it is definitely worth doing.