And on how the technology is correctly observed, your further comfortable stay in the room depends. So let's build the roof.
The choice of the type of construction is influenced by factors such as the location of the house and climatic conditions. If the climate you live in is windy, then the best choice will be a flat version of the roof. If it often rains in your area of residence, then you need to think about building. Naturally, building technology various coatings will differ.
According to the types of construction, the roof is combined and attic. - this is with insulation laid on top of it. For the construction of such a project, it is necessary to provide. The attic roof is a frame coated with a durable material. This type of building can be a gable or shed construction. Also, structures can be built in the form of a tent or attic.
The choice is made - we begin construction!
Any construction begins with a project. The project of the future roof is a crucial moment. You need to calculate the correct slope. It should not exceed 20°, minimum slope should be 3-4°. You should consider how the frame and supports will be built, what waterproofing material will be laid. When designing, it is necessary to take into account the issues of design, design of the coating.
Read also:
As .
Review .
How to do do-it-yourself roof - more details.
Roof construction: materials
Types of roofing materials: tiles, ondulin, metal tiles, bitumen roof, wooden, slate roofing.
Depending on what type of roof you choose for your home, you need to choose the material. Pay attention to its quality, and then to the price. You should not save on the construction of a protective structure for the house, as repairs can cost several times more in the future. A reliable roof is a reliable protection for your home.
For flat roof tar or bituminous roofing materials are well suited. From above they need to be covered with a lining. Should not be used as a water insulating material sheet roofing, as folds will form in it, preventing the flow of water.
Pitched structures
Materials for the construction of pitched structures should be highly bearing capacity. To do this, you can use corrugated board, metal tiles and various roll bases. Today on modern construction market the choice is very wide.
The insulation material must be optimal thickness and width. It is recommended to use heaters: rolled glass wool or mineral wool. Moreover, mineral wool slabs have proven themselves with better side. They do not slip, do not deform and do not compact. The density of the plate is 75-125 kg/m3.
The bearing elements of the future coating can be metal, wood, reinforced concrete or stone.
The technology of erecting roofs of houses
As a rule, in the construction of a private house, the technology of building a pitched structure is used. Work on the construction of the roof should begin immediately after the construction of the walls of the house.
General scheme of the roof device.
On concrete slab, after placing a layer of roofing material on its top, you need to lay a Mauerlat (a thick beam of wooden beams in a section of 15x15 cm). The Mauerlat is laid along the axis of the wall parallel to the ridge. The Mauerlat function is to distribute the load from the rafters, from the total weight of the structure, from snow and wind. Mauerlat should be laid no closer than 5 cm from outer wall. Beams must be securely fastened to the wall of the house, otherwise the roof may be blown away by the wind. You can fasten the Mauerlat with studs to concrete or using a wire rod - a thick wire laid in the masonry wall in advance. It is necessary to connect the Mauerlat to each other by the method of carpentry fastening - cutting one into the other by 50 cm in width. For reliability, you can fix it with bolts or nails.
The assembly of the truss system is the next stage of construction. The rafters are fixed to the Mauerlat on both gables. Then they make a support below and at the eaves. You should also install rafters on top of the structure. The rafters are connected to each other using a carpentry cut and fastened with nails. should be 7x15 cm. Install the bars at a distance of 60 cm to 1 meter from each other.
Building technology has many options. You can strengthen the beam to the transverse ridge. But this method is only suitable for light roofs. The most durable way is to mount to the Mauerlat. With this mounting option, you need to make sure that the rafters are placed with a cutout directly on the Mauerlat, otherwise they will slide off. For correct installation you need to drive two nails on both sides of the rafters crosswise. The nails will keep the beam from moving.
We strengthen the rafters on the "ridge"
- Butt - cut the top edge of the rafters at an angle so that it is equal to the angle roof slope, and rest against the corresponding rafter on the opposite side.
- On a ridge beam. To do this, between the rafters cut at an angle, you need to lay a ridge beam. Then fasten butt as described above.
- In the "overlap" - the rafters are not in contact with the ends, but with the side planes. Fasten the bars together with nails or bolts.
Runs are installed to support the rafters. Runs are laid parallel to the ridge and Mauerlat. It is necessary to set the vertical supports on the Mauerlat and already lay a beam on them - a run on which the rafters will rest. It is necessary to fasten these racks very securely, because they will bear the main vertical load.
Screed and waterproofing
The next step is the installation of horizontal screeds. Their main function is to protect the structure from “folding” inward. Boards are used for this. Moreover, the thickness of the boards for the screeds should correspond to the thickness of the rafters. When laying screeds, they must be positioned so that they "burst" the runs. Fasten beams with nails or bolts. With the help of nails, you need to fasten those boards that will create an overhang of the cornice (“filly”).
The next step is applying waterproofing film. It is necessary to roll out the film over the rafters from one edge of the surface to the other, starting from the bottom of the structure. Having cut off the required length from the roll, we continue to move higher in the same way until we cover the entire surface. The film is attached with a construction stapler. If construction is planned, under the film you need to lay a heater - glass wool or mineral wool. Insulation must be laid between the beams of the rafters.
Lathing and control lathing
The control lathing process is the application of laths on top of the waterproofing film. Reiki are attached with nails to the rafters. The function of the grid is to provide ventilation between the hydrofilm and the main crate. When working, safety precautions should be observed, since by negligence you can fall between the rafters.
The crate can be made in two ways: solid and sparse. For a continuous crate, building materials OSB, FSF or boards are used. This version of the crate is well suited for soft roof: metal tile, light slate. For a heavier material: clay, you need to make a sparse crate. The dimensions of the bars for a sparse crate should be 50x50 cm or 60x60 cm. Also, 30-40 mm boards are suitable for a sparse crate. Building materials are nailed to the rafters from top to bottom.
Facial roof treatment
The last and final stage of construction will be the front finish. Finishing technology depends on the choice of building materials. It is always necessary to start laying work from the end of the roof. You should first calculate the material consumption, taking into account all the cornices and "overlaps".
The roof of the house, erected in accordance with all the rules, will serve as reliable protection for many years. The stages must be observed and performed qualitatively.
How to make a roof at home with your own hands? This article was written to answer this question. Everyone has known everything about insulation materials and roofing for a long time, for this reason, in this article we will focus on how to properly make a frame for a roof.
Mauerlat is the basis that takes on the bulk of the structural loads. In plain language, the Mauerlat is the foundation on top of which the roof will be built. For the arrangement of the base, beams are used, with a cross section equal to 150 by 150 mm. They are installed in a parallel plane with the roof ridge.

The fastening of the Mauerlat beams must be extremely reliable, this is done so that the roof is not afraid of wind and weather disasters. AT ideal, these actions are carried out even when the walls are being built. To do this, you need to lay the top four rows of bricks with thick wire. This wire is called wire rod, and its location should be with a meter gap.
The middle of the wire should be in a brick wall, and its ends, which hang freely, should be of such a length that it is enough for the subsequent strapping of the timber. In the event that the house project does not provide for plastering, then the installation of the outer edge of the wire must be carried out inside the solution, so it will not be noticeable.
The important point is that the Mauerlat must recede from the edge of the wall by at least 100 mm. To protect the beams from decay, only a few layers are placed under them.
When building a roof, a prerequisite is the arrangement of a reliable frame.
A frame is a truss system attached to a Mauerlat. Be sure to take into account that if the length of the beams is more than 4.5 m, then you will additionally have to mount runs.

The optimal section of the beams used to build the roof frame in brick house, equals 70 by 150 mm.
The fastening of the rafters on the Mauerlat is carried out using a special cutout, which is fixed with twenty-centimeter nails. Nailing should be done according to this principle:

This method of fastening the truss system does not allow it to move from side to side.
The upper ends of the rafters are fastened with an overlap, it is on the other. One beam, with its end should overlap the parallel beam. In the upper part, they are also fastened with nails, although bolts can also be used for this.

On this, the work on arranging the frame can be considered completed, it remains only to lay the roofing cake.
The last stage of building a house is the arrangement of the roof. Traditionally, a gable roof is erected for any residential building, for outbuildings - a shed roof. Technological processes work on the installation, fastening and arrangement of a roof with a truss structure in a gable version of the roof has been perfected for centuries, and these operations do not change depending on the type of roofing materials (clay tiles, corrugated board, metal tiles, asbestos slate, metal or plastic).
People say: “the roof of a house”, that is, it means not only the shape, but also the reliability of the design, which has a long list of advantages:

The three most common gable roof options are:
The shape of the roof and its design can be chosen based on - the dimensions of the building, the material of the bearing walls, the geographical location of the site play a role. These and other parameters specified in the project determine what loads the gable roof can withstand during operation.

The angle of inclination of the slopes has a certain optimal range in which weather conditions have the least effect on the formation maximum loads on the roof. If the slope angle of the slope is ≤ 400, then this limits the possibilities of equipping the attic or a full-fledged room in the attic, and the slope angle ≤ 100 increases the load on the roof from rain, wind or snow. If you wish, be sure to have an attic or a room in attic space it is better to use the broken line option asymmetrical roof, and if the walls of the house have a length of more than 6 meters, then the truss system must be strengthened with additional runs. 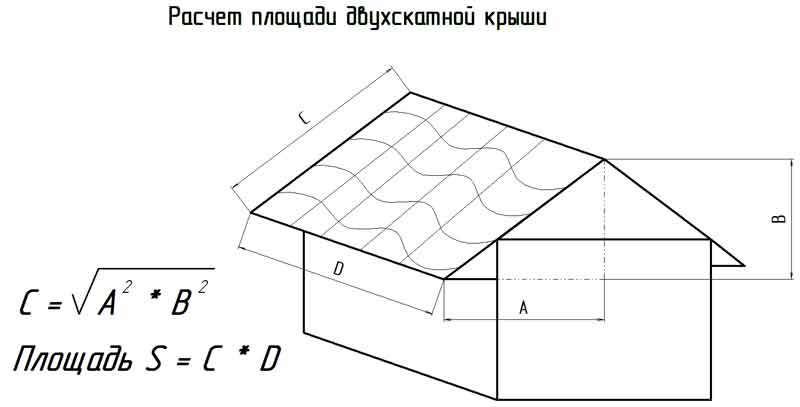
When calculating building materials for gable roof it is necessary to proceed from the axiom that the weight of roofing materials should be as small as possible so as not to load the walls and the foundation of the house. wooden elements will be stronger not only with an increase in their cross section, but also with the use of suitable wood species. The main parameter in the calculation of materials - total area roofs, and a symmetrical design in this regard is calculated more easily than others - it is enough to know the perimeter of one slope, double its area, and get an accurate result.

The main load from the weight of the roof is assumed by the long walls of the house, so the truss system is built on the principle of load distribution along the system. Not for home large sizes(≤ 6 m) more practical to use the system hanging rafters(without supports), when building a larger house, a system of layered rafters with a more complex configuration is used. 
A finished gable roof for a private house consists of the following elements and assemblies:
Mauerlat on the walls of the house holds the weight of the roof, evenly distributing it on the walls and the base of the house. The width of the Mauerlat beam should be equal to the width of the wall. The beam is impregnated with an antiseptic and substances that increase the fire resistance of wood. The outer border of the Mauerlat should not protrude beyond the outer edges of the walls. 
The Mauerlat is attached in different ways. A steel wire Ø 8-12 mm is laid in the brick wall, holes for the wire are drilled in the tree, and through them the timber is tied to the wall. Also, the beam can be fixed with staples, threaded studs in one or two teeth, metal plates, wooden surfboards or anchors through the same holes in the Mauerlat. The pediments and the lower edges of the batten are attached either directly to the Mauerlat, or to a beam of a smaller section, which is nailed (screwed) to the upper trim.
When arranging beam floors for the roof of a private house, it is necessary to use a wooden beam with a section of 200 x 100 mm. How more area at home, the larger the cross section should be load-bearing beam. The installation of beams begins with the fastening of the extreme elements along long wall at home. Then the points are marked at which the remaining floor beams will be attached. 
The crate is mounted on longitudinal beams, which are located at a distance of 50-60 cm, and are attached to the Mauerlat with nails 200 mm long or by any of the above methods. The beams are carried out beyond the edges of the walls to a distance that determines the width of the cornice - from 30 to 50 cm. The cornice will be nailed (screwed) from below to these beams. Since the pediment will be equipped at the ends of the roof, a tie-in is made into the groove on the Mauerlat transverse beam to fasten the cornice and the pediment. When erecting broken roof for the attic, the gable will have a fairly large area, so it is necessary to ensure the design of the ebb and the gable overhang. 
The rafters of a gable roof are several of the same wooden beams the same length and section. After the installation of the floor beams, a ridge beam is attached, for which beams with a section of 100 x 50 mm are fastened with spacers along the central longitudinal axis of the house. Rack height in standard scheme gable roof is equal to the distance from the floor to the upper surface of the Mauerlat. Instead of a beam for a ridge, boards with a thickness of 50 mm can be used.
Before installing the truss system, it is recommended to make a large-scale template. For this board from roof structure you need to attach one end to the beam, the other to the ridge, and mark its length. This will be the template length of the rafters. 
The truss system is also mounted according to the template, observing the sequence of processes. After installation and fixing from the lower end of one rafter beam you must immediately fasten the opposite rafter, and connect the beams with their upper ends to each other through the ridge. The rafters are nailed to the ridge beam, and to the floor beam - with steel brackets or a corner, self-tapping screws or anchors. For a roof of any shape with two symmetrical or asymmetrical slopes, boards are attached along and across the rafters to give the system rigidity.
The pediment is sewn up after the construction of the truss structure is completed. Modern materials are increasingly replacing traditional wood when sheathing gables, and now they use clapboard, siding, corrugated board, and other durable decorative Decoration Materials. Any sheathing material mounted on a frame, which is mounted in advance. Regardless of whether or not there is a room or an attic in the attic, it is necessary to leave a window opening in the pediment - for ventilation and minimum natural light space. 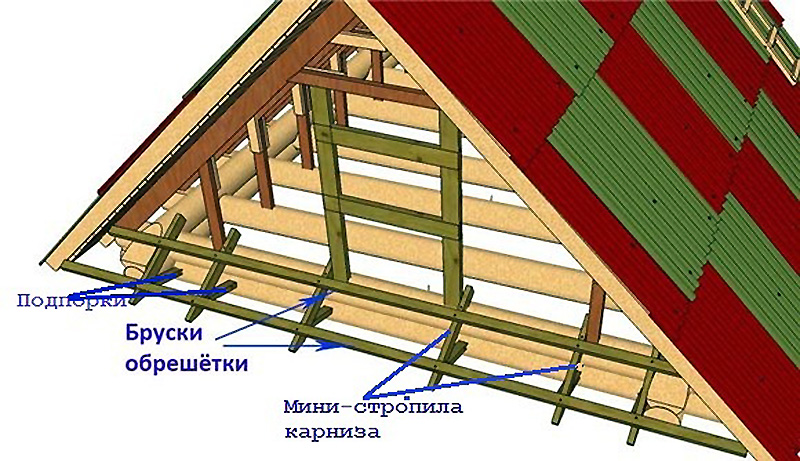
The cornice must be equipped around the entire perimeter of the house - it is necessary for moisture and wind protection of the truss structure, the walls of the house and the foundation. Since every self-respecting owner necessarily makes drainage around the perimeter of the house, they are also attached to the eaves, and drain pipes- to the walls. Plastic system drainage is mounted on plastic clamps. From below, the cornice boards or the frame of the cornice are painted, sheathed with siding, clapboard or corrugated board - in unison with the pediment finish. 
The roof is mounted on the crate, and, based on the type of roofing materials, the sheathing is first made with vapor barrier, hydro- and heat-insulating materials. For the roof, you can use ondulin, metal tiles, ceramic materials, soft tiles, etc.
1.
2.
3.
4.
5.
Assistance in the preparation of this material was provided to us by the technical specialist Andrey Filippov of the Spets.Krovlya company, which has been professionally engaged in the installation of the roof of private houses since 2009. The guys answered all our questions in detail, for which we express our gratitude to them!
After the foundation and walls are ready, you can proceed to the last stage of building a house - installing the roof. The information in this article will help you understand the main aspects of this process. Do-it-yourself roof installation must begin by familiarizing yourself with the main types of roofs that are common in private construction.
There are several main types of structures that differ from each other in the complexity of the work:
Before you start installing the roof with your own hands, observe the types of roofing of houses in the area. This will help you decide on the desired shape and type of construction. Often on houses of medium size there are broken mansard roofs. This situation is explained by the fact that such roofs allow you to equip the attic for living quarters. In addition, this type of roof is not difficult to install.
It should also be remembered that the larger the area of \u200b\u200bthe house, the large quantity additional elements and accessories can be on the roof surface. But if you do not have sufficient knowledge on creating complex roofs, then it is better to turn to specialists. How harder roofing, the more complex the system of rafters.
After you have decided on the choice of the type of roof, you can proceed to the choice of the coating itself. The number and cross-section of rafters depends on it, as well as specifications the entire roof. After all, the roof with your own hands must be done correctly. The most durable truss system should be under the tiles. Ceramic tiles has a much greater weight than slate and metal, so for such a coating it is very important to calculate the characteristics of the rafters (more: ""). For their installation, it is necessary to purchase timber, boards, slats and nails. Also for organizing roofing cake you will need insulation, hydro and vapor barrier films, screws and nails. The consumption of all materials directly depends on the complexity of the roof, its area and the roofing material itself. Calculations of materials should be carried out in advance, while we recommend that you involve specialists for these purposes.
Roof installation technology involves laying a Mauerlat wall around the perimeter. it thick timber, which is the support and foundation for the truss system. The strength of this element directly affects the strength of the rest of the structure. Therefore, the choice of wood and fasteners should be approached with great care.

Mauerlat laying is checked by level. It is impossible to allow distortions in one direction or another. For fastenings, it is best to use anchor bolts. They are installed even when pouring the reinforcing belt, while the ends are left protruding (more details: ""). Mauerlat will be mounted on the bolts later. To do this, holes are made in it, strictly step by step between the bolts. The beam is seated with a sledgehammer, while making sure that it lies evenly and tightly.
After laying the Mauerlat, they proceed to the installation of the truss truss. Rafters are assembled from thick boards or timber. It is they who will have all the main load, so you should not save on materials. Then the rafters are fastened with ties, jumpers, spacers and crossbars. If you already know how to do the installation of the roof with your own hands, then all tasks are noticeably simplified. If this is the first experience of such work, then it is better to enlist the help of someone who has already been involved in the installation of the roof.
Remember that each rafter leg necessarily rests on the Mauerlat, while at the other end it joins with the opposite rafter. The width of the step depends on the size of the roof and the weight of the roofing cake. The greater the estimated load, the narrower the pitch of the rafters should be.
The part where the bars meet is called the ridge. Crossbars are reinforcing jumpers between the bars. If you carry out the installation of the roof with your own hands, the type of which is gable, then the result should be a structure in the form of two triangles fastened together. They are more convenient to collect on the ground. Installation is carried out directly at the top. Assembly of the structure on the roof is carried out only after they are installed ceiling beams. The rafters are installed as follows - first, the extreme beams are fixed, which are fixed by the ridge beam, then they proceed to the installation of all the others. After that, the bars are finally fixed with nails and screws. AT right places additional ties and jumpers are installed.

Along each rafter leg it is necessary to fill the rails of the counter-lattice. It is needed to organize the gap between the rafters and the crate. Thus, sufficient space for ventilation is organized. Lathing slats are stuffed onto the counter-lattice. They are fixed with a certain step across the rafters. If all this technology seems too complicated for you to understand, we advise you to turn to more experienced builder, as well as see photos and videos of how to assemble a truss system, etc. In fact, all the work is not so complicated, it's just important to understand their principle.
After the rafter system and the crate are ready, you can proceed to the next stage of roof installation.
Before laying the roofing material, it is necessary to equip the roof protection. This item is mandatory, otherwise cold and moisture will enter the house.
The protective layers of the roof are usually arranged in this order:

These four layers are commonly referred to as roofing cake. Work on the arrangement of protection begins with laying a heat insulator between the rafters. Mineral wool is increasingly used as such a material. It is resistant to wear, has a long service life and low weight. To reduce the cost of construction, foam can be used, but it is highly toxic and flammable. Therefore, it is not recommended to do insulation in this way. For reliable protection of the roof, the insulation is laid in two layers. Thus, a gasket with a thickness of about 10 cm will be obtained. For regions with a relatively warm climate and not severe winters, 5 cm is quite enough.
In addition to protecting the house from the cold, thermal insulation acts as a sound-absorbing material. This feature of the insulation becomes especially relevant for houses in noisy places and in the case of using metal coatings as a roofing material.
After laying the insulation, proceed to the installation of the vapor barrier film. It is pulled from the inside, from the side of the attic. The film is attached to the rafter system with a stapler. Thus, it will close the thermal insulation from the inside. This allows you to protect the mineral wool from steam that rises from the living quarters.

The following stages of roofing work are carried out already from outer side. A diffusion layer is laid over the thermal insulation. waterproofing membrane. It does not allow moisture to enter, which forms on inner surface roofing material or penetrates through small cracks. At the same time, the steam that forms in the heat insulator freely rises and passes through the film. That is, even if the thermal insulation is at least slightly saturated with moisture, it will soon be easily removed from this layer of the “pie”. The film is fixed on the crate with a stapler.
On this roofing cake is almost ready and it remains only to lay the final layer. Thus, you almost know everything you need to complete the installation of the roof with your own hands.
Roof truss system, detailed video instruction:
If you carefully read the previous sections of the article, then you have probably already chosen the roofing material. But let's go over some of them again.
So, for example, slate differs in the lowest cost. It allows you to easily carry out the installation of the roof and at the same time get reliable protection at home. But appearance such a roof, to put it mildly, is not very attractive. Since slate is not elegant, it is often used for roofing on outbuildings, bathhouses and garages. However, the slate will good decision for a small country house.

natural tile has a much better look. A house with such a coating stands out well along with others. The tile has a lot of advantages, but it should be remembered that it is very heavy. Therefore, the rafter system must be strong enough and of high quality. The service life of such a roof is very high, its laying is relatively easy and fast. But for the work it will be necessary to attract specialists, since a huge role is played by proper organization framing systems.
Metal roofing is very popular. It mimics the look of the previous coating. In addition, the technical specifications are high level- durability, beauty, lightness and cheapness. Installation of such a roof will not take much time. In addition, thanks to the coating with a protective polymer, the metal tile will last for many years without requiring repairs. From a certain distance it seems that the roof is covered separate elements tiles, but in fact it consists of sheets that must be laid in a certain sequence.

Regardless of the material chosen, you should always put the bottom element under the top one. Each type roofing has its own styling features, and therefore it is necessary to strictly adhere to the instructions for work or seek help from professional roofers.
Very often, do-it-yourself roof installation ultimately allows you to get a coating that is no different from the work of professionals. The lack of knowledge and experience is compensated by responsibility and the desire to do better, more reliable, more beautiful for yourself.
We do not recommend amateur builders to save on materials, but if you really have "golden hands", then it is quite possible to save on some accessories. Such elements of the roof include a drain. It is necessary so that the water that flows down the plane of the roof is reliably removed, and does not fall on the walls and foundation. For these purposes, ordinary plastic pipes sawn in half are perfect, from which you can make. This is a great alternative to pre-made gutters. At the same time, a correctly selected pipe diameter allows you to create a high-quality rainfall drainage system.
As a result, the erected roof, regardless of the material chosen, must meet the requirements of strength and reliability. If you managed to create a coating that protects well from rain and snow, absorbs noise and cold, then you have done all the work correctly and the quality of living in the house will be very high.
Many owners of suburban areas prefer to build a house on their own. final stage building construction is the erection of the roof. With certain skills, you can reduce labor costs for employees and do the work yourself. Many do not know how to make a roof - in such cases it is better to take the help of skilled workers.
First of all, you need to determine the type of roof, prepare necessary tools and materials. Roof construction is one of the milestones building a house.
To make a roof, you will need to choose its type correctly. The simplest structures that you can make yourself include gable roofs with straight frames.
Overlapping the roof with one slope will save the material. If you make such a roof frame with your own hands, the laboriousness of the work will be less, and the installation speed, on the contrary, will be higher. But this method has several drawbacks. The first of them is not the most attractive: there is no way to equip an attic or attic. In this case, the space under the roof is too low.
 Very often a gable roof of a private house is mounted with my own hands. It is easy to make and allows you to get more space. Compared to the four slopes, it has less complexity and weight. Also in this case, less material is required. The roof of the house differs significantly from other types. In this case, you need to make triangular gables at the ends of the building.
Before you build a roof with your own hands with four beams, you will have to seriously prepare. This design has more elements compared to previous roofs. Besides, in the attic no way to do full windows , since the design is devoid of gables. Do-it-yourself roof installation in this case involves the installation of attic windows and skylights. They are designed for lighting and evacuation.
An excellent option would be combined design. It can combine features of all these types. Another option for an attic is to build a roof with broken slopes. In this case, the lower part of the roof has a greater slope than the upper. This assembly allows you to raise the ceiling in the room and make the house more comfortable.
The modern construction industry offers a huge number of traditional and innovative roofing materials. To understand all their diversity, you need to consider in detail the main types of parameters. However, first you should understand what principles are used when choosing certain roofing materials. The choice of material depends on many factors:

The modern market is full of various roofing materials. They must not only be strong enough. A prerequisite is the ability to withstand various negative atmospheric factors.
The construction of the roof of a private house requires the preparation of tools and materials.
In particular, you will need:

 Consider how to properly make a roof. To determine the configuration and size of the roof, it is necessary to take into account the snow and wind load in the existing climatic conditions
- how less angle, topics better design withstand loads. But a small angle (40 degrees or less) does not allow full use of the attic space.
Consider how to properly make a roof. To determine the configuration and size of the roof, it is necessary to take into account the snow and wind load in the existing climatic conditions
- how less angle, topics better design withstand loads. But a small angle (40 degrees or less) does not allow full use of the attic space.
The shape and structure of the roof are designed in accordance with the project plan: the key supports of the roof system must coincide with the lines and points of the supporting structures of the lower floor. Thus, it is necessary to take into account the width of the house, the presence of a longitudinal bearing wall. If the attic is not planned to be used as usable area for living, you can build reliable roof with multi-layer rafters. In this case, the rafters are attached to a track that supports the posts resting on the inner support wall.
If it is decided that the gable roof will be installed by yourself, you should carefully read step by step instructions. The functional parameters of the roof also depend on the correct insulation, characteristics and quality of the installation of the topcoat.
Before you build the roof of the house securely, you need to take care of fastening the Mauerlat - the wooden dressing of the house, which serves as the boundary of the transition from the stone to the wooden part.
Block it in the following ways:
 Rafters - the most hard part work. It is important not only to mount the legs of the rafters, but also to cut them correctly. In the event of a skew, the entire roof will “walk”, which is bad for the house.
Now it is necessary to cut off the upper edge of the board so that the system of rafters of two parallel legs can be connected with cutting edges without voids and gaps. To do this, you need to lift the board up, lean against the Mauerlat and raise it to the desired angle. In the center, overlapping to the rafter floor, you need to draw a line. This will be the board cut line. That is, in the upper part of the rafter we get an inclined cut. All rafters, cut with a pattern, are assembled securely at the top with staples, ties and bolts.
The pediment is a continuation of the wall bounded by the slopes of the roof. If there is a gable roof, then the gables of the house are triangular. When installing the structure, the first parts are first installed, which subsequently serve as a frame for the gables. It is necessary to strictly check the verticality of the structure and make sure that they have the same height. A mountain range is attached to the upper part of the gables, on which the rest of the truss structures are later mounted.
Usually, gables are sewn up after roofing, but this can be done at an earlier stage. Boards 50 x 100 or 50 x 150 mm are mounted in a vertical or horizontal direction. The pediment, which can be built by hand, is often provided with windows. Gables need to be insulated.
 In continuation of the topic, it is worth noting that the next step will be the installation of the frame and the building roofing pie. Once the system is ready, the frame needs to be laid, which will form the basis for the other materials of the pie - steam and waterproofing, as well as other insulation and roofing materials.
Roof covering can be installed from unedged boards 100x50 mm. In this case, the spacing of the boards depends on the final roofing material. The heavier, the smaller the rack step should be. Usually it is 30 cm.
Important: under the frame, it is desirable to lay down a layer of vapor barrier. It will protect the insulation from evaporation from the house. Boards have already been installed on top of the barrier.
Now, perpendicular to the tree, you need to lay the beam in steps equal to the width of the plates or rolls of insulating material. Insulation is placed between them, neatly into the existing grooves.
From above, everything is covered with a layer of waterproofing and fixed with another perpendicular frame (in this case horizontal). And already the last roofing material is being installed on it.
At the very end of the installation of the roof in the house, it is necessary to install drainage system. It is made from cut plastic pipes, they are bought in advance. Now it remains to sew up the roof with the selected material.
The plank is stuffed onto the truss system, the pitch of which is calculated based on the characteristics of the roofing material - its size and rigidity, installation method. If the use of flexible materials (tiles, rolled bitumen) is required, it is necessary to make an even frame.
Roof tiling work is carried out in the following order:

 Overlap must be reinforced in each wave. Covering the roof with metal tiles, Special attention attention should be paid to the reliability of the fastening of the sheets and the accuracy of their connection.
When installing the roof, everything must be done as carefully as possible otherwise heat loss will be very significant. Usually, a gable roof is immediately made, taking into account the use of various materials. This allows you to build a roof with minimal economic costs. In addition, this approach speeds up and simplifies the installation of thermal insulation and vapor barrier systems. design gable roof it is recommended to perform step by step with assistants. Compliance with the technology of work allows us to build a reliable, durable structure.


