Proper drainage of water from the bathhouse is one of the most important points during construction. Its durability, the absence of harmful odors of raw materials or fungus, and how often the foundation will subsequently have to be repaired directly depend on this. In this article we invite you to understand various options drainage system devices.

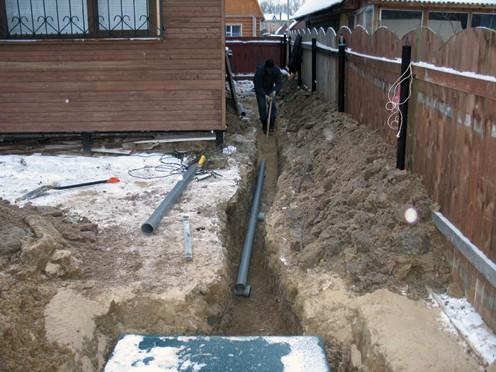
The simplest and most tried and tested method for draining water in a bathhouse for decades is a drain pipe, which is laid during the construction of the foundation of the steam room. It needs to be made obliquely in relation to the drainage hole itself - this way you won’t have to additionally insulate it.
The hole itself should be dug at a distance of 3 to 5 meters from the bathhouse, and its edges must be strengthened from possible collapses. It would be better if it were concrete rings or a frame filled with concrete. But it is important to make the bottom of the hole so that the water in it is freely absorbed into the soil.
To prevent the water drain for the bath from becoming clogged, it is advisable to make the pipe completely without bends - after all, it is from them that it is most difficult to remove debris. And yes - you can only take a sewer pipe for these purposes, the diameter of which has its own strictly defined value.

Install drain pipe quite simple, just follow these instructions:
But where the water itself will go - it all depends on the planned budget and the load on the drainage. So, it never hurts to build a separate cesspool, and then lay a trench from it and put a sewer pipe in it with good insulation.
And the most budget option is to put gravel (both large and small) directly under the sink, where the water will go.
Some bathhouse attendants also make something like a funnel under the washing and steam room - they concrete its walls and coat it with liquid glass. In the center of such a funnel is a drain pipe that extends beyond the bathhouse: into a pit, the walls of which are reinforced with bricks, or the pit itself is an old one. iron barrel without bottom.
At the bottom of the pit there is gravel, at the top there is a thick metal lid and a hole for the ventilation pipe. Judging by the reviews, such a simple but reliable system may not be opened for ten years.
We also recommend reading the article about installing a shower drain in the floor under tiles on the Vannapedia website - the installation technology is very well described there classical system draining water.
But some builders today are convinced that the water must be removed outside the bathhouse. They say that sand takes a long time to dry even in summer, and in winter all the water that goes under the foundation in the old fashioned way will simply turn into ice - and oh warm floors you can forget about it in the steam room until spring.
Others are sure that very little water is used for one or two people in a bathhouse, the steam room is usually used from time to time, and if you take not ordinary sand, but a large fraction, then no problems should arise...
But the pit itself can be made using a technology that Lately becomes especially popular among bath attendants: the pit is made from tires of a jeep or similar car. The water flows into this pit through plastic pipes, and to prevent cold or unpleasant odors from entering the bathhouse in winter, a water seal is made - something like a water lock:
Step 1. Take a plastic five-liter bucket, make a handle from galvanized tape and place it on the lowest cord from the top tire iron pipe- across the pit. A bucket is hung on it - it will hang like a cauldron over a fire, below the top level of the pit.
Point 2. A corrugation is put on the end of the sewer pipe, which is lowered into the bucket from above - it will be located at a distance of 10 cm from the bottom and 10 cm from the edge, i.e. in the middle of the bucket. That's the whole hydraulic lock - after draining, all the water will be collected in a bucket and overflow, carefully flowing into the hole. And when the draining stops, the water that remains in the bucket will prevent the same air from entering the bathhouse. And, even if dirt or leaves settle on the bottom of the bucket, you can always turn it over to clean it.

For a steam room, which is visited from time to time by three or four friends, you need one water outlet in the bathhouse, but for a whole group of regulars, it’s a different one. In a bathhouse for a small number of steamers, a drainage hole is usually installed directly under the foundation. Its walls can be lined with bricks and covered with coarse sand - just right for a summer bath. But in the second case, you will need a special pipe that will go into the drainage well - and below the freezing level of the soil, otherwise it will freeze. Or you can combine both methods - using the first in the summer, and the second in the winter.
And so that the water from the bath does not go to waste and does not pollute environment habitat, you can use a septic tank, which will clean it and distribute it through irrigation pipelines. The most complex and expensive way to remove and purify water from a bathhouse is a well with biological filters. It contains slag, broken bricks and crushed stone. The whole secret is that when bath wastewater constantly enters a well, it becomes covered with silt over time, and in the silt there are microorganisms that then purify the wastewater. Such a septic tank is usually built in the lowest place on the site.
That's all! Nothing complicated - you can do a proper drain in a bathhouse with your own hands.
The water drainage device in the bathhouse is one of the most important processes, without proper organization which makes it impossible for comfortable and long-term operation of the structure being built. Therefore, significant time and money are allocated to perform this type of work. The entire system for draining waste and used water in a bathhouse consists of two parts:
As a rule, drainage of wastewater in a bathhouse is provided directly in the floor structure, and is carried out immediately during its construction. This is the simplest and most effective way to organize the drainage of water in a bathhouse.
In most cases, the three most common design options for draining water in a bathhouse with different floors are used:
Draining water in a bathhouse from a leaking floor is a fairly simple task structurally and technologically. But despite all its simplicity, the design in question has a significant drawback - its operation is possible only in warm time of the year. Considering the cheapness and ease of the device for bathhouse owners in summer cottages who use them only during the season, then a quite common and convenient solution.

Do not forget about the mandatory processing of all used wooden structures under the floors. It consists of antisepticizing absolutely everything and waterproofing hidden wooden surfaces.
It is advisable to make beams, logs and boards used for bathhouse floors from hardwood, this will increase their service life. The bathhouse floor covering boards are laid with a gap of at least 5 mm, are not nailed down, but are attached at the edges, which makes it possible to periodically remove them for drying.

Advantages of draining water from a leaking bathhouse floor:
The disadvantages of this design, in addition to the difficulty of use in cold weather, include a rather short service life. This is partially offset by the ease and low cost of repairs. In addition, installed wooden pallet, taking on some of the water, will also slightly increase the service life.
The option under consideration is to drain the water in the bathhouse - the work is somewhat more complex than the previous one. However, it does not have the disadvantages described above, can easily be used all year round, and is more reliable.

Sequence of work:


The considered design for draining water in a bathhouse is more technologically complex and is more expensive financially, but it is also much more reliable and has a longer service life without the need for repairs.
Concrete floors in a bathhouse have one important disadvantage compared to any wooden option - they are cold. But, despite this circumstance, when building a bathhouse in modern conditions, it is used relatively often. The reason is that they are durable and easy to use, they can be used over tiles, and modern ceramic tiles are one of the most durable and reliable materials. In addition, the tiles have an attractive appearance, thanks to which various design solutions. In addition, a wooden pallet is often laid on concrete or tiles, reducing the problem of a “cold” bathhouse floor.

This drainage design is carried out when the foundation work has already been completed, before the start of floor covering work.
Sequence of work:

With this design, the drain is installed either in the center of the steam room, or in one of the corners near one of the walls. The second option is much simpler, so it is much more common. After completing the above work, the following diagram is formed:
There are several of the most common and frequently used drainage systems:
A relatively complex system that can be used for relatively large volumes of wastewater unless it contains solids. The system consists of a container and an extensive system of sewer pipes that extend from it and are located along the area of the site.

The container contains a septic tank that partially processes water polluting particles. The volume of the container must exceed the volume of waste at least three times. The septic tank in the tank is changed at certain intervals, and a sewage disposal machine pumps out the sediment that accumulates in it.
A fairly simple design, can be used when groundwater is deep enough. The volume of container that the drainage pit needs depends on the amount of drainage. For example, if the bathhouse is operated by three people, the volume of the drainage pit is quite sufficient - 75 liters. The pit is located 2-3 meters from the building. In most cases, the edges are simply strengthened with ordinary ceramic bricks or a stone, after which filtration material is placed there. It is usually made of two layers: in the lower layer - fragments and crumbs of brick, expanded clay, crushed stone, and in the upper layer - construction sand.

Quite often, instead of fastening walls with bricks, they use digging in plastic or metal barrel, in which the bottom is first knocked out, and numerous holes are made in the walls.
No less simple and accessible to self-made design. Can be used when groundwater is close to the surface and installing a drainage pit is impossible. A drain well consists of a sealed container to which a pipe is connected for the flow of waste. The liquid must be pumped out periodically using a sewage disposal machine. Usually located at a distance of no more than 5 meters from the building.

A fairly frequently used design, popular due to its simplicity and reliability of design. The pit is made directly under the steam room floor. It is filled with some kind of filtration material, which is usually expanded clay, crushed stone, sand or a mixture of them. In fact, this system also uses a principle based on the natural filtration of wastewater. Its use is possible when their volume is insignificant or the bathhouse is used infrequently.

If a unified sewerage system is installed and operating on the site, then wastewater is discharged directly into it. For normal operation, it is enough to observe the difference in level marks.
A competently and correctly executed water drainage system will help increase the service life of the bathhouse and the level of benefit and comfort from visiting it.
A well-planned bathhouse design not only increases the service life of the building, but also protects it from the appearance of mold and pathogenic fungi, and also increases the heat transfer of the heating installation. The main requirement of the bathhouse is to thoroughly drain the wastewater.
A properly designed structure using concrete and boards will eliminate odor and reduce the proliferation of pathogenic microorganisms.

How to make a drain in a bathhouse with your own hands? You will find the answer to this question in our material.

Proper drainage of wastewater in a bathhouse can be done in several ways:

In the first case, it is collected in a special department, where the waste liquid flows into sewer pipes. In the second option, during the construction process the building is made at a certain angle of inclination with additional gutters to drain dirty water.


A detailed diagram helps to avoid common mistakes during self-construction. It includes:

Preparing a trench for laying pipes. The depth of the grooves should not exceed 0.5 m. During installation, it is necessary to observe correct angle tilt To do this, each subsequent pipe is fixed 3 cm higher than the previous one.

The bottom of the trench is sprinkled with sand. The height of such a substrate should be 16 cm after compact compaction. During the installation process, it is important to maintain the angle of inclination.

Next, all the pipes are connected to each other and laid at the bottom of the pits. If the bathhouse will have a bathroom, then it is necessary to install an additional sewer riser. To do this, it is fixed to the wall surface with a special clamp.

For proper circulation of air masses in the toilet, additional ventilation must be installed. This will reduce the delay unpleasant odors indoors.

After this, they move on to laying the flooring. During the sewer installation process, it is necessary to attach additional metal grates. They will prevent large debris from entering the drain hole.


Special water seals will help eliminate unpleasant odors. They are rubber pads that are fixed in the area of the drain hole.

How to drain a bathhouse? Before proceeding with the construction of an external sewage system, it is recommended to consider several main factors:
These factors are integral part on initial stages bath design. For frequent use of the premises, it is necessary to design a complex sewage drainage system.

For this purpose, ground filtration is additionally carried out. In addition, it is enough to use a waste pit here. The waste will gradually be absorbed into the thickness of the soil cover.

If sandy soil predominates on the site, then drainage rings are used for reliability. For clay soil, the optimal solution would be to strengthen interior walls. As the pit fills with waste, it must be cleaned with special equipment.

Today, there are a huge number of devices for arranging drainage sewer for a bath. They have both positive and negative sides. These include:


Drainage well. It is a deep pit, the walls of which are filled with filtrate. Sand is used for this fine crushed stone, pebbles.

The advantages of this method include: low cost of materials, ease of installation. The disadvantages include labor-intensive process replacing filtered masses with new ones.

Drain well. This is a large container for collecting sewer liquids, in which waste from the bathhouse gradually accumulates. As it is filled, it is cleaned using special equipment or a machine.

The advantages of such a system are: ease of installation and arrangement of the drainage pit, low cost. Negative qualities include: frequent cleaning, inconvenient location of the drain well. As a rule, installation should be carried out at the lowest point of the site.

Pit. It is located under the floor covering of the bathhouse. Drain waste is collected in this pit and undergoes independent cleaning through a filtrate of fine materials.

TO positive qualities systems include: low cost of materials, easy installation. The disadvantages of such a structure are: low throughput, it can be used on sandy and dry sandy soils Oh.

Ground filtration. This is a system that consists of a septic tank and several pipes. Purified water passes through them. The pipeline is laid at a certain angle, due to which all the liquid will drain on its own and be absorbed by the soil.

The advantages of such a system are considered to be: it can be used for all sewer network, with its help, the liquid is thoroughly cleaned from harmful impurities. A photo of a bathhouse drain shows the process of filtering sewage waste.


Having your own bathhouse is the dream of most homeowners. Many of them begin self-construction to make their dream come true. One of the most important moments during construction, the organization of water drainage is considered. Well designed and installed structure will protect the foundation and wooden parts from destruction, will prevent possible appearance fungus and unpleasant odors. How to drain a bathhouse according to all the rules? Let's figure it out.
Wastewater collection in the bathhouse can be carried out different ways. Choice optimal option depends on what kind of floors you plan to lay. They may or may not leak. In the first case, it is assumed that a special reservoir will be installed to collect water, from which the wastewater will go into the sewer system. In the second case, an inclined floor is installed, and gutters and ladders are installed through which the water will drain.
In any case, the drainage system must be installed before laying the floors. General scheme its installation looks like this:
At this point, the installation of the sewage system inside the bathhouse can be considered complete. All that remains is to connect sanitary equipment and a toilet to the system, if necessary. Now it's time to tackle the outdoor drainage.
pipes for external sewerage
There can be many options for organizing an external bath sewer. When choosing one of them, be sure to consider the following points:
This is the most important aspects, which will allow us to determine the best way water drainage. For example, for small bathhouse where two or three people will wash once a week in the warm season, there is no need to equip a complex sewer system using ground filtration. A drainage hole or even a pit under the building will be quite sufficient here. Whereas for a bathhouse in which you plan to wash all year round, you will need a more complex drainage system.
The type of soil is also important. For highly absorbent sandy soils, a drainage well is the optimal solution. This is not suitable for clay soils. Here the best option a drainage pit will be constructed from which wastewater will be periodically removed. When installing the system, do not forget about the level of soil freezing. If this is not taken into account, the water in pipes laid above this level will freeze in extreme cold and destroy the sewer system.
There are several effective and relatively low-cost ways to organize the drainage of water in a bathhouse. All of them are quite easy to do on your own. Let's look at their main advantages and disadvantages.
It is a sealed container in which wastewater coming from the bathhouse accumulates. When the well is full, it is emptied using a special machine. Advantages of the system:

The disadvantages include the following:
It is made in the form of a pit filled with filtrate, which cleans the wastewater. Sand, crushed stone, small fragments of brick or furnace slag can be used as filler. Design advantages:

Drainage well - as an element for draining water from a bathhouse
The system has one drawback - the need to change the contaminated filtrate or clean it approximately every six months, which requires serious labor costs.
A hole dug directly under the floor of the washing room in a bathhouse. Its bottom is filled with filtrate, through which wastewater passes, is cleaned and gradually passes into the lower layers of the soil. Advantages of the system:
A pit is the easiest way to arrange a sewer system in a bathhouse
Disadvantages include:
It is a system consisting of a septic tank and pipes diverging from it, through which purified water is discharged. The pipes are laid at a slope so that the liquid flows by gravity and is absorbed by the soil. Design advantages:
Significant disadvantages:
As an option, you can consider connecting to a centralized sewerage system. This is the optimal solution to the wastewater problem. In this case, no external devices for receiving and processing wastewater. Another plus is the ability to connect several water intake points at once. The disadvantages of this option can be considered high cost services of contractors and bureaucratic red tape, which often arises when obtaining permits.
Drain pit - practical solution for wastewater disposal. It can be arranged in different ways. The simplest one is to dig a plastic or metal container into the ground. You can make a hole out of iron concrete rings, fill the walls with concrete or lay them out with bricks. Let's take a closer look last option.

Drain well is an excellent solution for draining sewage
We start by choosing a suitable location. It should be located at the lowest point of the site, since the wastewater will have to move by gravity. In addition, we take into account that the pit will regularly need to be cleared of waste, so it is necessary to provide convenient access for sewage treatment plant cars. Having outlined the location, we get to work:

The drainage pit is ready for use.
Such a system can only be installed in an area with deep groundwater. Otherwise in force design features drainage well it will be constantly filled groundwater, and there will be no room left for waste. Before starting work, we determine the place where the well will be located. It is optimal to place it 2 meters away from the wall of the bathhouse. If the distance is greater, certain difficulties will arise with organizing the necessary slope of the drain pipe, which is necessary for the waste to drain by gravity.
A drainage well is an excellent way to arrange a sewer system in a bathhouse.
In addition, the close location of the well threatens the foundation with wetting or subsidence. Having decided on the installation location, we find out what materials we will need for installation. It depends on the type of soil. If it does not crumble, we will not need to strengthen the walls of the pit. However, such soils are not found everywhere. Most often, the walls need to be strengthened. This can be done in different ways:
Let's get started:


The drainage well is ready for use.
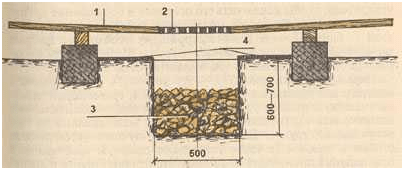
Tip: If the site has sandy, well-absorbing soil, you can install a horizontal drainage pad instead of a well. It is a trench about 1 m long, 0.3 m wide and 1 m deep. A cushion of crushed stone 20 cm high is laid at the bottom, and soil is poured on top. The wastewater is discharged directly onto this pad, cleaned and absorbed into the soil.
drainage well
The pit is a wastewater reservoir located directly below wash room. You need to understand that such a system will be effective only for small baths that are used infrequently. Work on arranging the pit is carried out in the following sequence:
Tip: The floorboards of a wooden floor laid over a pit do not need to be nailed to the joists. In this case, they can be removed if necessary and taken outside to dry.

There is another option for arranging a pit, which in in this case plays the role of a reservoir from which wastewater, having reached a certain level, is discharged into a sewer or septic tank. Such a system is usually installed under “leaky” floors. Let's get started:

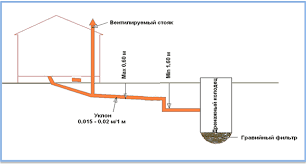
We install a water seal. This element is necessary to prevent unpleasant sewer odors from entering the bathhouse. The simplest option homemade water seal - a metal plate installed at an angle. We fix it to the pipe in three places, leaving the lower part unfixed. Important: there should be 5 cm from the bottom of the pit to the bottom edge of the plate. Another option for a homemade water seal is a children’s rubber ball, fixed above the pit drain. When the tank is filled with water, it floats up and opens the drain. As soon as the water drains, the ball descends and closes the pipe.

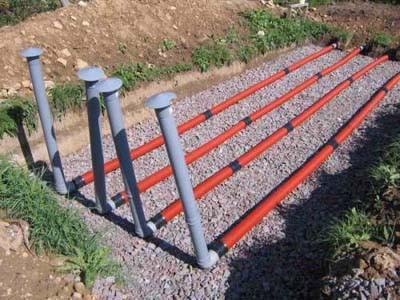
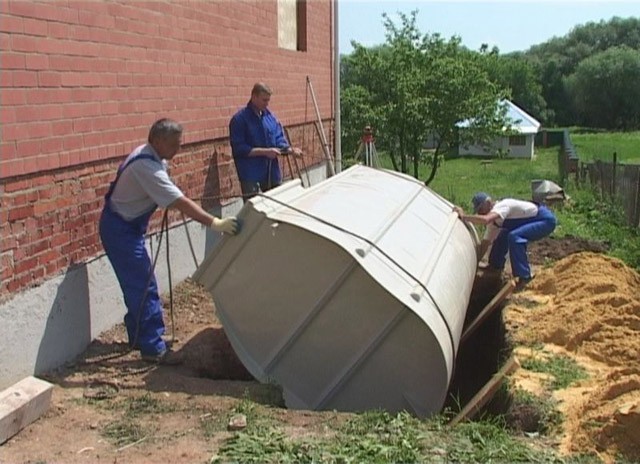
One of the main elements of such a system is autonomous septic tank, which is both a settling tank and a distribution well. Drainage pipes extend from it, which distribute purified water throughout the area. A septic tank can be purchased at a store or assembled yourself. In the latter case, the easiest option for self-production is a design made of plastic or metal containers. A septic tank made of concrete rings works effectively, as does a structure made of concrete or brick.

A septic tank is an excellent solution for draining sewage
In any case, we begin the installation of the system with the installation of the septic tank. We install the tank at a depth of 1.2-2.5 m. There is no need to lower the tank deeper, otherwise a problem may arise with the post-treatment of wastewater, which is carried out by anaerobic bacteria. We connect a sewer pipe to the septic tank. It must be buried below the soil freezing level. After installing the septic tank, we begin preparing the drains, as drainage pipes are called.
Their length and diameter depend on the number of drains. Most often, standard plastic pipes with a diameter of 11 cm are used. You can take ordinary plastic sewer pipes and make holes in them. You need to know that in the upper part of the part the diameter of the holes should be smaller than those located in the lower part. This is done to ensure that the outflow of water is uniform. The number of holes at the beginning and end of the pipe also differs. At the very beginning, perforations are performed more often, and at the end - less frequently, and most of them occur in the lower half of the pipe.

To properly arrange drainage, several rules are used:
After the pipes have been prepared, you can begin their installation:


Scheme - using a septic tank as an element of sewerage arrangement in a bathhouse
Important: The ground filtration system requires periodic maintenance. It consists of replacing the silted sand and gravel cushion and the soil underneath it. Depending on the load on the system, such work is carried out once every 10-15 years or less.
Properly organized drainage of water in a bathhouse is the key to its long and trouble-free functioning. It will protect the building from the destructive effects of moisture and prevent contamination of the site with wastewater. Even for small bathhouses, the installation of a sewerage system is mandatory, especially since it is necessary for large premises with separate shower room and toilet. The organization of drainage should be taken with full responsibility, avoiding mistakes and omissions. And then new bathhouse will only please its owner with long, impeccable service.
During the construction of a bathhouse Special attention should be given competent organization water drainage systems. If everything is done correctly, fungus will never appear in the sauna and there will be no unpleasant odors. And the building itself will last much longer.
A Russian bathhouse or sauna in your own countryside is the dream of many people. Bringing it to life is not that difficult. It is enough to understand all the features of the construction and arrangement of the steam room, in particular, the rules for organizing drainage in it. This issue needs attention increased attention. If you do not organize effective drainage of waste water from the sauna, within a couple of years after the start of operation, its foundation, floor base and lower parts of the walls will become unusable. Naturally, very soon all these problems will cause the destruction of the building.
It is possible to do the drainage in the bathhouse with your own hands, but first we will need to understand all the existing drainage options, choose optimal system, and only after that start arranging the drain. The first issue to be resolved is related to the type of flooring in the steam room. They can be done:
A concrete floor is ideal for a permanent sauna, in which water treatments are taken throughout the year. Such a base consists of several successive layers. Compacted gravel comes first, then concrete mortar, vapor barrier gasket, heat insulator (it is best to use polystyrene foam boards). The insulation is covered with polyethylene, which acts as a water protector. Another layer of concrete is laid on it. The entire structure is secured with a reinforced cement screed. In the end concrete base lined with tiles (ceramics) or other finishing materials.
A wooden floor is much faster and easier to build. It is installed in bathhouses used exclusively in the warm season. The costs for wooden foundations are significantly less than for concrete ones. But there is one problem. Even with careful processing of wood special. compositions, after some time it will begin to deteriorate under the influence of moisture and high temperature. After 5–6 years of operation, such a floor will have to be completely re-laid. This should be kept in mind when choosing the type of base for your bath.
Wooden floors are structurally divided into non-leaking and leaking. The first of these are always laid on a pre-made concrete screed (it must have a certain slope). Non-leaking structures are prone to rotting, since after using the steam room they take quite a long time to dry. From this point of view, leaky floors are more convenient to use. They are simply laid on the joists without rigid attachment to the latter. The boards are laid with small (about 5 mm) gaps. It is through them that water is removed from the surface of the flooring. At any time, such a floor can be removed, taken outside under the hot sun and dried.
If you plan to build a leaky foundation, you should make a pit (preferably sealed) under the sauna and connect a pipe to it, through which the drainage will be carried out.
Having figured out the type of flooring, we move on to selecting a suitable drainage system. There are several options for arranging a drain:
The choice of one system or another depends on geometric parameters and the frequency of use of the bathhouse, the presence or absence of a centralized sewerage system on the site, the depth to which the soil freezes, and directly the type of soil present. If a person plans to go to his own sauna with two or three friends a couple of times a week, there is no particular need to organize a complex drain (for example, ground filtration). IN similar situations you can get by at low cost by building a simple pit or well for waste water. If the bathhouse becomes permanent place gathering a large number of hot steam lovers, you will have to take care of arranging a more sophisticated and efficient system.
On clay-type soils, it is best to make a drainage hole. Used water will flow into it from the bathhouse through pipes and then be pumped out. For sandy and similar soils, systems in the form of drainage wells are more suitable. We also take into account the most important requirement - the pipes through which water will be drained must be laid below the freezing level of the soil. If you mount them above the specified mark, in very coldy they will freeze, and we will not be able to fully use the private bathhouse.
Let's talk about the pros and cons of different drainage systems. And then we’ll find out exactly how each of them is mounted. Let's start with the simplest system - a pit. It is essentially a hole that is dug under the floor base of the steam room. A layer of filter material is placed at the bottom of the pit. Water passes through it, is purified, and then gradually seeps into the soil. The pit does not require pipes or any other communications to operate. Its arrangement takes a minimum of time. These are definitely advantages. But this solution also has disadvantages. Firstly, a pit cannot be made on soils that do not absorb water well. Secondly, it cannot be installed in saunas with a foundation in the form monolithic slab. Thirdly, even a deep pit is characterized by an objectively low throughput potential.
It won't be much more expensive to install a drainage well. This is understood as a sealed tank for collecting wastewater, buried in the ground. When it is full, the owner of the bathhouse calls a sewer truck. She pumps out the water. Drain system Any summer resident can do it, spending a minimum of effort on the work. Here you just need to choose the right place to install the tank. It should be installed on the lowest plot of land. No special maintenance is required for the drain well. The disadvantages of the system are the need to regularly call special equipment to pump out water and to arrange fairly wide access routes to the tank. The sewer truck will not pass along the narrow path.

A drainage well is a deep and wide hole that is filled with a layer of filter element. This can include furnace slag, small pieces of bricks, crushed stone, and construction sand. Digging a hole is easy. Cover it with filtrate too. But here's to serving drainage system not at all easy. The wastewater is not pumped out of it. They go into the ground. In this case, at least once every 5-6 months you need to completely change the filter layer and clean the well. Such an operation requires considerable labor costs, which negates all the advantages of the system.
We will consider the advantages and disadvantages of the ground filtration method below. And we’ll immediately describe exactly how professional builders make such a system. She is considered the most effective option drainage of wastewater from private saunas.
Methodology soil cleaning wastewater requires the installation of a full-fledged sewer system. It includes pipes for collecting and draining water and a special septic tank. The latter plays the role of a distribution well and at the same time a settling tank. Some craftsmen assemble a septic tank on our own, but more often it is bought ready-made in specialized stores. The advantages of the system are high-quality purification of heavily polluted water, completely autonomous operation, and no need to call in equipment to pump out the well. Disadvantages - a huge amount of land (very labor-intensive) work, the considerable cost of the consumables and equipment used, the need to allocate a large area for installing a septic tank.
A step-by-step guide to setting up a ground filtration system is provided below. First, we decide on the location of the septic tank. We bury it 150–250 cm into the soil. Then we connect the sewer pipe to the installed container. We remind you! It should be laid below the freezing mark of the ground. After this, we prepare perforated drainage pipes (the so-called drains). We select their cross-section and length taking into account the volume of wastewater. In most cases, plastic products with a cross-section of 110 cm are used as drains. You can also use other pipes by drilling a number of holes in them.
Length of one drainage pipe It is undesirable to take more than 25 m. The pipes are laid in trenches about 1 m wide (minimum 50 cm). The distance between individual drains must be maintained at least 150 cm. The system installation process itself looks like this:
The soil drainage filtration system is ready! If properly installed, it will serve trouble-free for at least 15 years. But after a specified period of time, you will have to change the cushion under the drains, since it will gradually silt up during the operation of the sewer.
As noted, drainage from small, rarely used baths can be organized using a pit. The diagram of its device is as follows:
Boards can be nailed to the joists. But it’s better not to do this in order to be able to periodically remove the flooring and dry it outside.

Some craftsmen make an improved pit. It serves as a collector for wastewater, which, after reaching a given level, goes into the sewer. This pit option is also quite simple to construct. We dig a cubic hole under the floor. We take the length of the ribs of such a pit to be at least 50 cm. We protect the walls and bottom of the pit from moisture. The easiest and most reliable way is to fill them concrete mixture. Although you can use any roll waterproofing material, for example, roofing felt.
Next, at a height of approximately 10 cm from the floor base, we bring the pipe to the pit. We take it outside the building on a slope (otherwise the drains will not be able to leave the pit by gravity). We install a water seal. It is a device that prevents unpleasant sewer odors from entering the steam room. The simplest water seal is a metal plate installed at a slight angle. Its lower end should be about 5 centimeters away from the bottom of the pit. The shutter can also be made from an ordinary rubber ball. It should be secured above the pit (directly above the drain). When the tank is empty, the ball covers the pipe, and when the tank is filled, it floats up and the water flows freely through the pipe.
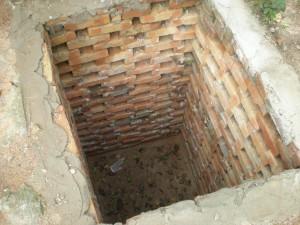
A drainage pit is rightfully considered the most rational way to organize drainage from a bathhouse. We need to dig a hole and install a metal or plastic tank in it. This option does not require serious expenditure of effort. But also durability drainage structure it turns out not very big. Therefore, home craftsmen prefer other methods of arranging such a system. They make pits from reinforced concrete rings or line the walls of the well with bricks. In this case, the structure becomes more reliable, due to which its service life is significantly increased.
To Work with reinforced concrete products difficult. And here brickwork It’s quite possible for any self-taught master to do it. Let us describe the last option for organizing the drain step by step:
Now we begin laying the walls of our drain structure. We carry out the operation using new or used red brick. We make the masonry 25–30 cm thick. We install the bricks with an offset of half a stone. We fix the products with a composition made up of sand, clay and water. We install a pipe in one of the walls for the wastewater entering the well.
Brick is a permeable material. Therefore, the masonry needs to be additionally sealed. We use any bitumen mastic. We apply it strictly according to the manufacturer's recommendations. After waterproofing the walls, we install a ceiling on the well. It should be 25–30 cm larger than the pit (on each side). It is advisable to make the ceiling from reinforced concrete. This design has a considerable weight, but is distinguished by its durability and unique strength.
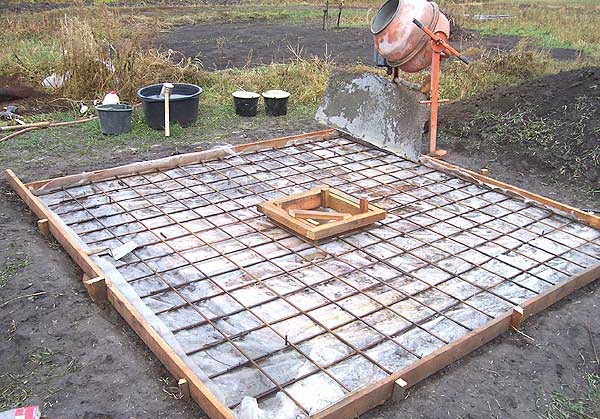
The process of installing the ceiling is as follows: we assemble the formwork, fill it with concrete (layer - about 7 cm), install metal reinforcement, and add another concrete layer on top. We are waiting for the ceiling to harden. After the concrete has crystallized, we install a hatch in the center of the slab. We take plastic film. We cover the flooded floor with it and fill it with soil. Only the hatch remains on the surface of the earth. Through it, wastewater will be pumped out from the brick tank after the tank is filled to a critical level.
A drainage well is made exclusively in areas where groundwater flows very deeply. If they are located high, the structure we are interested in will not be able to perform its function. It will begin to fill with groundwater, and the drainage from the bathhouse will simply have nowhere to collect. The drainage well should be dug 2–2.5 m from the walls of the building. If, the risk of subsidence or wetting of the foundation will increase. With a smaller distance between the wall of the building and the pit, we will not be able to organize the required slopes to ensure gravity flow of water.
By selecting appropriate place, we dig a cylindrical hole in the ground. Theoretically, the well can have any other shape. But practice shows that cylindrical pits are much less likely to need repair work. In addition, they mark a uniform distribution of loads on the walls. We can choose any depth and size of the well. For large and actively visited baths, the parameters of the well, of course, should be more impressive than for saunas that their owners use only from time to time.

We fill the reinforced pit with crushed stone, broken brick or expanded clay, making a pillow 10–15 cm high. Then cover it with sand (the thickness is similar). We dig a trench to the well from the sauna (don’t forget about the slope, optimally if it is 1 cm for every meter). We put a drain pipe into it. We put the last one into the drainage hole. After this, you need to install a cover on the well. It is better to make it metal and always removable. After all, we will have to regularly maintain the drainage pit, changing the filter layer in it and cleaning it. All that remains is to cover the lid with polyethylene and fill the structure with soil.
Choose suitable option sewerage for the bathhouse and do all the work ourselves. Guided by the given instructions, we will arrange a truly effective system drainage.


