When starting an apartment renovation, many are faced with a huge number of problems and questions to which they do not know the answer. Especially often, difficulties arise for those who have never done such work with their own hands. In this article, we will tell you what a renovation can be like and analyze all its stages step by step. You will learn where to start renovating an apartment with your own hands and how best to do it, we will offer step-by-step instructions that will help you determine the order of work.
We will also talk about how to carry out rough finishing of an apartment so that further repairs take place without problems, what materials are the best, what is the price for them, and much more that will help us determine the procedure for repairing an apartment with our own hands.
There are several types of apartment renovation: major renovation, cosmetic renovation.
Carrying out a major renovation of an apartment will require a lot of time, effort and, of course, nerves. The cost of such repairs will not be small, so be prepared to spend a lot of money. A major renovation of an apartment involves a complete reconstruction and replacement of windows, doors, wall and floor coverings, pipes, and so on. The scope of work carried out includes:
Above you can see photos of apartment renovations before and after major renovations.
It will take a lot of time to carry out a major renovation of an apartment with your own hands, but if you correctly decide where to start and outline the order of work, then the time costs will be significantly reduced, and your apartment without finishing will very soon acquire an aesthetic appearance.
The first thing you should do is empty the room yourself of the furniture there. To avoid the situation that you have to sleep right on the floor somewhere in the corner of the room among a pile of painting and building materials, peeled wallpaper, so it is better to decide in advance the issue of accommodation for the night - live with relatives for a while or rent a room.
And so that repairs in an apartment without finishing with your own hands do not take much time, you will again need to decide the question yourself, we talked about this above, where to start repairs in new apartment, it is this decision that will further influence the time, price and order of work. You also need to take into account that the rough finishing of the apartment must be of high quality, so you will significantly simplify and speed up the process of completing the work.
This kind of do-it-yourself apartment renovation involves cosmetic work that will help slightly update your rooms. The price of such repairs will depend on the scope of work and the amount of materials used. Repairing an apartment without finishing will only affect the replacement of coverings of one or all premises, without replacing existing communications.
This also includes replacing the old floor covering with a new one, finishing the ceiling and walls: painting, wallpapering, puttying. In a word, cosmetic renovation of an apartment will not take you much time, but this is only if you approach the work competently and calmly, in this case it will take you a couple of weeks to complete the renovation, while a major renovation will take a month or even several, depending on the amount of work, the main thing is to decide for yourself where to start, and then we will see. If necessary, you can carry out a rough finishing of the apartment, although then the price of your renovation will increase slightly.
Below is a photo of a do-it-yourself apartment renovation – cosmetic renovation.
The concept of European-quality renovation is, one might say, quite conventional; it came to us from the beginning of the nineties. Then, during European-quality renovation, all work was carried out strictly according to European standards and only with the use of expensive imported construction and finishing materials, which is why the price of European-quality renovation was too high.
Currently, European-quality renovation is an original design approach to the design of premises, the use unique technologies, bold style solutions, European zoning of rooms and so on. In a word, European-quality renovation provides the customer with comfortable, beautiful and exclusive housing.
The decision in favor of European-quality renovation with your own hands should be given if you put forward enough high requirements to renovate your home and want to see it completely transformed. Not everyone can afford such repairs, because the price will be simply prohibitive for many.
Above is a photo of the apartment renovation - European-quality renovation.
When renovating an apartment with your own hands, you not only eliminate existing defects in the premises, it also complete replacement heating systems, lighting, air conditioning systems, development of color solutions for future design.
Before you begin European-quality renovation, you should create a competent design project for your house, cottage or apartment and determine the order of work. If you wish, you can develop a design yourself using the most original types finishing.
It is also very important to decide where to start working with your own hands so that it goes quickly and efficiently. If you like to do future design yourself, this means that you creative person, and that means the results of DIY repairs will not keep you waiting.
If you don’t know where to start renovating an apartment with a rough finish, in this case you will need to draw up detailed plan, where the stages of work will be indicated step by step. You should draw up a step-by-step repair plan yourself based on what you want to get as a result of the repairs done. In addition to the plan, you will need to independently develop a design project for an apartment without finishing, choose materials, wallpaper, color scheme, and so on.
Thanks to design project and the plan you will be able to determine the price of your future repairs, because the necessary materials, their quantity and much more are indicated there. Of course, when doing repairs with your own hands, you still won’t be able to plan everything correctly; you will need more detailed instructions, but this information will help you avoid a lot of typical mistakes that are most often made by those who have never done repairs on their own before.
Now you know where to start renovating an apartment without finishing it yourself and how to determine its price, even if it’s approximate, but it’s better to know at least something than nothing at all.
The photo above shows rough plan repair, but it can be taken as a basis.
To understand where it’s best to start renovating your apartment, watch the video:
So, if you don’t know where to start renovating an apartment without finishing it yourself, below we will describe step by step all the steps that will need to be completed.
All this work must be done with your own hands first. Why? The fact is, if you first carry out repairs, which include finishing work on the ceiling, floor and walls, and only then proceed with the above work, you can ruin the work already done, for example, you will splash the new wallpaper on the walls with the solution, and then you will have to make repairs again.
If you don't have enough finances to complete renovation, then prioritize toilet renovation, bathroom renovation, radiator installation and window installation. And to renovate the remaining rooms, start gradually buying materials: tiles, wallpaper, putty, and so on.
And in order to more accurately determine the costs, decide where to start the repair with your own hands, what to do next and how to finish it, in this case you will know exactly what materials you need to buy, their price, what you can do with your own hands, where to start the repair in apartment when you need to call a specialist.
All other stages of apartment renovation are carried out independently in the following order:
If you doubt that you can make repairs and install electrical and plumbing yourself, then seek help from specialists. When they carry out the repairs, ask them to make for you a plan of existing communications; this will not only help you later when doing the repairs yourself, but will also eliminate the risk that you accidentally damage the pipes and cables laid in the wall.
If, when renovating an apartment with your own hands, you adhere to the order of work and know exactly where to start, this will help you avoid a huge number of mistakes, which in turn will significantly save time spent on renovations in a new apartment and will help reduce the price well.
It must be said that renovating an apartment with your own hands requires a lot of time and, of course, financial investments, so if your budget does not allow you to renovate the entire apartment at once, then it is better to do one room, and after a while another. The main thing is to decide where to start the renovation, or rather which room.
If you ask the fair half of humanity which room is better to start renovating an apartment from, then most likely every second of them will answer that from the bathroom or from the kitchen, and there is some truth in this. After all, it is in the kitchen that we spend large quantity time, and if guests come, the first thing they will want to do is wash their hands before going into the kitchen and sitting down to the table.
There are probably no people who would not want the renovation of their apartment or house to be done with their own hands in full accordance with modern design solutions, so each apartment owner himself chooses a style solution for the interior of his premises, which will be one hundred percent responsive and his personal wishes, and modern trends.
If you prefer to see ease and freedom in your interior, then choose a minimalist or high-tech style. Many people prefer to see their interior in a classic style, which is ideal for rooms of different sizes and any lighting options.
If your apartment is small in size and you want to furnish it with your own hands as comfortably as possible, then your style is country, and for risky and business people the most attractive will be the modern style, where the most original ideas, sometimes even too provocative.
In a word, everyone chooses an interior style based on their tastes and preferences; for some, it is comfortable to live in a half-empty apartment with a minimum of furniture and decorative elements, while for others, the house should be a “full bowl” in literally everything. But your imagination will tell you where to start choosing the future design for your apartment.
It must also be said that the cost of your renovation will largely depend on the complexity of the chosen interior. If you prefer to see sophistication and luxury in everything, then get ready for the fact that the cost of creating such an interior will be far from small.
This photo shows the ceiling, which is made in the Rococo style.
In the photo above you can see the decor of the living room, which is made in Indian style.
The photo above shows classic style in the interior.
In the photo above you can see the bedroom, which is made in the style of constructivism.
If you have started renovating an apartment with your own hands, but don’t know where to start, below will be suggested step-by-step instruction, which will determine the order of work in the apartment, this will help you a lot when you ask yourself the question of where to start renovating an apartment without finishing, what is its approximate cost, what materials will you need to buy, and so on
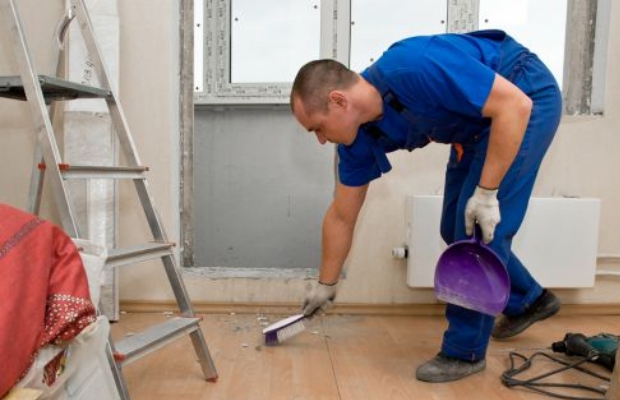
We remove old finishing material from the walls, ceiling and floor with our own hands. If there is wallpaper on the walls, you must tear it off. The fact is that many people, in order not to waste their time, glue new wallpaper onto old ones - this is another mistake that is often made when renovating. This cannot be done, because the old wallpaper under the new ones may peel off, but together with the new wallpaper, which will entail a waste of money and time, you will need to buy and glue the wallpaper again.
If your subfloor in your apartment has become unusable, you don’t need to touch it for now, such work should be left for later. If you are not going to completely change the subfloor, then you need to cover it with something; plastic film is suitable for this purpose, which will need to be well secured at the edges with masking tape. To protect it from mechanical damage, you can use cardboard; it is much more reliable than if you used paper for these purposes.
For those who don’t know where to start dismantling old finishing coatings in your apartment - start with the walls: remove old wallpaper or other finishing material, clean the surface of the walls from glue residues, repair cracks, in a word, carry out all the work so that you are left with a clean wall.
The photo shows the removal of old wallpaper from the walls.
In the video below, you can see how to clean the walls before wallpapering.
Here you can already install existing pipes and electrical wiring into the wall yourself. This stage renovation work in an apartment is considered the dirtiest, but also the most important. Carrying out this work in the apartment next time will be quite difficult, and in some cases impossible, without performing another major overhaul.
It should also be noted that it is better not to save money on electrical and plumbing, because the wiring and pipes hidden in the wall can be damaged, then in order to repair them you will need to dismantle them, just imagine what kind of work this is, and this despite the fact that your The rooms have already been completely renovated and covered with expensive wallpaper.
Do-it-yourself wall nailing must be carried out strictly according to the scheme, which should then under no circumstances be thrown away; it will later help you drive nails into the wall in safe places. In the grooves you made yourself, you need to carefully lay pipes and wires of the required cross-section and then seal the grooves. Advice: it is better to use propylene pipes for laying in grooves.
This photo of an apartment renovation shows how you need to ditch the walls yourself for laying pipes and electrical wiring with your own hands.
In the video below, you can see how the work of gating walls for wiring is carried out.
At this stage of rough work, old windows in the apartment are replaced with new ones. Such work is quite labor-intensive and requires professionalism. If you are new to this business and don’t know where to start, then trust the installation of windows to specialists. As soon as the windows in the apartment are installed, they will need to be protected from dust and dirty splashes, without which not a single rough finish can be completed.
To provide protection to new windows during rough finishing, they need to be covered with film or pleated paper curtains; their price is low, but they look quite aesthetically pleasing. Well, then you can begin the rough finishing - we prepare the ceiling and floor for the final finishing.
Rough finishing of an apartment involves leveling the surface of the walls, then all existing seams and cracks are grouted, then puttying begins. The material for rough finishing in an apartment should be selected based on the type of final finishing. Now you know how and where to start replacing windows in your apartment.
Above is a photo of an apartment renovation - showing the dismantling of windows.
In this photo you can see how the installation of new windows takes place.
To better understand how to dismantle and install new windows, watch the video below:
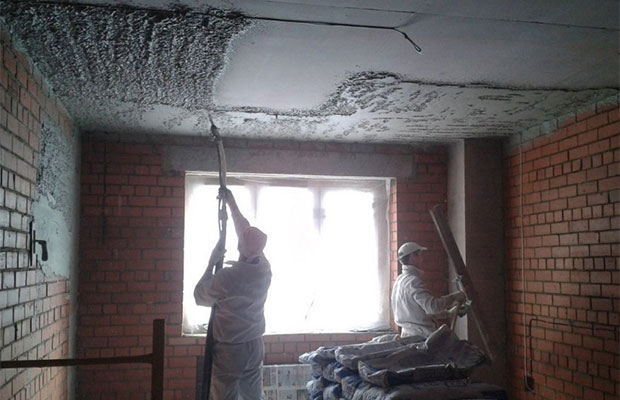
At this stage of rough finishing in the apartment, you will need to make a primer; it gives the ceiling and walls better strength. After applying the primer, you need to wait until it is completely dry and only then can you paint the ceiling.
Above is a photo of an apartment renovation, where you can see how the ceiling surface is primed.
This video shows the work of priming the ceiling.
At this stage, you can begin rough finishing the floor. If you are satisfied with the old floor in your apartment, then you will not need the fifth stage. But if you decide to change your floor, then you will need to fill the base of the subfloor with mortar or screed it.
When renovating a subfloor in an apartment, it is better to use a self-leveling mortar, since screeding it yourself will require much more time and effort. Here, decide for yourself what is better and more profitable for you. As soon as the work on screeding the floor in the apartment is completed, you need to wait until the solution dries well and only after that you can begin other work. After finishing the work, you will already understand where to start the next stage of renovation in the apartment.
The photo shows the rough work stage of leveling the floor using self-leveling mortar.
To understand more clearly how leveling works with self-leveling mixtures take place, watch the video below
The photo shows the stage of rough work to level the floor using cement mortar.
The video below shows how to properly level the floor using cement-sand mortar.
At this stage, we will be finishing the surface of the walls in the apartment with our own hands. The finishing material should be chosen based on your wishes and the monetary component. For wall decoration you can buy beautiful wallpaper, better non-woven ones.
Currently, the modern market is simply gushing with an abundance of finishing materials, so you won’t have any problems with the choice, there are both expensive options for finishing, and cheap. In addition to the wallpaper option, you can choose painting, decorative plaster and others. If your finances allow, you can buy decorative types decorations for the apartment, although the price for them will be significantly higher, but the result will certainly please you.
If you have decided on the choice of finishing materials, then think about how and where to start decorating the walls in the apartment yourself. If you are gluing wallpaper, then paste it so that the patterns match. Paneling should be done from the corner of the wall. Important: finishing materials will fit well on the surface of the walls only if the rough finishing of the apartment was done competently and efficiently.
You can see in the photo decorative finishing walls with your own hands, it looks very beautiful.
Important: when carrying out rough finishing of the walls in the apartment, carefully ensure that the surface is perfectly flat, in this case you can choose any type of finishing. If the rough finishing of the apartment was carried out poorly and unevenness remained on the walls, then among the finishing materials offered on the market today you will be able to choose only a few options that are suitable for your walls when renovating the apartment. Now you know where to start decorating the walls with your own hands and how to carry out further repairs in a new apartment.
The photo shows wall decoration using wallpaper.
At this stage of repair we carry out work related to the installation of flooring. You can buy carpet, linoleum, parquet boards, laminate, etc. If you decide that you will lay tiles on your floor, then it is better to lay them after the work on the ceiling is completed. For the tiles to lay well, the subfloor must be perfectly level.
If the rough finishing of the apartment and the floor was done poorly and unevenness remains, then laying most flooring materials will not be possible for you, since they require a floor that is perfectly smooth. In this case, you will have to either re-finish the rough floor, or resort to other methods that will make the rough floor even.
That is why, in order to avoid such mistakes, you need to take the work of rough finishing the apartment very seriously, then it will become clear to you where to start this or that work related to the installation of floor coverings. If the renovation is done correctly, then your new apartment will acquire an aesthetic appearance.
The photo shows preparatory work for laying flooring.
The photo above shows how the flooring is installed.
It must be said that renovating an apartment with your own hands brings a lot of trouble, especially when it comes to the rough finishing of the ceiling. But also holding finishing It's not any easier. The rough finishing of a new apartment, especially the ceiling, worries those people who bought their home on the secondary market.
Such a purchase of a new apartment very often leads to the fact that most owners of such apartments almost every day have to deal with a lot of problems, then the plaster will fall off in one place, then in another, and there’s nothing to say about the appearance of cracks. Many people, looking at such disgrace, don’t even know where to start correcting such problems. In this case, the rough finishing of the new apartment must be done with special care.
So where should you start renovating an apartment with your own hands, especially the ceiling? The answer is this: do-it-yourself apartment renovation, including the ceiling, must be done according to exactly the same scheme as the rough finishing of the apartment, floor, wall surfaces, that is, dismantling, screeding, whitewashing or painting.
The photo shows how alignment is carried out draft ceiling in a new apartment with your own hands.
The photo shows how to install a plasterboard ceiling.
The final stage of repair involves: installation door frames, install skirting boards and so on. Along with this, pieces of furniture are assembled and placed in their places, and decorative elements are added to the interior. That's all, now you can admire to your heart's content how new renovation inhale the same new life to your premises.
And most importantly, you can be proud of yourself, because you had to independently complete all these eight stages of apartment renovation with your own hands and achieve excellent results carrying out independent repairs. In addition, such repairs will teach you how to competently perform rough finishing of an apartment, which will be very useful to you in the future.
In the photo you can see the last stage of renovation of a new apartment with your own hands - installation interior doors.
There are several indicators that have a huge impact on the cost of turnkey apartment renovation. There are three such indicators:
It will be difficult for an inexperienced person to calculate the cost of turnkey repairs on their own, but today there are other ways by which you can accurately determine how much turnkey repairs yourself will cost you.
There is no need to manually calculate the cost of repairs. We suggest you save time and use one of the following options:
Based on cost, apartment renovations are divided into categories:
| Conditional categories repair work | The approximate cost of repairs per 1 m2 of total area expressed in rubles. | ||
| Repair work | Materials used | Total cost. | |
| Regular apartment renovation. | From 3000 rub. up to 5000 rub. | From 2000 rub. up to 3000 rub. | From 5000 rub. up to 8000 rub. |
| High-quality apartment renovation. | From 4000 rub. up to 6000 rub. | From 2000 rub. up to 5000 rub. | From 6000 rub. up to 11,000 rub. |
| High quality apartment renovation. | From 6000 rub. up to 11,000 rub. | From 5000 rub. up to 10,000 rub. | From 11,000 rub. up to 21,000 rub. |
In this table you can see only the approximate cost of renovating an apartment with your own hands. In order to more accurately find out the cost of the planned repair, it is still better for you to call a specialist who will competently draw up an estimate for you based on the volume of work performed and the cost of it.
It must be said that renovation of an apartment is water and fire in one bottle. For those who are faced with such work for the first time, renovating an apartment will not only take a lot of time, but will also spoil a lot of nerves. If you have never done renovations in an apartment yourself, in this case it is better to seek help from knowledgeable people, this will save you from numerous mistakes and save money, plus the repairs will be carried out at top level, especially when it comes to the rough finishing of the apartment.
Below are instructions from an expert that you can rely on before carrying out renovations in your new apartment yourself.
In the photo above you can see doors with good sound insulation.
The photo shows washable vinyl wallpaper.
The photo shows how the wiring is installed.
To understand how electrical wiring is installed and carried out electrical work you can watch the video below
In the photo above you can see a diagram of how to properly connect the RCD.
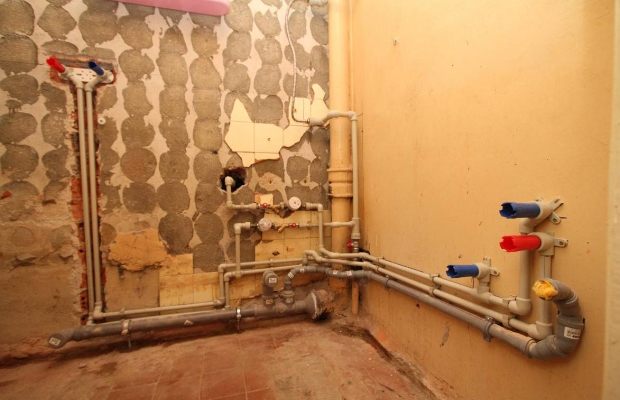
In this photo you can see a water supply system based on pipes made of metal-plastic.
In the photo you can see the installation of heated floors in the bathroom.
The photo shows how the heated floor is installed.
In the video below, you can see how a heated floor is screeded:
The photo shows the seam between the slabs on the ceiling
Renovating an apartment is now an expensive proposition. Some save for it for years, while others give away their last savings and end up in a debt hole. Regardless of their financial situation, everyone tries to save money, but in practice not everyone succeeds in doing this. Let’s look at which materials you can save on and which ones you shouldn’t, and we’ll learn to expose hired repairmen who are trying to profit from the owners’ ignorance.
The final estimate will depend on the type, size of the room and complexity of the renovation. There are three types of repairs: cosmetic, major and European-quality repairs. The cosmetic option is the most economical. This repair usually includes painting, wallpapering, and floor sanding. Such work can be easily done with your own hands, saving on calling a specialist. If you lack some specialized tool, it is not worth purchasing it for one-time purposes. Rent it. Make a preliminary estimate for repairs in order to adjust it in advance and select cheaper options. If you decide to hire a private specialist, redecorating your apartment will cost you, on average, 1,500 rubles per 1 m2, and through a construction company - 2–2.5 times more expensive.
Produce major renovation doing it yourself is much more difficult, since many of the jobs require special skills and abilities. Stages of such repairs: floor screed, wall leveling, demolition and installation of partitions, dismantling of old coating and finishing, complete replacement water pipes, plumbing and electrical wiring, replacement of windows, doors, garbage removal. The price for calling a specialist when carrying out major repairs increases to 6,000–15,000 rubles per 1 m 2. And this does not include the cost of consumables.
Here are four tips to help you save on major renovations:
European-quality renovation is practically no different from major renovation. The cost increases due to the purchase of expensive and natural materials from famous manufacturers. The price of materials is automatically reflected in the cost of the master’s work, which starts from 25,000 rubles per 1 m 2. .
If you decide to involve an experienced team of repairmen in the repair, be prepared that you may be deceived. To check this for sure, pay attention to several important features. The information will be useful for both beginners and experienced homeowners who have decided to start a renovation.

To determine the exact costs of repair work, the foreman measures the parameters of your room with his tape measure. It seems that everything is fine and there can be no catch. In this case, we recommend providing your own tape measure for measurements. Often, cunning repairmen cut the tape measure, for example, by 50 cm, and fasten it to another part of the tape, retreating 20–30 cm or more. From the actual size, for example, 2 m, your room increases to 2.3 m and, accordingly, the price increases, because the cost of work is calculated per 1 m 2.
When receiving an estimate, carefully review all items. Often repairmen duplicate the cost of services under the guise of other work. For example, leveling walls - preparing walls for wallpaper. Read each item carefully so as not to overpay.
Please note the price per 1 m2. Preliminarily compare it with other construction companies and individuals. Prices below average should alert you. Usually, during the work process, the repairmen who originally offered you low price, they pick her up and ask her to pay extra for additional services. The owner finds himself in a dead end, since the work is already in progress, and the estimate automatically increases by 2-3 times.
Saving materials and increasing the cost of work is another technique used by dishonest repairmen. For example, they can put a 1 cm layer of plaster on you at a cost of 3–4 cm, reducing the planned laying path electrical cables or plumbing pipes, and take the remaining material for yourself. In fact, you are overpaying for material that does not “work” for you. To avoid such mistakes when performing turnkey repairs, ask the repairmen to photograph the completed work process in detail step by step and send it to you by email.
If you decide to install heated flooring, remember that it is not placed around the entire perimeter of the room. An unscrupulous foreman will offer you to put a heated floor under furniture where it is absolutely not needed, which will also increase the cost of the project.
Complete replacement of wiring is another service that almost every foreman will offer you without making sure that you really need it. On old wiring You can make good money from copper and aluminum conductors.
AND last tip: purchase materials yourself, do not trust this matter to the repair team. As a rule, they buy building materials on the market, where the storage conditions for many goods do not meet the standards. In addition, repairmen there can ask for a blank receipt with a stamp and enter a list of goods and their cost with a markup.
It is better to start repairs in the off-season - in early or mid-autumn. This period is suitable for carrying out both external and internal repair work. It’s still warm outside, and prices for building materials are gradually decreasing for the winter season. Savings on summer goods reach 15–20% without loss of quality. Therefore, if you were planning to spend 250,000 rubles on renovating a room, know that in the fall and winter you can save about 30,000 rubles, which can be spent on renovating the hallway.
Promotions and special offers – special kind services where you can save money. Pay attention to illiquid items. They have a limited shelf life and up to next season don't last. Construction stores offer good discounts on such products. If you are going to do repairs right now, take a closer look at putty, plaster, glue, and sealant at a bargain price, below the market average.
Replacing plumbing affects a significant part of the renovation budget. If it is in good condition, without chips, cracks, and only the surface with an old coating makes you think about dismantling it, we advise you to clean and restore the plumbing. Expensive detergents We replace it with a mixture of baking soda and vinegar, which destroys stubborn plaque well. Budget transformation option - . You can cover the bathtub yourself with enamel, liquid acrylic, or order acrylic liner according to the dimensions of your plumbing fixtures. Restoration will reduce purchase costs new bath approximately 4 times and, depending on the chosen option, will extend the service life old bath from 5 to 20 years.
If you decide to change your plumbing, consider a budget option purchases from so-called landfill entrepreneurs. Often when arriving in new house the owners replace earthenware and cast iron plumbing fixtures that are in good condition and throw them into a landfill. Resourceful businessmen have come up with an easy way to quickly and easily make money from this. They take plumbing fixtures in good condition from the landfill, wash them and put them in order. They do not directly expose their contacts, working on the principle of word of mouth. In the subsidiary warehouse of such entrepreneurs, you can select suitable plumbing fixtures and save a third or even half of the factory cost.

To save money when covering walls, we advise you to buy not edged (planed) lumber, but slab (wood sawing waste). Croaker is sold raw and does not match the quality of conventional materials. This can be easily corrected if you purchase it in advance in March-April and keep it in a dry room until autumn. In addition, slab cladding saves money on leveling the walls. In 80% of cases, it completely hides all irregularities. The option of covering the walls with waist-high slabs and covering the walls up to the ceiling with non-woven wallpaper will help not only save money, but also make wall decoration practical. The lower part is resistant to wear and contamination, and the upper part complements the overall picture.
The most budget-friendly option for laying floors in dry rooms is marmoleum. This material requires leveling the floor only in 10% of cases. However, for rooms with high humidity (bathrooms) marmoleum is not suitable; you will have to lay classic tiles. Alternative option marmoleum - laminate. This option is also inexpensive, looks beautiful and is suitable for installation under plank floors. True, the floor will have to be leveled.
To decorate the walls in the bathroom, choose laminated hardboard. This material is less familiar than tiles, but cheaper. It is better to sheathe the ceiling plastic panels. Don't skimp on waterproofing. The money spent on it will pay off and extend the service life of even the cheapest finishing materials. Instead of gypsum plaster, use a cement-plaster mixture to level the walls. It is not inferior in quality and is cheaper. When deciding to lay tiles on the walls and floors, buy a plain finish. Such tiles do not need to be frequently adjusted and matched to the pattern; less material is required, which is automatically reflected in the purchase cost.
When carrying out major and European-quality repairs, it is impossible to do without replacing the electrical wiring. It is better not to save money on this event and entrust the work to a professional. It is especially important to pay attention to Soviet wiring due to high power modern devices, which sometimes the old cable cannot withstand. During the replacement, you will have to use a wall chaser to properly lay out the new wiring. Workers charge 100 rubles per 1 m2 for this service.
Complete replacement of wiring in a two-room apartment, on average, will cost 40,000 rubles. A private specialist may charge less, but he does not provide a guarantee for installation, so if malfunctions occur, you will have to pay the specialist again for the work. To save money, we advise you to contact an electrician from DEZ. Such a specialist performs the work slowly depending on his workload, but the quality and guarantee of service are an undoubted advantage of choosing this particular specialist. But you can install sockets and switches yourself.

Another job for which you need to involve a specialist and not save money: replacing plumbing pipes. Consumables choose according to your budget. Hiring a plumber will cost, on average, 15,000–20,000 rubles. If you do not have experience in connecting plumbing, we also recommend that you seek help from a specialist.
Apartment renovation raises a lot of questions, especially for those who have decided to take on such a responsible task for the first time, relying on own strength. Our recommendations will help you plan your work correctly so that you don’t have to correct mistakes later.
The correctly chosen sequence of renovations in the apartment will help you complete it in a short time, without unnecessary worries. Initially, you should decide what repairs are to be made. Perhaps it will be cosmetic: limited to changing wallpaper, painting and other individual operations. If major renovations are needed, planning is essential. After all, it may touch windows, doors, walls, floors and ceilings. You might want to redesign the premises and remove the partitions.
The layout and design of premises requires careful consideration. For each room, think about what material will be needed for the walls, ceilings, and floors. You may need to replace windows or want to rearrange furniture. It’s impossible to keep everything in your head, so you need to make a plan. We measure all the rooms and make drawings on separate sheets. For each room you will need six of them: one for the floor and ceilings, four for each wall separately. On the plan, indicate the placement of windows, doors, sockets, switches, and lamps.
On each sheet, write down what materials will be used. For example, the floor in the kitchen: linoleum with insulation - 12 m2, brown color. Ceiling: 12 m2, water-based paint, White color. First wall: 6.1 m 2, level - satengypsum starting, finishing, primer. Painting: water-based emulsion, peach color, colorex, primer. Replace the door with a new one, leave the trim. It is advisable to indicate how much of which material will be needed, based on consumption rates; it would be nice to indicate the price. If you do not undertake some work, but will involve a specialist, indicate this in the plan. This is only indicative planning, you can record whatever you think is necessary. A start has been made - the work has been planned.
An ideal option if, in order to carry out renovations, it is possible to completely empty the apartment of furniture and interior elements. But, most likely, it will have to be moved to one of the rooms so that it does not interfere with work. We lay it compactly and wrap it with stretch film. Renovation begins with other rooms. When at least one room is ready, the furniture is moved there, arranging it as the rooms are ready.
The next step is to dismantle the elements that need to be replaced. If the repair is cosmetic, remove the layer of old linoleum and remove the wallpaper. During a major renovation, you may have to remove interior doors, remove partitions, change the location of doors, create special niches in the walls, remove plumbing, etc. If you are not going to change the floor, but only update it, do not forget to cover it with film so as not to damage it.
Time to remove the old windows if you are going to install new ones. Once you install windows, do not remove them. protective film. Let it remain during the repair and protect the glass from scratches, dirt, and dust that are inevitable during repairs. If redevelopment is planned, there is a desire to start from scratch, we do not demolish load-bearing partitions.
Having finished dismantling, step by step. We start with communication systems. The time for a major overhaul is the best time to replace electrical wiring, heating radiators, pipes, install a hood, and an air conditioner. Communications should be planned in advance, especially wiring. If you are going to build new partitions, the work should be completed before laying the wiring and pipes, so that you do not have to break and redo them later. IN frame house It is better to hide wiring and pipes in the walls. On the walls, grooves are made from a different material where the wiring is hidden.

Residents panel houses It should be borne in mind that walls in such houses can only be tapped in a vertical direction. We install the wiring under the ceiling or in the place where the walls and floor meet. We hide the wires under or behind the baseboard. Do not forget to run cables for the Internet, television, and intercom at the same time as the wiring. We don’t install switches, sockets, and lamps right away, we just prepare places for them. Installation of devices is carried out after completion of all work.
We do plumbing: we install pipes to supply water to the washing machine and discharge it to the sewer. We also make connections to faucets, bathtubs, showers, dishwashers, and toilets. Now it is important to know the dimensions of the bathtub and shower, water and sewer connections. It's good when they have already been purchased, but you can also find out specifications in the store where you are going to buy equipment.
We carry out finishing, starting from the top - from ceilings to walls and floors. This sequence prevents damage to the repaired parts when working with others. Stretch ceilings are an exception: they are done last. If you need to make a floor, we start by leveling it with a screed. We use economical way – cement-sand mixture. Whenever possible, we use self-leveling floors. They are more expensive, but the result is worth it. If you are going to install a heated floor system, now is the time.
Let's start leveling the walls. The duration of work and the amount of material depend on the condition of the surfaces. You may need several layers, or you can get by with just one. The walls are leveled mainly with your own hands. Using machine leveling in conditions ordinary apartment inappropriate. Manual alignment is performed in two ways: visual and using beacons. We align the walls that are being prepared for painting according to the beacons, which ensures better quality.
Having finished plastering, we move on to the final work - putty. Putty should be applied thoroughly to seal all uneven areas and utility lines. We finally prepare the surface for finishing. The choice of primer is important - a high-quality one will avoid problems during puttying, painting, and pasting. If you are going to install decorative elements like crown molding, do it now.
Then we move on to the wall tiles. It is important to plan which tiles we will use on which wall. If possible, we make an installation diagram on the computer or draw it on paper. This way we’ll know exactly how many tiles you’ll need and how many will have to be cut in order to wisely plan your purchase of stock. A variety of colors, patterns, finishing materials allows you to make the apartment unique. Except ceramic tiles At this stage, decorative mosaics, bamboo tiles, 3D elements and much more are used.
We install the plumbing - all the connections have been completed before - and begin laying the flooring or decorating the walls. Most builders prefer this order: first, start laying the finished floor: laminate, parquet, linoleum. Next we are installing interior doors. We select the door in advance in order to prepare, if necessary, doorways of the required height and width. We install boxes and hang them door leaf. We cover the clean floor with film and work on the walls. Options at your discretion: painting, wallpaper.

It is not necessary to attach the trim immediately; it is better to do this after painting the walls or wallpapering them.
We complete the process by installing lamps, switches, sockets, and fastening baseboards.
So, summing up all the tips, we will outline the sequence of repair work in the apartment:
We begin the repair from the most distant room, so that debris and dirt are not carried into the repaired premises. We are repairing the corridor last. Garbage and building materials are carried through it and there is a high risk that the walls, floor, and ceiling will be accidentally damaged. We close the renovated room and cover the door with construction film. In this way, we will prevent the ingress of dust, debris, and building materials from premises where renovations are ongoing.
So, you have finally become the happy owner of your own home or simply decided to radically change your interior. Among the many logical questions that arise in this regard, the main one is in the lead: how to organize everything correctly in order to turn all the ideas into reality and forget about subsequent repairs for many years?
Of course, the issue of repair work can be dealt with without any problems by resorting to the services of a professional work team of craftsmen, but everyone knows that this is a pleasure, especially in the era financial crisis, not every family can afford.
Besides, it’s much more pleasant to transform your favorite home with my own hands, putting a piece of your soul into the renovation.
Apartment renovation can be divided into two groups: major and cosmetic. The difference between them lies in the original condition of the living space and your own desires.
Major repairs involve remodeling rooms, installing or dismantling electrical wiring, replacing windows, doors, plumbing, leveling ceilings, floors and walls, and installing communications. This sequence of renovation of an apartment in a new building or in a home whose layout you want to radically change is appropriate.
Redecorating provides for changing the appearance of housing without global destruction: plastering walls, gluing wallpaper, repainting ceilings (or installing suspended/suspended ceilings), painting or restoring windows and doors, replacing flooring, baseboards and trim.
Well planned is half done, so first of all, you need to understand what exactly you want.
In order to decide on the layout, design and style, get visual information: look through catalogs of interior design and decor ideas, take a closer look at what your friends and acquaintances have done in their apartments, because learning from other people’s mistakes is much more profitable than learning from your own.
When choosing a style, pay special attention to the color scheme of the rooms, because the comfort, mood and even health of you and your loved ones will depend on what color you choose.
Psychologists have long proven the system of the influence of color on a person’s mental state:
In parallel with the choice color range, decide what and where you will have. This is where the arch will appear instead regular door, in this room there is a suspended ceiling with starry sky, and here there is definitely a parquet floor...
Then you will need to figure out what materials all this will be made from, and then decide on the manufacturers of these materials and calculate the price, but more on that a little later.
Having been inspired by an idea, you should not rush headlong into hardware store for materials. First, draw up a clear plan of your home, take measurements of the rooms, the width of door and window openings, the location of risers, radiators, wiring to the kitchen stove, etc.
Even if you use the apartment plan data from the BTI (by the way, if you are planning a major renovation, you will need permission from this organization), it is still worth double-checking the width of all protrusions in the apartment. Often the walls are slightly curved, and such nuances are not recorded in the documents.
To control the amount of financial costs, it is very important to draw up an estimate, rationally calculating the amount necessary materials and their cost.
What to include on the list:
Important advice: purchase building materials approximately 10-12% more than the original plan. Believe me, even qualified workers are not immune from careless use, errors and incorrect calculations.
Before you start " active actions", empty the apartment of personal belongings and furniture, moving them to another place - for example, to the country house, to the neighbors, to the attic. If this is not possible, carefully pack all your existing items (leaving only the essentials that will be needed during the repair) into cardboard boxes and tie them with tape.
Happy owner square meters one day he notices that the sides have become dark, cracks have appeared in places on top, the plumbing has faded, the paint on the carpentry has become frayed. The time has come to make changes in your own apartment, where to start?
Today on the market there is a large selection of private craftsmen and construction companies performing all types of work. Some people can’t imagine other people’s workers remodeling their home. Therefore, he puts the mansions in order on his own. Others invite a team to work that was recommended by an acquaintance or friend. However, there are situations when, after such “masters”, the owner is forced to seek help from a company that can eliminate the shortcomings of the result already obtained. Advantages of working with a professional organization:
After a visit to construction company and consultation with professionals, the client determines how serious the changes should be. Redecorating two-room apartment can be carried out by craftsmen who perform only internal finishing alterations. With such changes it is updated appearance dwellings, minor defects that have appeared since previous construction changes are corrected. Cosmetic renovation of a two-room apartment does not include the replacement of plumbing or electrical wiring. The wallpaper is re-glued, the finishing elements that have lost their color are painted, and the ceiling and floor coverings are restored.

A major renovation of a two-room apartment takes longer, is complex in terms of the amount of work and is expensive in terms of the amount of upcoming expenses. It involves replacing communications and important structural elements. Depending on the plans for changes and improvements in housing, the issue of the need to redevelop the premises, change the openings between rooms and the corridor, and replace windows and doors is decided. The later the previous overhaul was done own apartment, the more labor-intensive changes are required to bring the home into the expected form.

The cost of renovating a two-room apartment can be determined independently. To do this, we add the monetary remuneration of the craftsmen to the price of building materials. Materials used in carrying out planned changes are divided into:
The amount spent for the necessary repairs directly depends on price category purchased building materials. Cosmetic repairs are called “budget” because the investment in the process is much smaller, and the visual result may not be inferior to a major overhaul. When making small home improvements, especially with your own hands, inexpensive painting and finishing materials are used. The cost of renovating a two-room apartment can be reduced if the working areas are not leveled, but simply covered with wallpaper.
When making more serious changes, it is better to contact the designers to draw up individual design project and general budget. A major renovation of a two-room apartment requires investment in order to replace plumbing products, electrical equipment, and pipes.
Pay for workers depends on where exactly you go. A prestigious company can charge up to 100,000 rubles for the repair of a two-room apartment; a private owner will limit it to 10,000 rubles. Great importance It also has a list of required works.

First, the amount that will be spent on all changes and alterations is determined. The owner of the home will independently carry out all the activities: drawing up a project, then moving furniture, painting walls and ceilings, wallpapering, cleaning up construction waste.
The main steps in improving square meters with your own hands are:

Repair of a two-room apartment in a panel house requires special attention. The main disadvantages of such a home are small rooms, kitchens, toilets, and corridors. A characteristic feature of this housing are always cold rooms.
To eliminate such defects, you should first of all insulate all surfaces, especially side walls outside. If the room is on the ground floor, you also need to work with the floor, and if on top floor, then the upper surface must be processed. It is advisable to insulate areas using high-quality insulating materials, which simultaneously maintain the temperature in the apartment and reduce the level of audibility.
Available old wooden windows And balcony doors should be replaced with new ones (plastic or wooden) with soundproofing and energy-saving double-glazed windows. You can do redevelopment or decoration and thus eliminate the appearance of drafts in the apartment. It must be noted that side surfaces made of blocks. Cracks form at the joints, so repairs in a panel house should include finishing all joints.
Bathrooms in apartments of such houses do not provide for placement washing machines. Therefore, when renovating, it is preferable to make changes to the old floor plan and combine the toilet with the bathroom.

To make a fundamental change, you must be clear about the final result you want to achieve. It is preferable to visualize your ideas for renovating a two-room apartment on your own or with the help of a professional.
You can increase the number of useful square meters by changing the configuration of interior doors. It is advisable to replace them with sliding ones or remove them completely. Make arched doorways as a replacement.
The use of decorative white or beige allows you to visually increase the volume of your home. suspended ceilings. Such varnish or glossy materials have reflective properties, making the room appear taller and more elongated.
In squares painted in light colors, apply a geometric or floral pattern. A vertical line on the walls will create the appearance high ceiling. By adding a horizontal line, you can visually expand the space of a room or corridor.
If the kitchen takes up little space, it should be combined with the next room to create a living room. By combining the corridor, kitchen and living room you can create a studio apartment.
Having finally come to the conclusion that repairs are inevitable, feel free to make the necessary decisions. The more unusual the idea, the more interesting the result. The building materials market does not limit, but only stimulates the emergence of new ideas and their implementation.


