You can reset the personal settings of an Apple laptop or monoblock in many cases. If your system began to boot for a long time, slow down during operation, the programs you needed stopped opening, and much more, then in this case, a reset is simply necessary. To understand how to reset a Macbook to factory settings, read our instructions.
First you need to determine the extent of the problem that you have. There are two ways to reset the system:
In many cases (for example, system or program freezes) it is enough. Before you reset your Macbook Air, Pro, or iMac to factory settings using a reinstall, back up all your important files and programs as this method involves cleaning your hard drive.

The second option is simpler and more loyal - reset only the system parameters, but leave all the information on the disk intact. Let's consider both options step by step.
This method is suitable if the problem with the computer is not serious and non-critical. For example, a long turn on, malfunctioning of a program, etc. In any case, we recommend that you use this method first before proceeding with the reinstallation. To reset to factory settings, follow these steps:

Before this process, you need to do the following:


Restoring macbook air, pro or iMac to factory settings in this way will not work without an Internet connection.
After the download is complete, the device will unpack all files and reboot. Next, the main settings screen will appear. Log in with your Apple ID account, select the system language, and so on.
If you do not have the ability to connect to the Internet, then you will need a bootable USB flash drive with the distribution. However, without the OS installer downloaded from the network, nothing will work anyway. Now you know how to reset settings on a macbook in two different ways and you can put them into practice.
Fair, not too high or too low. There should be prices on the Service website. Necessarily! without "asterisks", clear and detailed, where it is technically possible - the most accurate, final.
If spare parts are available, up to 85% percent of complex repairs can be completed in 1-2 days. Modular repairs take much less time. The site indicates the approximate duration of any repair.
Warranty and Liability
A warranty should be given for any repair. Everything is described on the site and in the documents. A guarantee is self-confidence and respect for you. A 3-6 month warranty is good and enough. It is needed to check the quality and hidden defects that cannot be detected immediately. You see honest and realistic terms (not 3 years), you can be sure that you will be helped.
Half the success in Apple repair is the quality and reliability of spare parts, so a good service works directly with suppliers, there are always several reliable channels and a warehouse with proven spare parts for current models so that you do not have to waste extra time.
Free diagnostics
This is very important and has already become a rule of good form for the service center. Diagnosis is the most difficult and important part of the repair, but you should not pay a dime for it, even if you do not repair the device after it.
Service repair and delivery
A good service values your time, so it offers free shipping. And for the same reason, repairs are carried out only in the workshop of the service center: it can be done correctly and according to technology only at a prepared place.
Convenient schedule
If the Service works for you, and not for itself, then it is always open! absolutely. The schedule should be convenient in order to be in time before and after work. Good service works on weekends and holidays. We are waiting for you and working on your devices every day: 9:00 - 21:00
The reputation of professionals consists of several points
Age and experience of the company
Reliable and experienced service is known for a long time.
If a company has been on the market for many years, and it has managed to establish itself as an expert, they turn to it, write about it, recommend it. We know what we are talking about, since 98% of incoming devices in the SC are restored.
We are trusted and passed on complex cases to other service centers.
How many masters in the directions
If you are always waiting for several engineers for each type of equipment, you can be sure:
1. there will be no queue (or it will be minimal) - your device will be taken care of immediately.
2. You give Macbook repair to an expert specifically in the field of Mac repairs. He knows all the secrets of these devices
technical literacy
If you ask a question, the specialist must answer it as accurately as possible.
To give you an idea of what you need.
Will try to solve the problem. In most cases, from the description, you can understand what happened and how to fix the problem.
Restoring or reinstalling software
Mac OS X software
If there is a problem with your Mac software or hardware
problem, you can use the recovery utilities in Mac OS X,
to avoid problems and even restore the original factory settings
software. These utilities are available in Mac OS X Utilities,
even if your computer does not boot properly.
Mac OS X Utilities lets you do the following:
repair a computer disk using Disk Utility;

Chapter 4
There is a problem - there is a solution
restore software and data from a Time backup
machine;
restore Mac OS X Lion and Apple programs;
restore your computer to factory settings by erasing its disk and reinstalling
Mac OS X Lion and Apple software.
If a problem is detected with the computer, it automatically opens
Mac OS X Utilities panel. You can also open it manually by rebooting
a computer.
To open the Mac OS X Utilities panel, do the following:
Restart your computer while holding down the (x) and R keys.
Some utilities in the Mac OS X Utilities panel require
access to the Internet and the App Store for Mac. You may need to make sure that
The computer is connected to the Internet via an Ethernet or Wi-Fi network.
Connecting via a Wi-Fi network
Select a network from the Wi-Fi status menu at the top right corner of the screen.
If necessary, enter a password to access the network.
To connect to a private network, select Connect to another network.
Enter the network name and password.
Restoring a disk with Disk Utility
If there is a problem with your computer, or when loading
computer you see the Mac OS X Utilities panel, you may need to
restore computer disk.

Chapter 4
There is a problem - there is a solution
Select Disk Utility from the Mac OS X Utilities panel and click
"Proceed".
Select a drive or partition from the list on the left and open the First Aid tab.
Click Repair Disk.
If Disk Utility can't fix the drive, try as much as you can
back up the information and follow the instructions in
“Reinstalling Mac OS X and Apple Software” on page 97.
Information about Disk Utility and its settings can be found in the Help
center, or you can open Disk Utility itself (in the Utilities folder
in Launchpad) and select the menu item Help > Disk Utility Help.
Restoring information using a backup
time machine
If you have created Time Machine backups before, you can use
Restore utilities restore all contents of the computer
to the state in which it was at a certain point in time
in the past.
Use a Time Machine backup only for restoration
information on the computer from which the backup was created.
To transfer information to a new computer, use the Assistant
migrations.
If the backup is on a Time Capsule, make sure the Mac Pro is connected
to the same Ethernet or Wi-Fi network. (To connect to a Wi-Fi network, follow
instructions on page 95).

Chapter 4
There is a problem - there is a solution
In the Mac OS X Utilities panel, select Restore from Time Backup
Machine" and click "Continue".
Select the drive where the Time Machine backup is located, and then
follow the instructions on the screen.
Reinstalling Mac OS X and Apple programs
There are times when you need to reinstall Mac OS X and Apple programs.
When reinstalling the system, you can save all files and settings.
Important.
In the Mac OS X Utilities panel, you can also reinstall and repair
Mac OS X Lion Server software, if installed on your
Mac Pro.
Make sure your Mac Pro is connected to the Internet via Ethernet or Wi-Fi.
"Proceed".
When prompted to select a drive, select your current Mac OS X drive
(in most cases this is the only option available).
To install additional software, click
"Tune".
Click Install.
You can install Mac OS X without deleting the entire contents of the disk (while
existing files and settings are preserved) or clean the disk first (when
this erases all your data) to prepare your computer for reinstallation
Mac OS X and programs.

Chapter 4
There is a problem - there is a solution
After reinstalling Mac OS X, you can go to the Mac App Store and reinstall
download the software that came with your Mac and other software
that you purchased from the Mac App Store.
before attempting to restore the software. Apple
is not responsible for possible loss of data.
Restoring your computer to factory settings
Restoring your computer to its factory settings deletes everything on it
yes (accounts, network settings, files and folders). Before recovery
be sure to back up the files you need: copy
them to another drive. Make a note of your network settings so that after you reinstall Mac OS X
it was easier to connect to it again.
Make sure you are connected to the Internet via Ethernet or Wi-Fi.
(To connect to a Wi-Fi network, follow the instructions on page 95).
In the Mac OS X Utilities panel, select Disk Utility and click
"Proceed".
Select the drive in the list on the left and open the "Erase" tab.
From the Format pop-up menu, choose Mac OS Extended (Journaled)
enter a drive name and then click Erase.
After erasing the drive, select Disk Utility > End
Disk Utility".
In the Mac OS X Utilities panel, select Reinstall Mac OS X and click
"Proceed".

Chapter 4
There is a problem - there is a solution
To reinstall Mac OS X and Apple software, follow the instructions
Mac OS X installer.
After restoring Mac OS X and Apple programs, you can, at your discretion,
restore necessary files and programs from a Time Machine backup.
Why do many people prefer Mac when choosing a computer? The answer is obvious: it is reliability, safety, ease of use and high stability. The latest versions of macOS are so polished that users rarely encounter software bugs. However, if this still happened and the failure cannot be fixed by improvised means, you can perform a clean installation of macOS. Moreover, it is not at all difficult to do this.
Unlike Windows, the procedure for reinstalling macOS is as simple as possible. Without exaggeration, even an inexperienced user will cope with this task. All you need is a reliable internet connection and some of your personal time.
The first step is to connect the power adapter to your Mac. Next, you need to go into recovery mode and decide on the type of installation. There are three possible scenarios.
To enter Internet Recovery mode, immediately after turning on or restarting your Mac, you must hold one of the following key combinations until the globe logo appears:
After starting, you will need to wait a bit: if an Internet Recovery update is available, its latest version will be automatically downloaded.

If you did everything right, after a while the “Utilities” window will be displayed. If you want to get a clean operating system, it makes sense to completely format the drive in Disk Utility and specify the following options:


After cleaning the disk, you can proceed with the installation itself, of course, after specifying the desired drive. It is normal for your Mac to restart several times during the installation process. As a rule, the entire procedure takes no more than 30 minutes (provided that the installation is performed on a solid state drive).
If everything went well, we will be greeted by the "Setup Assistant" and we will be able to configure all the initial settings of the computer, as well as log into the Apple ID account. All is ready!
How often do you have to reinstall macOS? Let me know in the comments or
It refused to boot. cmd+r Does not help. How to be?
The beginning of the working day did not bode well. A cup of coffee, a good mood, the Power key and the MacBook displays the following dull picture:

A restless thought immediately flashed through my head about the safety of data, the current version of the backup TimeMachine(which was not at hand) and the possible loss of information.
Being an inquisitive user and an avid "Makovod", I immediately tried to start the MacBook in recovery mode by holding the keys cmd+r. Instead of the usual disk utility, the system met me with a window with an attempt network recovery.

Having chosen my home Wi-Fi network, I began to wait for further developments. A few minutes later, OS X recovery progress was interrupted error -4403F.

Attempts to start the process again led to exactly the same result. Rebooting the router confirmed that everything was in order with the network connection.
Trying to diagnose a Mac, fix possible hard drive errors, or simply reinstall the system was now out of the question. Section with Recovery HD, which stores the tools for recovery, ordered to live a long time.
Mac computers were built by high-class engineers, so the correct organization of the entire system and the presence of "hidden hardware reserves" allows you to avoid a number of interruptions in its operation. One of these reserves are sections of memory PRAM and NVRAM. It stores settings data that is not reset even when the computer is turned off from the power. To revive the fallen system, a decision was made reset PRAM and NVRAM settings.
1. Turn on the Mac.
2. After the white screen appears, quickly hold down the key combination CMD+Option+P+R.
3. Hold until the next reboot and the Mac welcome sound.

PRAM and NVRAM reset is complete.
Although they say that hope dies last, it continued to lurk in my mind, lifeless and barely alive. Resetting PRAM and NVRAM did not affect the error when loading the system. The MacBook kept getting on my nerves.
Accustomed to storing all the necessary data “in the cloud” or on removable media, the easiest solution to global problems has always been reinstalling the system from scratch. This case was special. I needed in-memory data, and I needed a working Mac today.
In the Mac environment, there is a so-called SMC system management controller. The stability of the entire system depends on the reliability of its operation. Resetting the SMC settings can cure a number of problems, such as:
To reset the SMC, follow these steps:
1. Turn off your MacBook and plug in the power adapter.
2. Simultaneously hold down the keys Shit + Control + Option + Power and hold until the MagSafe adapter light color changes.
3. Release all keys and press the key again power.
1. Turn off your MacBook and unplug the power adapter.
2. Remove the battery from the laptop.
3. Hold down the key power and hold for at least 5 seconds.
4. Release Power, insert the battery and connect the power adapter. Turn on your laptop.
1. Completely unplug your computer from AC power.
2. Wait at least 30 seconds.
3. Connect the power and wait another 5-10 seconds and then turn on the computer.
The above actions can become really effective and the system will start. In my case, the miracle did not happen.
An attempt to revive the system using the above steps was unsuccessful. The only option left was to reinstall OS X using a bootable flash drive. This step will require:
Preparing a flash drive
1. In the Mac App Store, you will need to download the OS X Yosemite distribution.
2. To create a bootable flash drive, download the DiskMaker X utility (distributed for free). You will need it to deploy the distribution.
3. Format the flash drive with Disk Utility in Mac OS Extended (Journaled).

4. After the distribution is downloaded, cancel the proposed installation and run the utility Disk Maker X.
5. Choose a system Yosemite (10.10). The utility will detect the distribution kit in the folder Applications. Click Use this copy(use this copy).

6. Select the drive installed in the USB port and agree with the warning about the complete deletion of all data present on the USB flash drive.

7. The process of mounting the distribution kit from OS X Yosemite to the drive will begin.

The copying process takes about 10-20 minutes and depends on the write speed of the USB flash drive. During mounting, dialog boxes and folders may occasionally open on the screen. Do not pay attention.

After successfully deploying the OS X Yosemite image, remove the drive.
System installation
1. Insert a flash drive into the USB port of the "problem Mac", press the key power and hold down the key alt.
2. In the list of available partitions for download, select OS X Base System. Note the absence of a section Recovery.
.

3. Mac will boot into recovery mode. After selecting the main language of the system, the installation menu will open. In the top menu you will find a standard list of utilities.
Use Disk Utility and try first to check the permissions on the system partition and fix any errors. If the system still refuses to boot after a reboot, you will need to separate a partition of at least 20 GB in order to install the new system. You will find detailed instructions for partitioning a disk.
From the same menu, it is possible to both start the process of installing the system on a newly created partition, and restore the system using a TimeMachine backup (see).
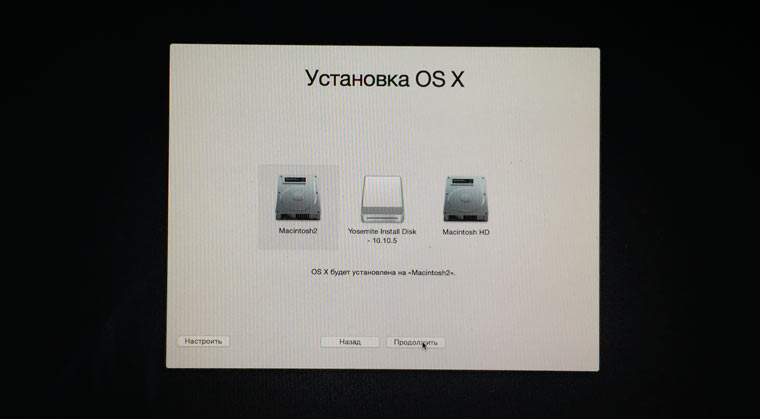
CAREFULLY! Be careful when choosing the installation partition. Installation is required to be carried out not over the old partition, but on the newly created one.
After the installation is completed, you will have access to all data located on the "corrupted" partition with the old version of the system.
If for some reason you were unable to create an additional disk partition to install a new version of OS X, and saving the data remaining on the broken partition is still a priority, there is an option to install OS X using a previously created bootable USB flash drive to an external drive.


